Przejdź do głównej zawartości
Wersja: 3.0
informacja

You are currently viewing documentation for CompuTec AppEngine 3.0 (.NET 8).

If you are working with older environments, you may need the documentation for CompuTec AppEngine 2.0 based on .NET Framework: https://learn.computec.one/docs/appengine/2.0/.

Please note that CompuTec AppEngine 2.0 will be supported only until December 31, 2026. After this date, the product will no longer receive regular support or maintenance updates. Read more

As CompuTec AppEngine 3.0 introduces a new architecture, all CompuTec components must be updated together to ensure full compatibility.

Please review the CompuTec AppEngine 3.0 documentation before starting your installation or upgrade process.

Actions in Analytics

Actions allow users to perform business operations directly from selected rows in CompuTec AppEngine Analytics report.

When users select one or more rows in a table, CompuTec AppEngine automatically displays the Actions available for that data. For example, users can release a production order, post a document, or run a custom plugin action without leaving the report.

Actions are available only when they are enabled for both the Source and the Variant.

FOR DEVELOPERS

Plugin developers can create custom CompuTec AppEngine Actions that become available automatically in Source configuration after the plugin is installed. Read more

How actions work in Analytics

Actions in CompuTec AppEngine Analytics are configured on two levels:

  1. Source: defines which actions are available and how report values are mapped to action parameters
  2. Variant: defines which actions are visible

Users then execute these configured actions directly from the report. This separation allows you to reuse the same action across multiple report variants while controlling how it appears in each one.

For example:

  • In a Production variant, you can show the Release Production Order action.
  • In a Warehouse variant, you can hide that action and show only warehouse-related actions.
  • In a Manager variant, you can rename actions to use more business-friendly labels.
note

An action must be enabled in a source before it can be configured in a variant.

Variants can't create actions. They can only control the visibility of actions that were previously configured in the source. :::

Configure actions in a source

To configure an action in a source:

  1. Open CompuTec AppEngine Launchpad.

    CompuTec AppEngine Launchpad screen showing the analytics workspace selected in the left navigation panel, with header text CompuTec AppEngine and visible menu items for analytics and launchpad in a clean application interface

  2. Go to Analytics.

    Screenshot of the Actions tab in CompuTec AppEngine Source Manager showing fields for configuring an action mapping including Object Type, Required, Source Type, and Value Source

  3. Navigate to Source Manager.

    navigation to source manager

  4. Click the source you want to edit, for example, Sales Orders.

    choosing a source

  5. Click the edit icon.

    edit icon click

  6. Open the Actions tab.

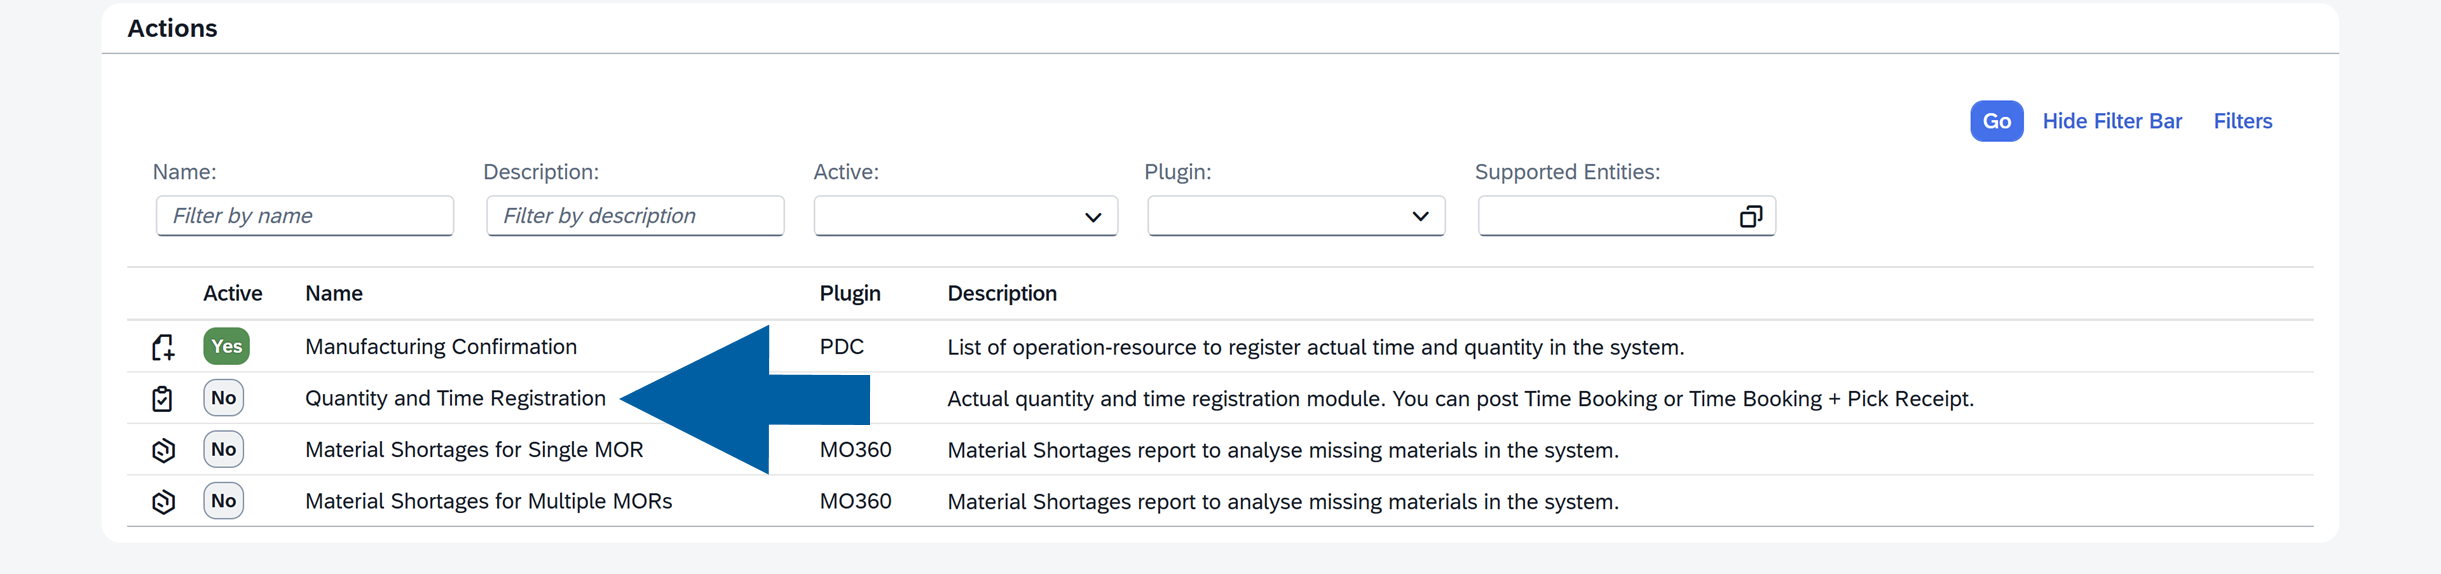
    Actions tab selected in CompuTec AppEngine Source Manager with a large blue arrow pointing to the Actions tab. The primary subject is the analytics action list row for Quantity and Time Registration inside a table with headers Active Name Plugin Description. The wider environment is a business analytics configuration screen in CT AppEngine with navigation and report source controls, and the tone is functional and informational.

  7. Select action you want to activate.

    Screenshot showing the Actions tab in CompuTec AppEngine Source Manager with a list of available analytics actions. The primary subject is the action row for Quantity and Time Registration, highlighted by a large blue arrow. The wider environment includes the action table with columns for Active, Name, Plugin, and Description, and the surrounding analytics configuration interface. The tone is functional and informational.

  8. In the Additional Information section, define how the action receives values from the report:

    • (optional) Object Type: Defines how the action should behave depending on the object it is applied to.
      Example: If an action can work with both the Sales Orders and Manufacturing Orders object types, you can specify the rules for the selected object type.
    • Required: If enabled, the action will not be executed when the mapped value is empty.
    • Source Type: Choose how the value will be provided:
      • Constant: A fixed value defined manually
      • Field: A value taken from a column in the report
    • Value Source: Select the column from the report that should be mapped to the action parameter.
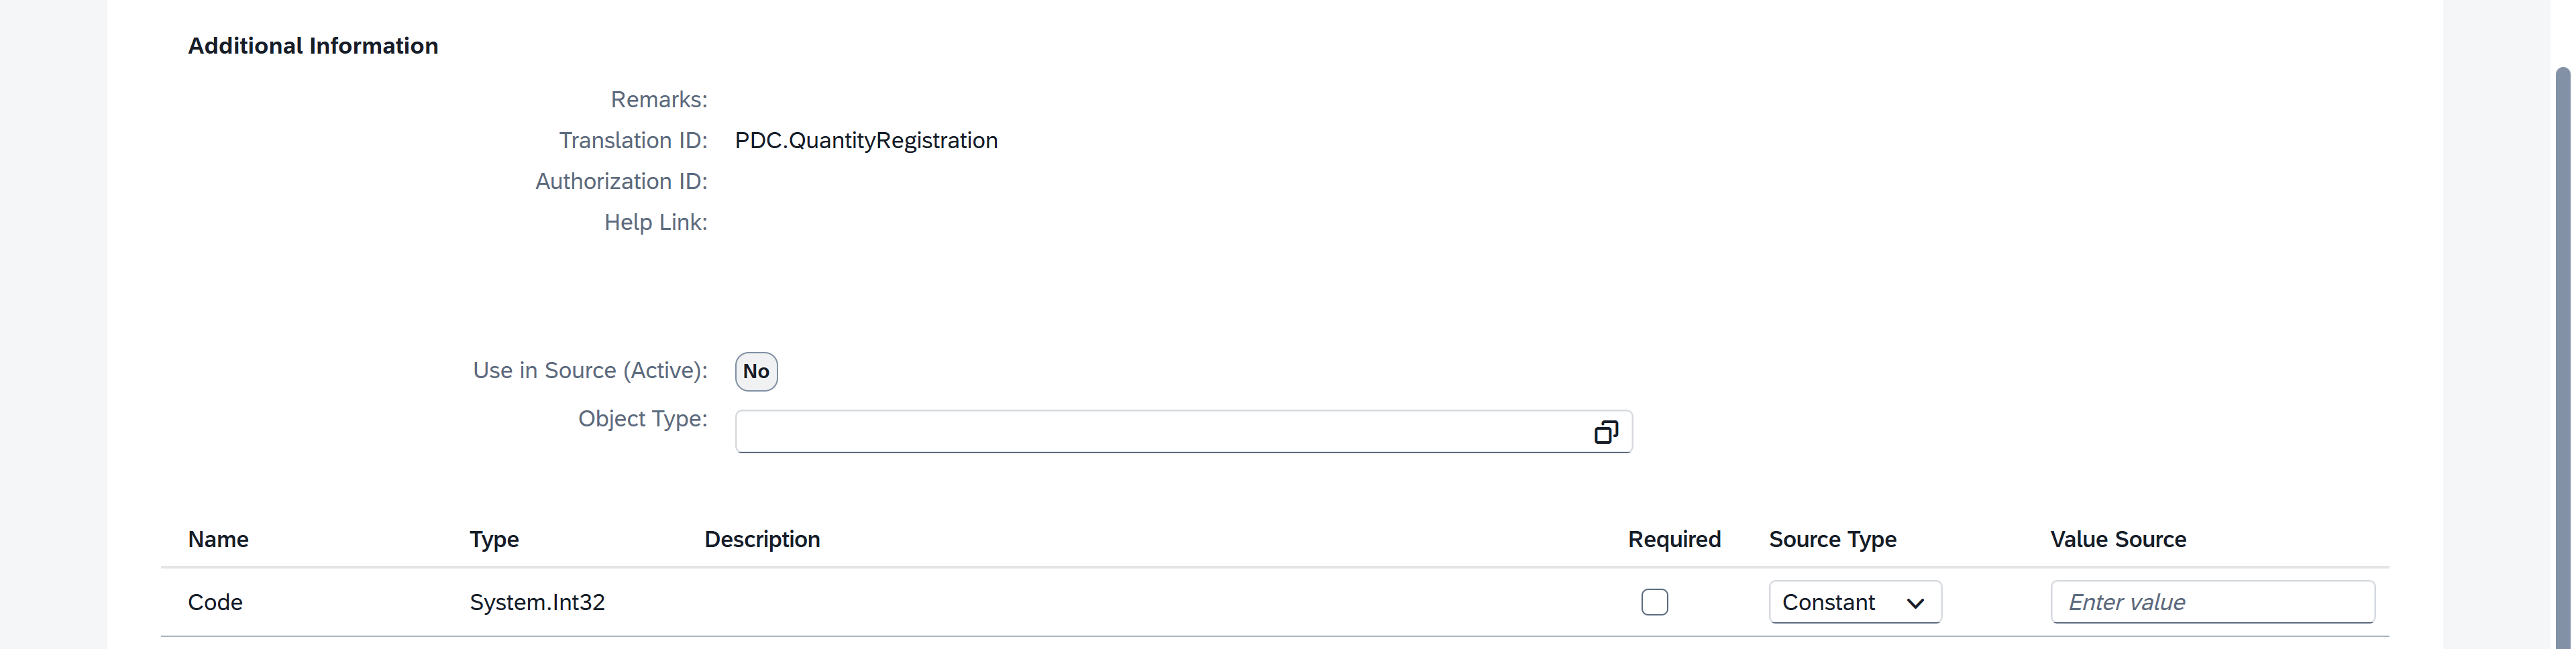
    additional information section in analytics actions

  9. Click Use in Source to apply the mapping.

    Analytics action parameter mapping panel showing Use in Source Active set to No, an empty Object Type field, and a Code parameter row. The row shows type System.Int32, Required checked, Source Type set to Field, and Value Source set to DocEntry. A blue arrow points to the Use in Source button on the right. The wider environment is a functional configuration screen with a table of action parameters.

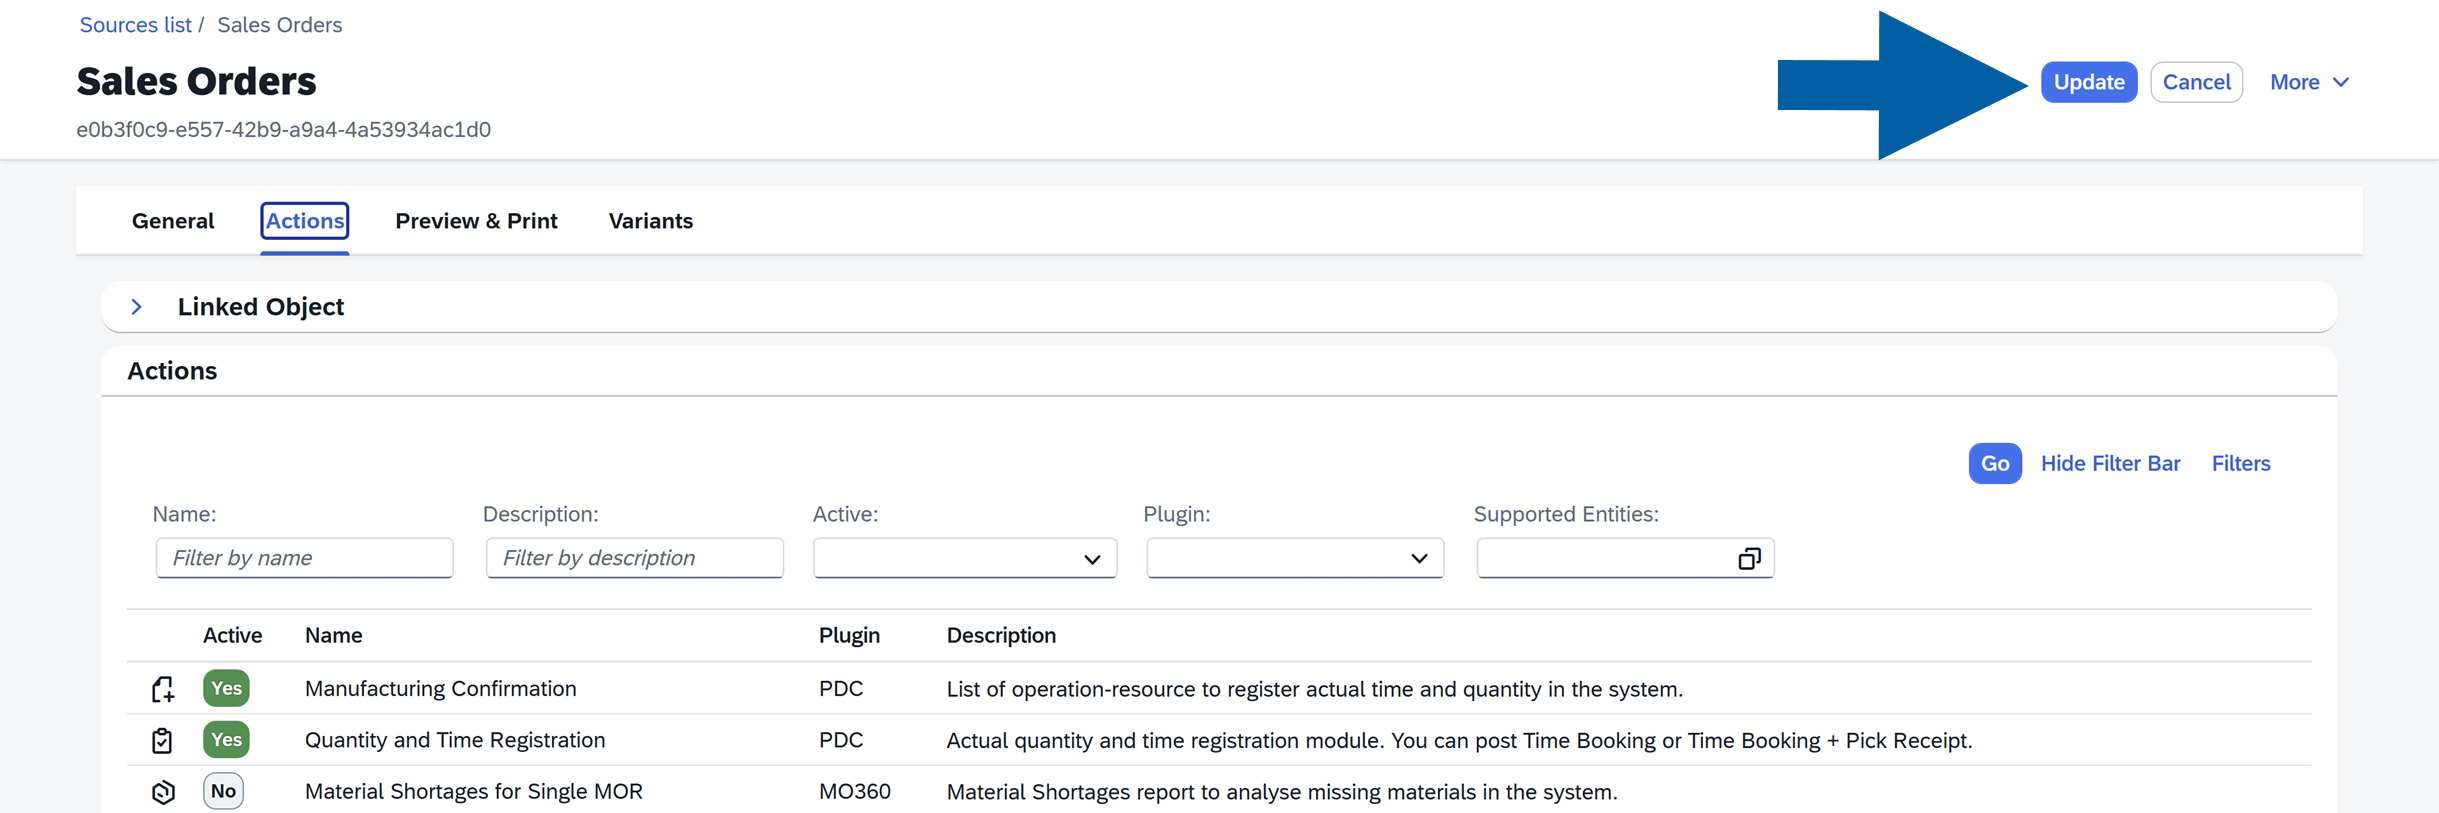
  10. Click Update.

    Sales Orders source configuration screen with the Actions tab selected and a large blue arrow pointing to the Update button. The page shows the breadcrumb Sources list / Sales Orders, the Sales Orders heading, tabs for General, Actions, Preview & Print, and Variants, plus the Actions section with filter controls and an action list. The interface is functional and instructional.

  11. The action is now activated and available in the report.

Map action parameters

Actions require some information to know which data should be used when the action is executed, for example, the document's internal number DocEntry or its unique code Code. These values are called parameters.

For each parameter, you can define where the value should come from.

Action parameter mapping table with an Object Type field and two rows. The DocEntry parameter has type System.Int32, Source Type set to Field, and Value Source set to DocEntry. The RscLineNum parameter has type System.Int32, Source Type set to Constant, and value 1. The table columns are Name, Type, Description, Required, Source Type, and Value Source. The wider environment is a functional analytics configuration interface for mapping action values in a clear instructional layout.

Available Source Types include:

  • Constant value
  • Field value

Constant value

Use Constant value when the action should always receive the same value.

Action parameter mapping table showing Object Type and the Source Type setting for two parameters. The table includes DocEntry with type System.Int32, Source Type Field, and an empty Required checkbox, and RscLineNum with type System.Int32, Source Type Constant, and value 1. Column headings read Name, Type, Description, Required, Source Type, and Value Source. A large blue arrow points to the Constant selection. The wider environment is a clean analytics configuration interface for mapping action parameters.

Example:

  • DocType: 17
  • Status: Release
  • Type: Header

Field value

Use Field value when the action should receive data from a selected row in the report.

Action parameter mapping table showing Object Type and columns Name, Type, Description, Required, Source Type, and Value Source. The DocEntry row has type System.Int32, Source Type Field, and Value Source DocEntry. The RscLineNum row has type System.Int32, Source Type Constant, and value 1. A blue arrow points to the Field selection for DocEntry in the analytics configuration interface.

When the user selects a row and runs the action, the system takes the value from the mapped column and passes it to the action automatically.

Required parameters

You can mark a parameter as Required.

Analytics action parameter table showing the DocEntry parameter marked as Required with a checked checkbox. The table lists DocEntry and RscLineNum, both with type System.Int32; DocEntry uses Source Type Field with value source DocEntry, while RscLineNum uses Source Type Constant with value 1. Save and Deactivate buttons appear below. The screenshot shows a clear configuration interface with a blue arrow highlighting the required checkbox.

If a required parameter is empty, the action cannot be executed.

For example, if the report row does not contain a value for a required document number, the action will not run.

Configure actions in a variant

After an action is added to a source, you can control its visibility in each variant.

For example, you may have different variants such as Sales, Warehouse, or Production. Each variant can have its own permissions and therefore only the relevant actions should be enabled for that specific variant.

By configuring Action Settings, you ensure that users see only the actions that are appropriate for their role and report context.

To configure Action Settings in a variant:

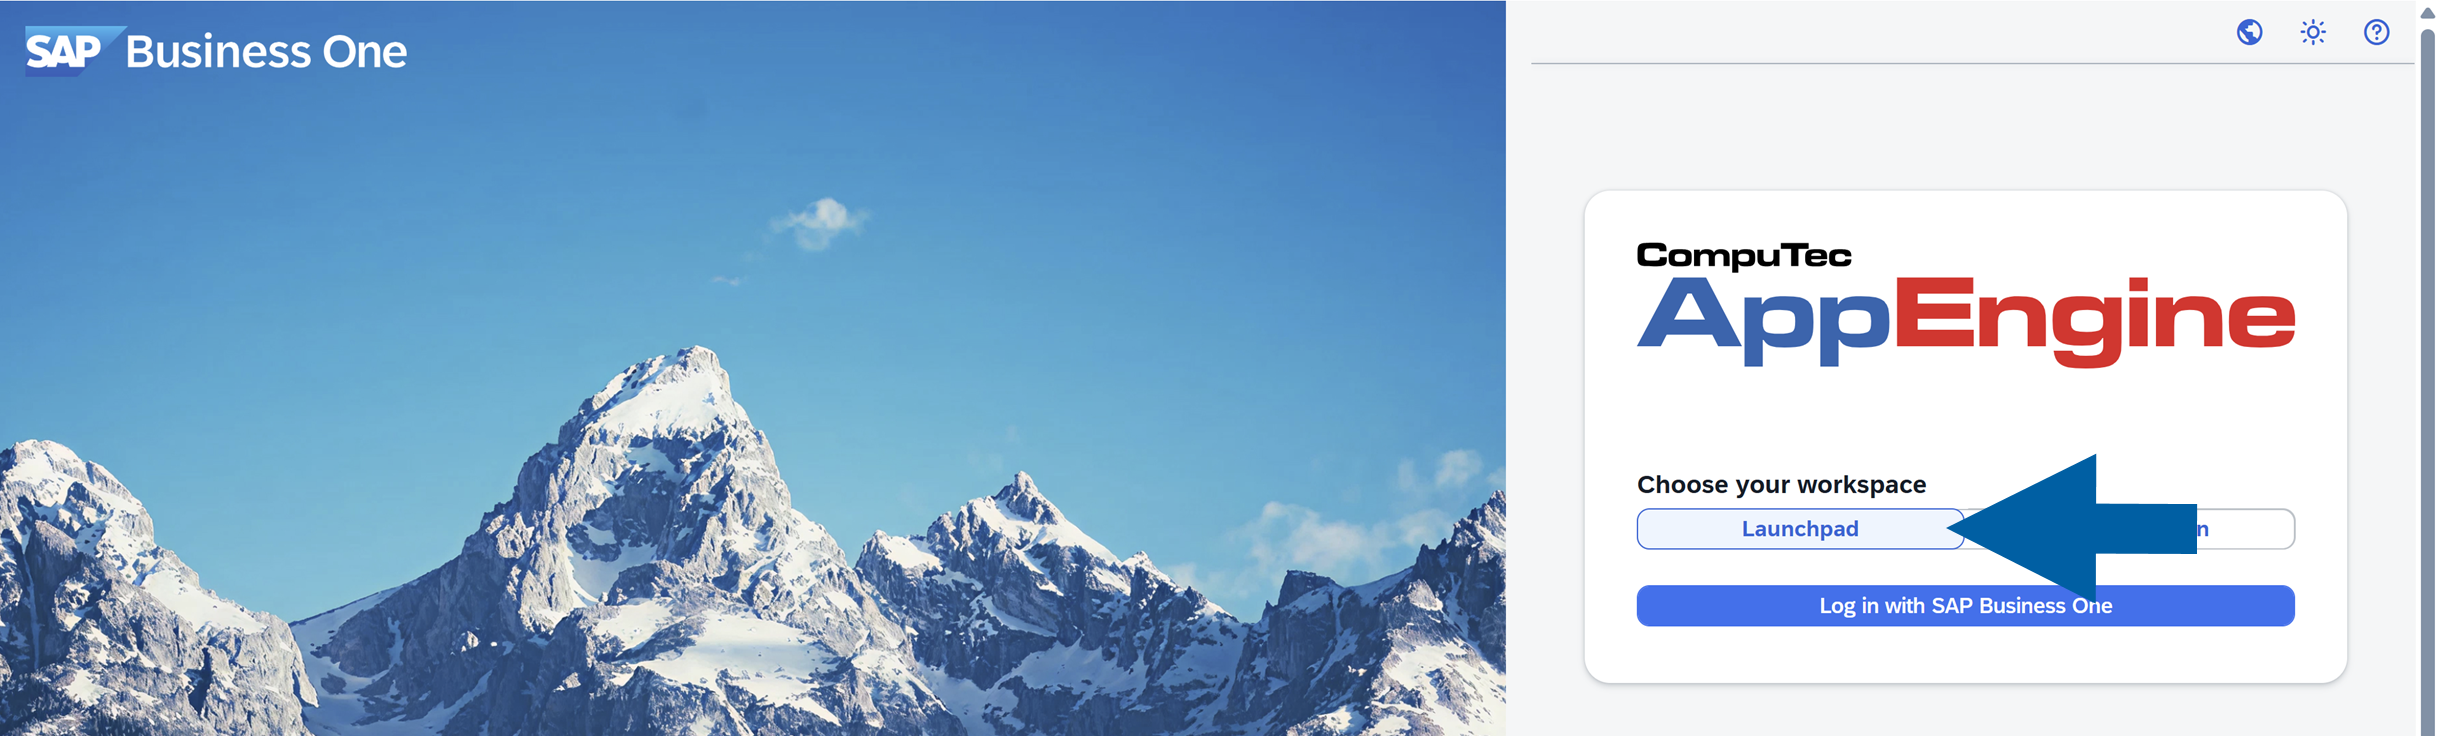
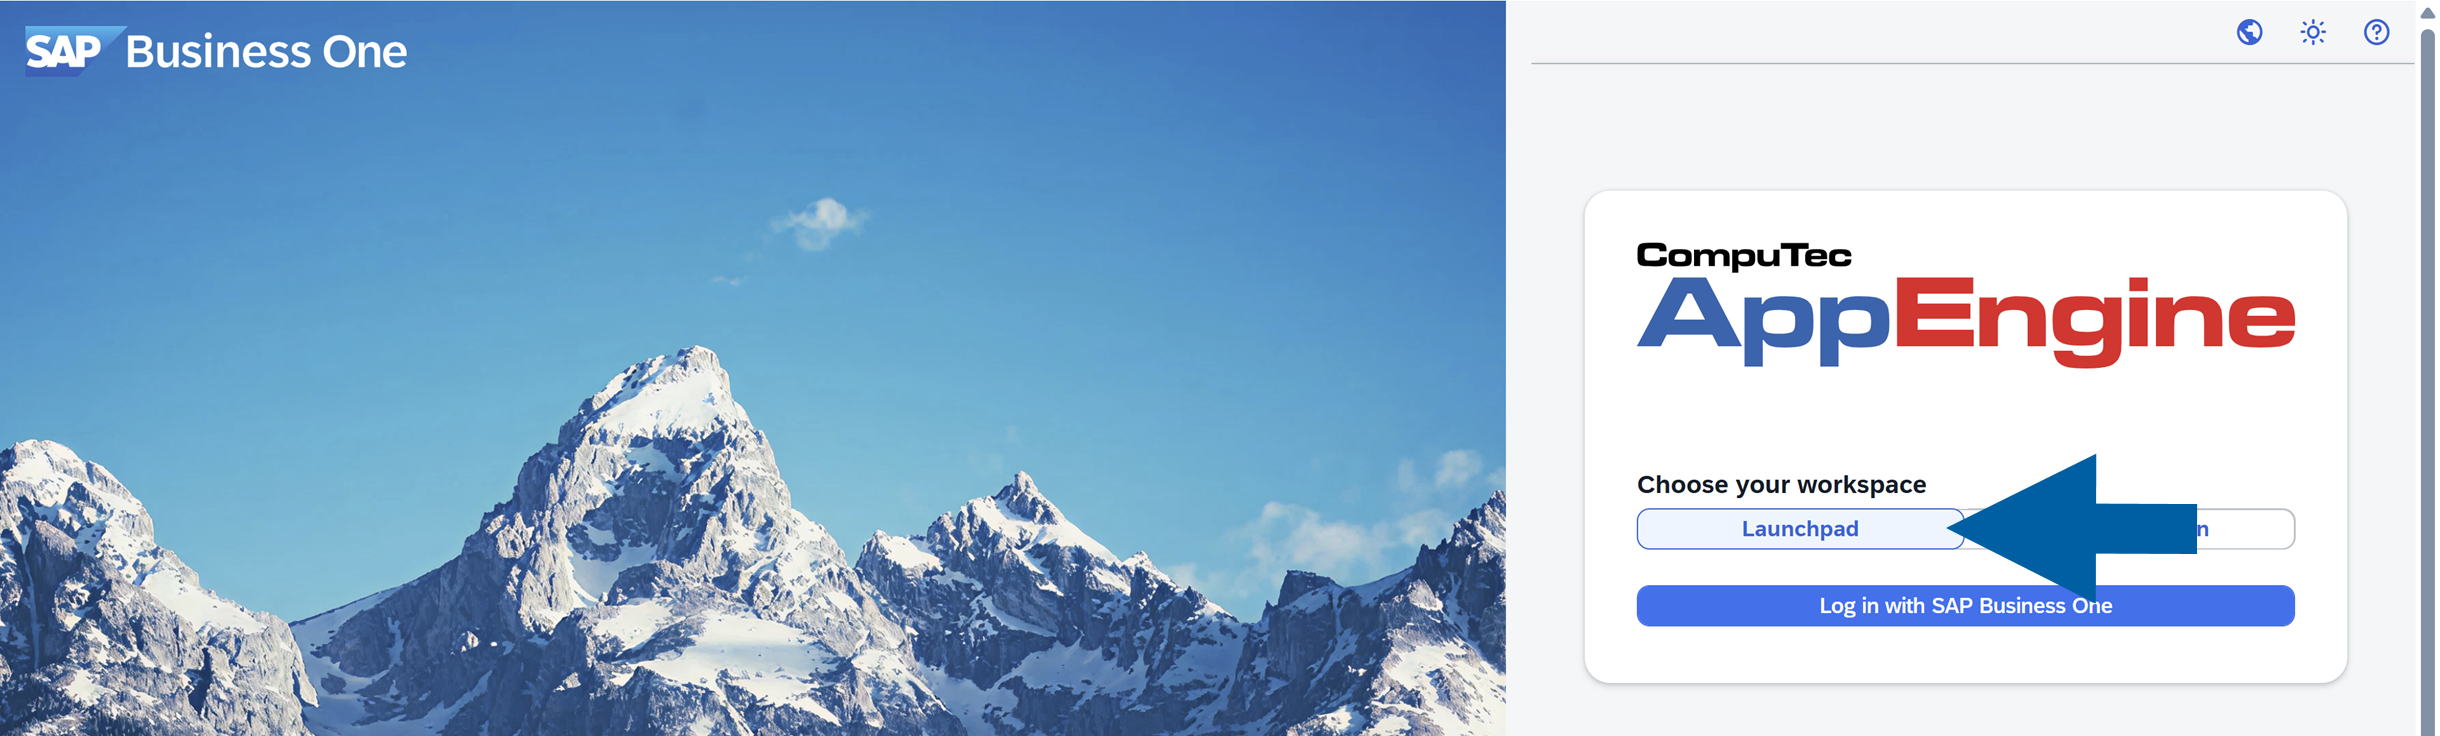
  1. Open CompuTec AppEngine Launchpad.

    CompuTec AppEngine workspace selection screen in SAP Business One. The right-side panel displays the CompuTec AppEngine logo, the heading Choose your workspace, Launchpad selected, an additional workspace option partially obscured by a large blue arrow, and the button Log in with SAP Business One. The left side shows the SAP Business One interface over a bright blue mountain landscape. The screen has a clean, neutral setup interface.

  2. Go to Analytics.

    CompuTec AppEngine Launchpad navigation bar with the Analytics icon highlighted by a large blue arrow. The bar includes the Launchpad label and icons for Analytics, display or workspace options, a globe, and settings. Below it, a light gray workspace contains tiles labeled WebUp, MRP, and MO360.

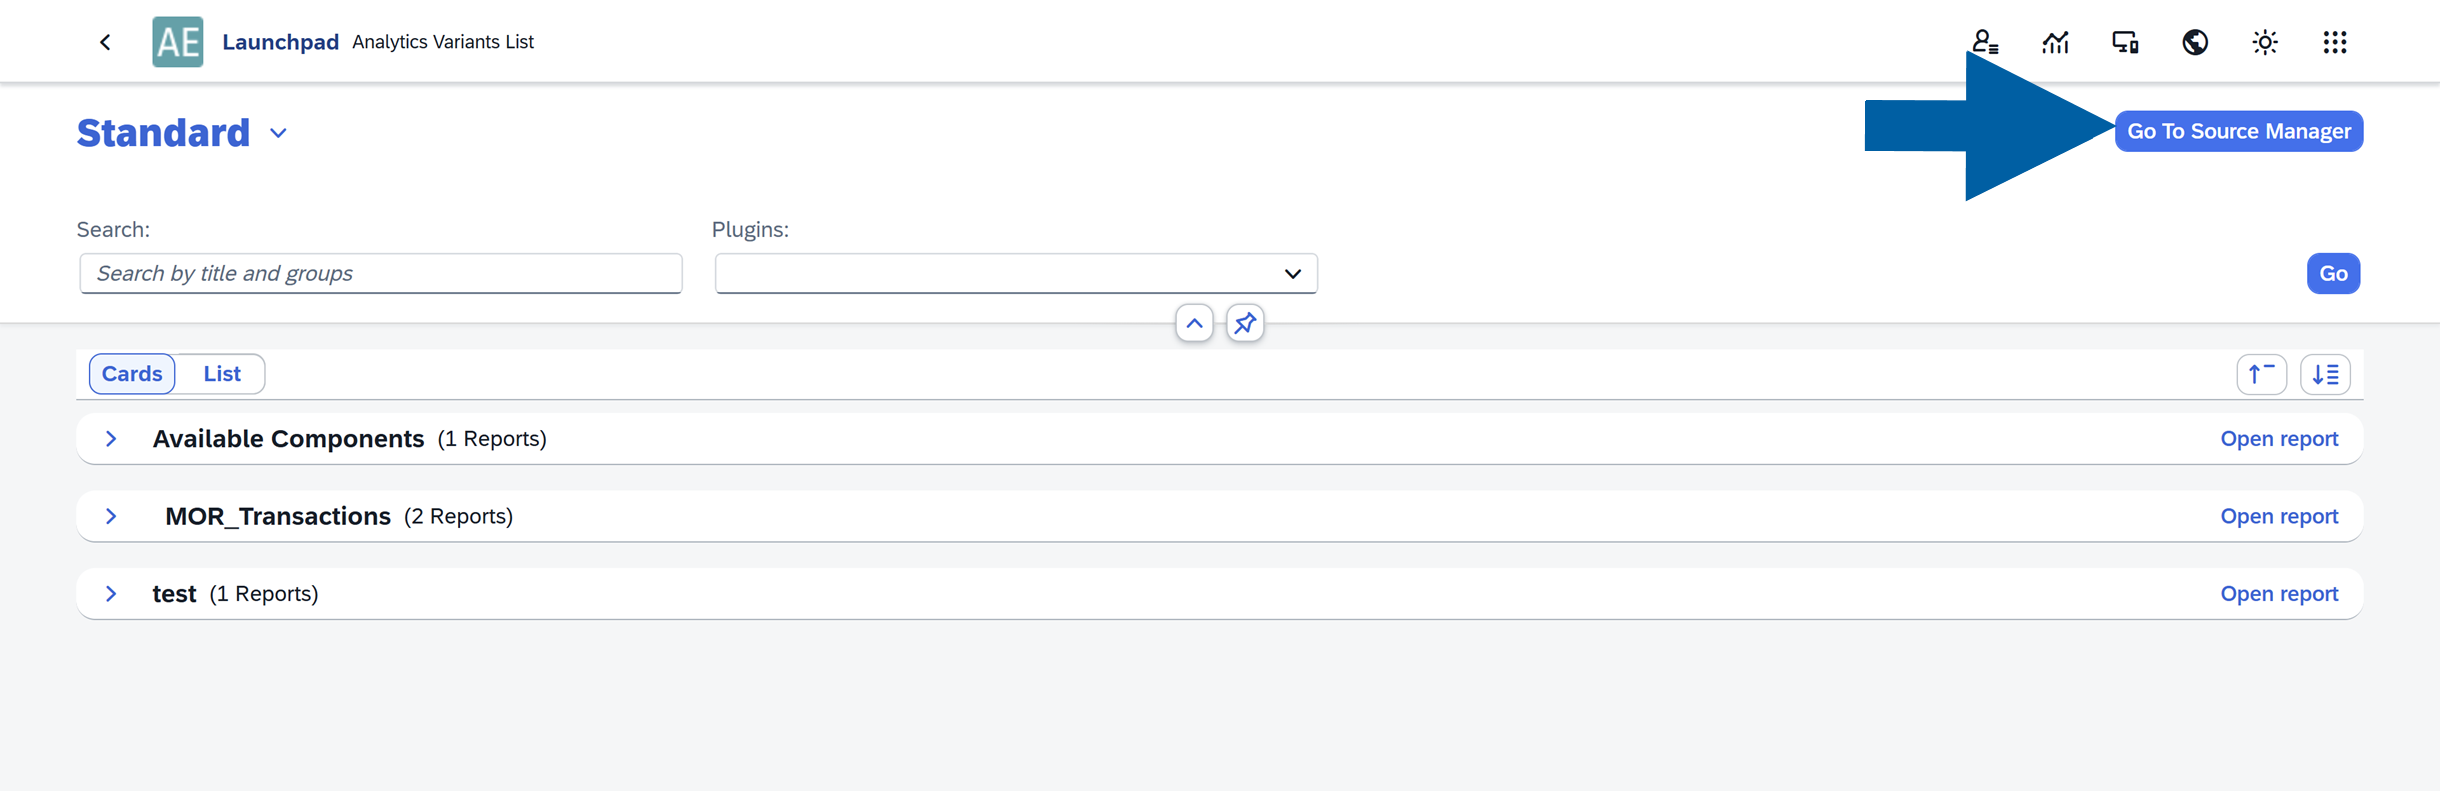
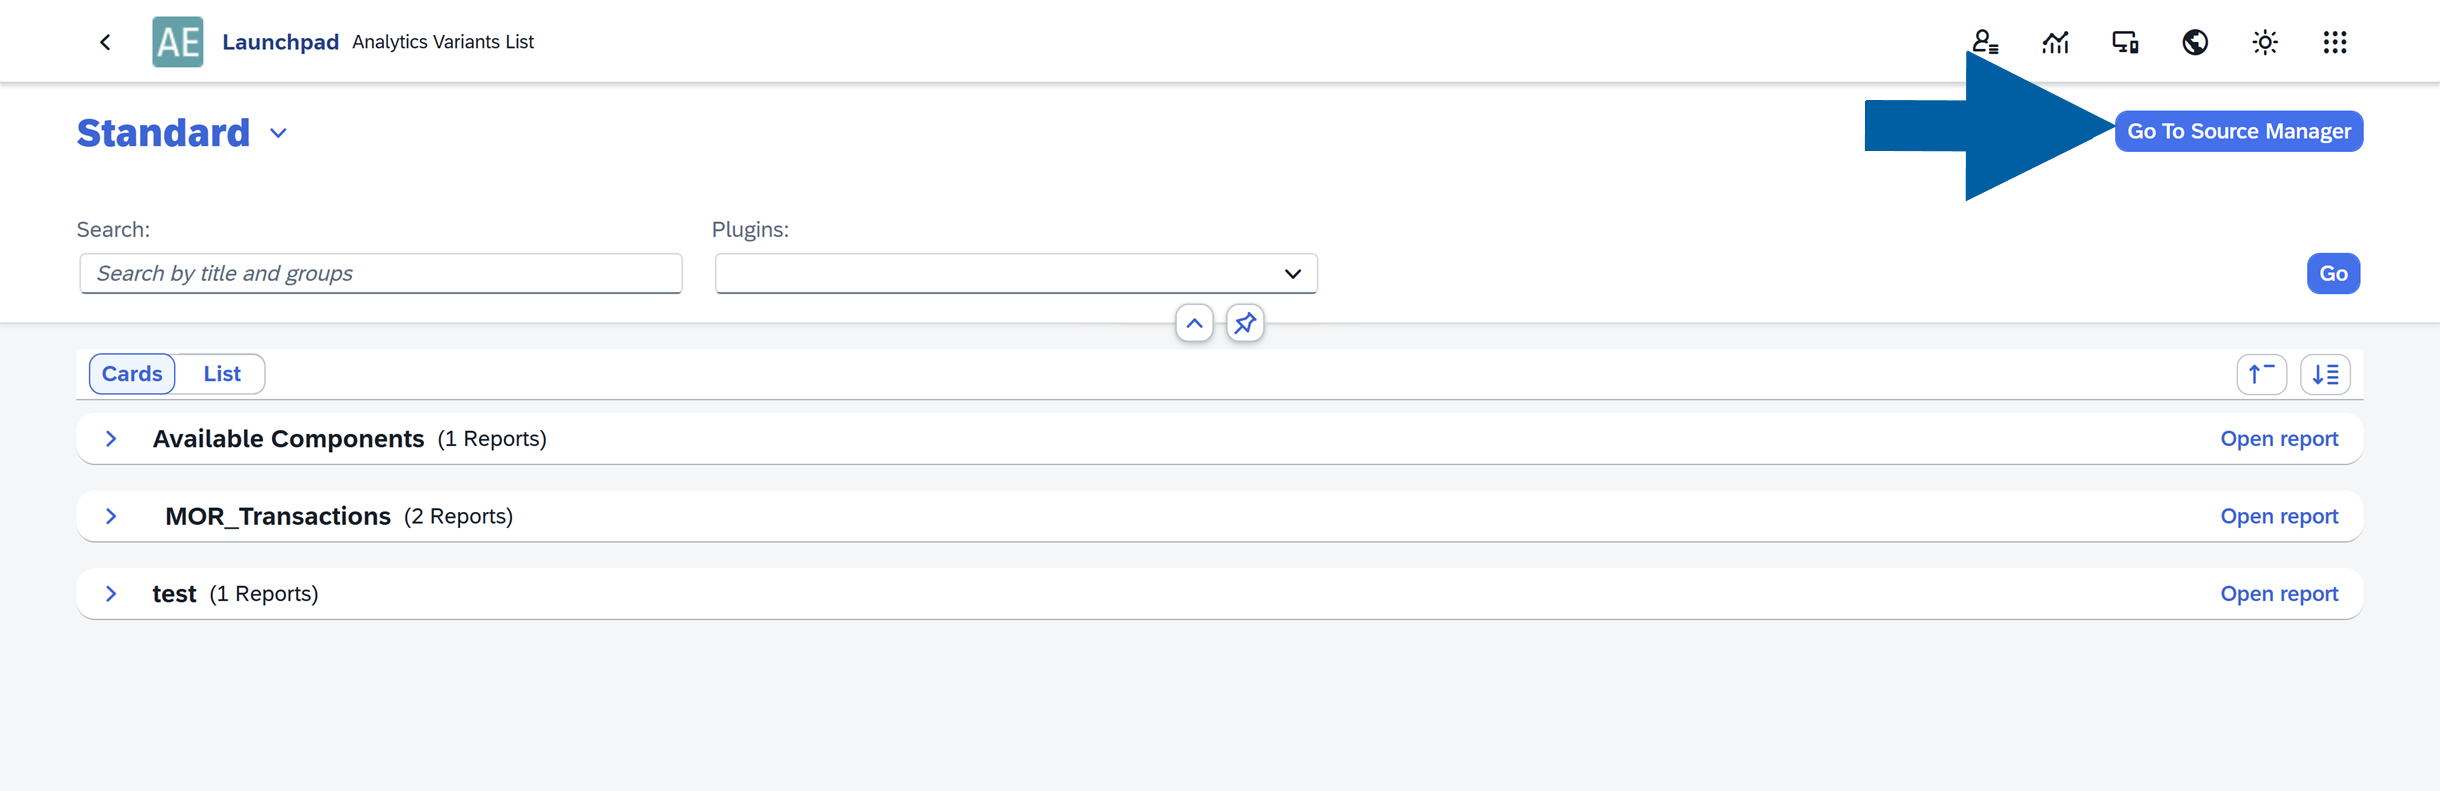
  3. Navigate to Source Manager.

    CompuTec AppEngine Launchpad Analytics Variants List screen with a large blue arrow pointing to the Go To Source Manager button in the upper-right corner. The page shows the Standard variant, search and plugin filters, and report groups including Available Components, MOR_Transactions, and test.

  4. Click the Source you want to edit.

    CompuTec AppEngine Launchpad Source List displays available sources in a table. The header reads Source List, with Generate Date Parts and Add New Source controls on the right. A large blue arrow points to the Sales Orders row, which shows SQL from ORDR. Other visible rows are test, showing select ItemCode from OITM, and Sales items, showing Select DocEntry, LineNum, ItemCode, Quantity from RDR1. The clean interface has a neutral tone.

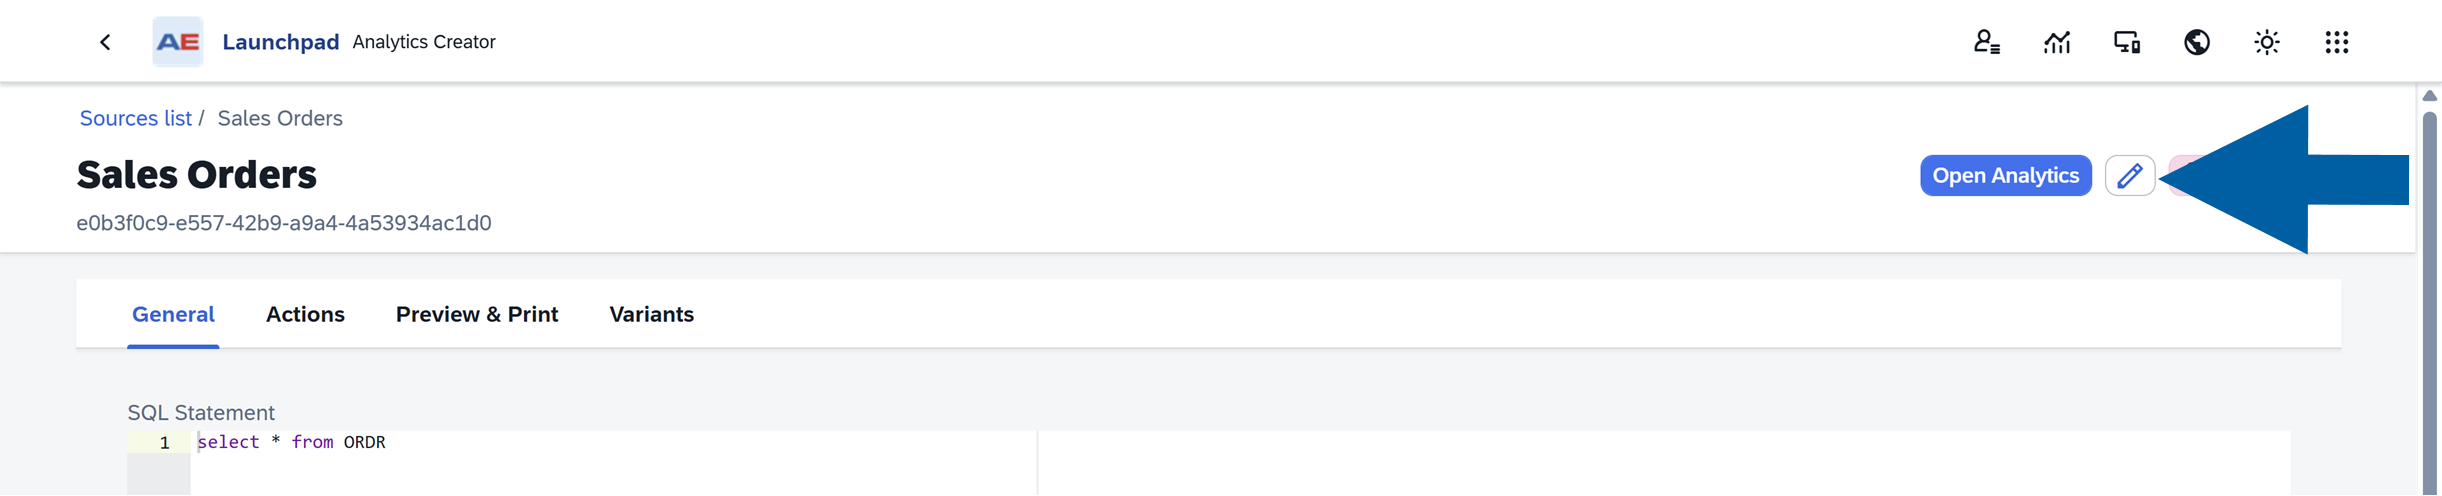
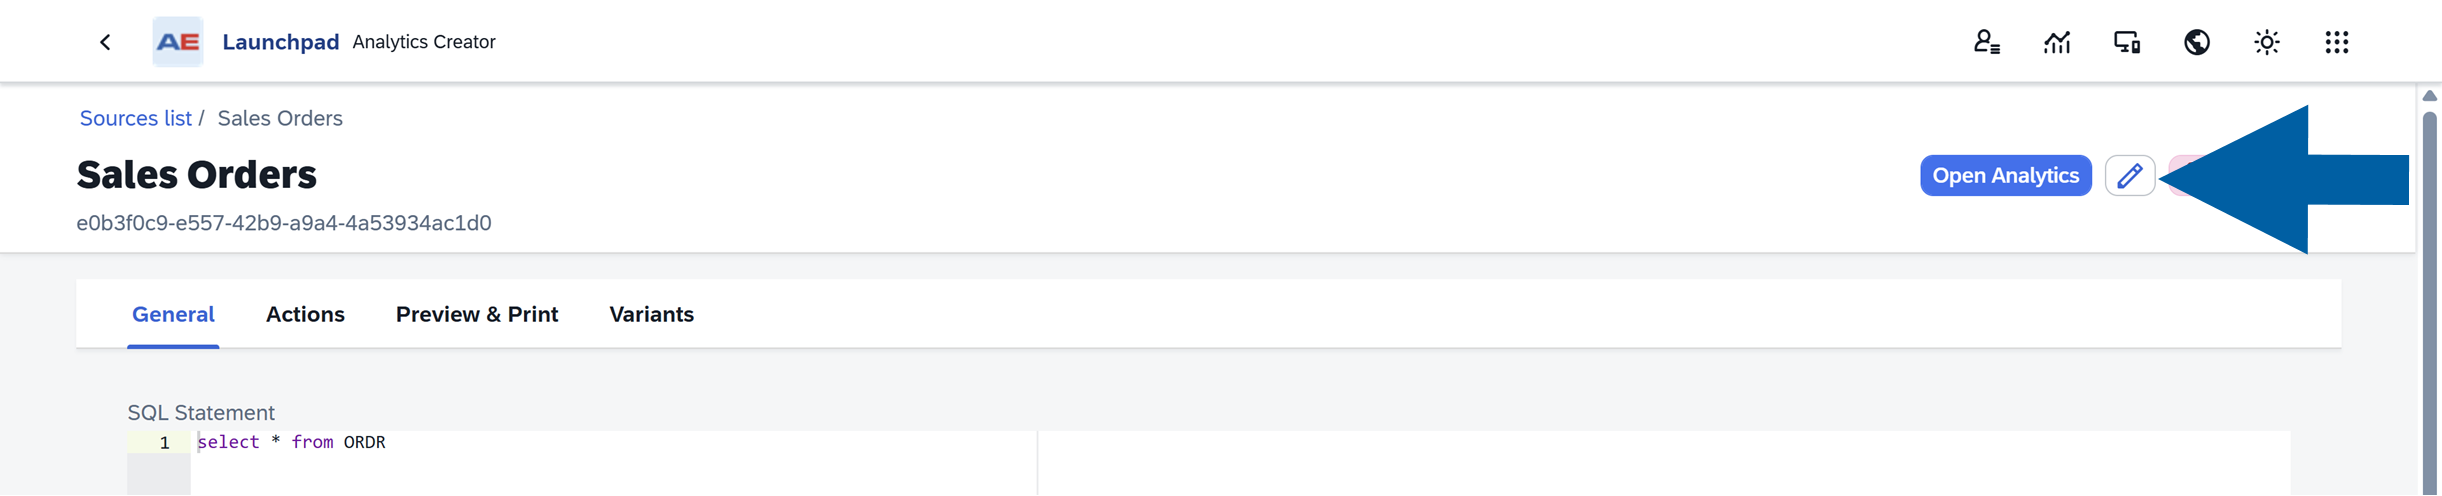
  5. Click the edit icon.

    CompuTec AppEngine Analytics Creator displays the Sales Orders source with the breadcrumb Sources list / Sales Orders, an Open Analytics button, and an edit pencil icon highlighted by a large blue arrow. The General tab is selected, with Actions, Preview & Print, and Variants tabs visible above the SQL Statement editor containing select * from ORDR. The interface has a clean, neutral layout.

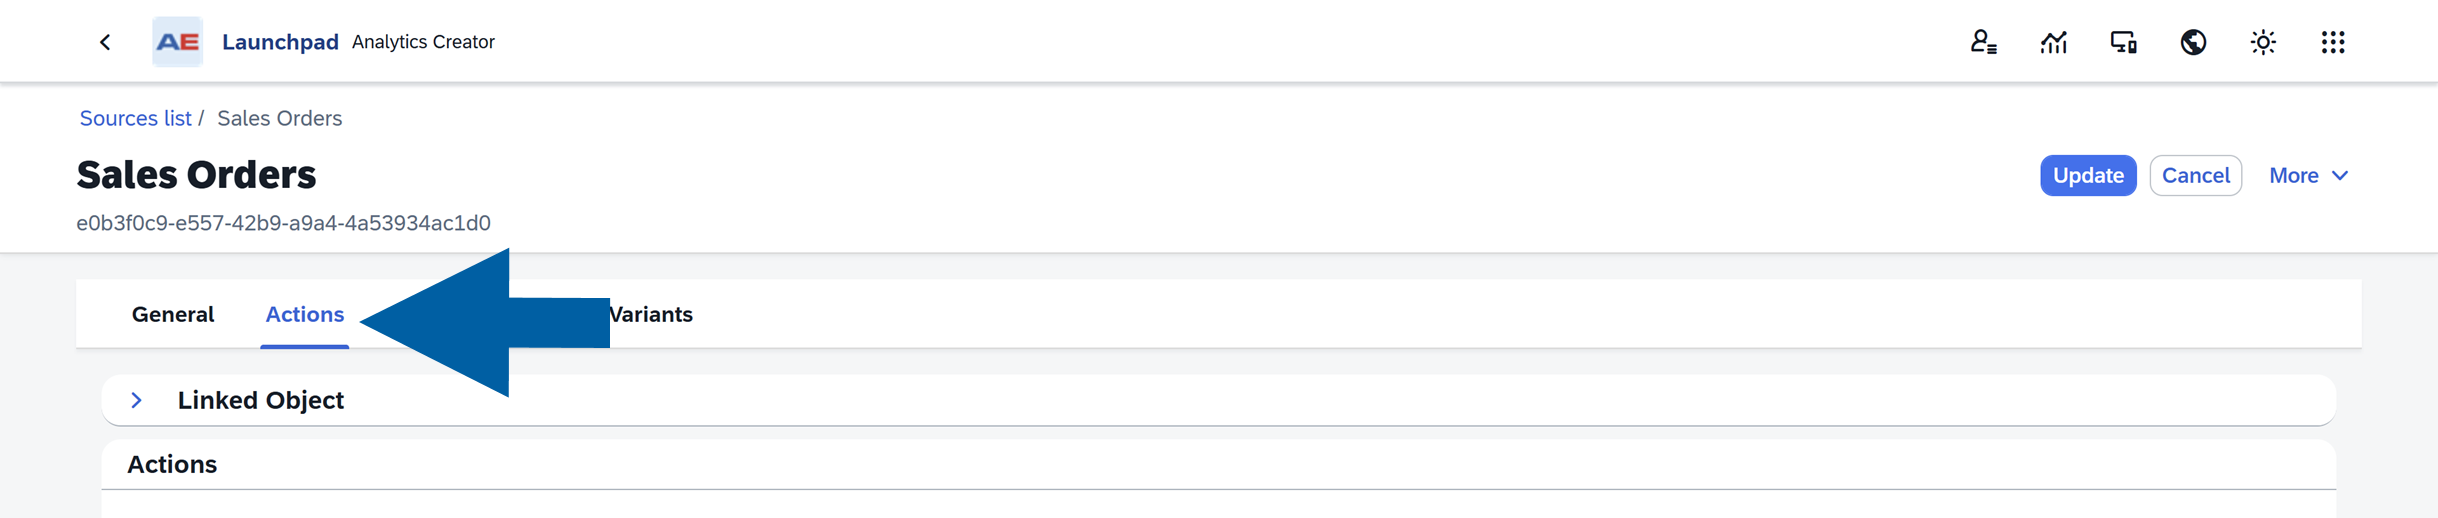
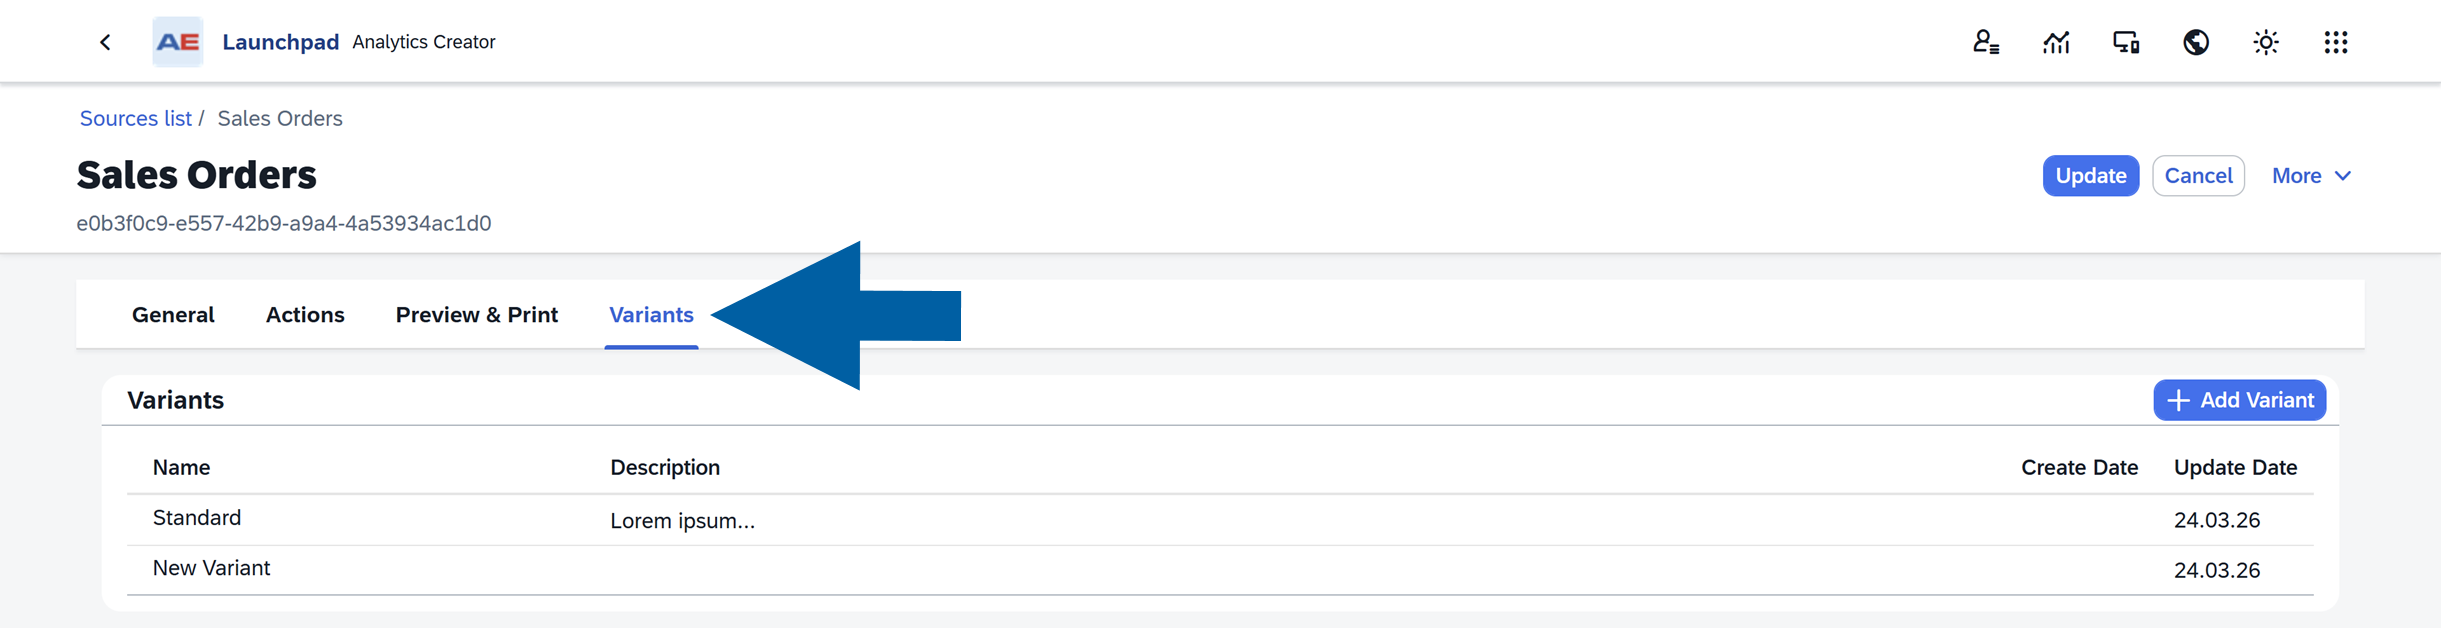
  6. Open the Variants tab.

    Analytics Creator Sales Orders source with the Variants tab selected and highlighted by a large blue left-pointing arrow. The page shows the breadcrumb Sources list / Sales Orders, the source title Sales Orders, Update and Cancel buttons, and tabs labeled General, Actions, Preview & Print, and Variants. A Variants panel below contains an Add Variant button and a table with Standard and New Variant entries, plus Description, Create Date, and Update Date columns. The interface is clean and neutral.

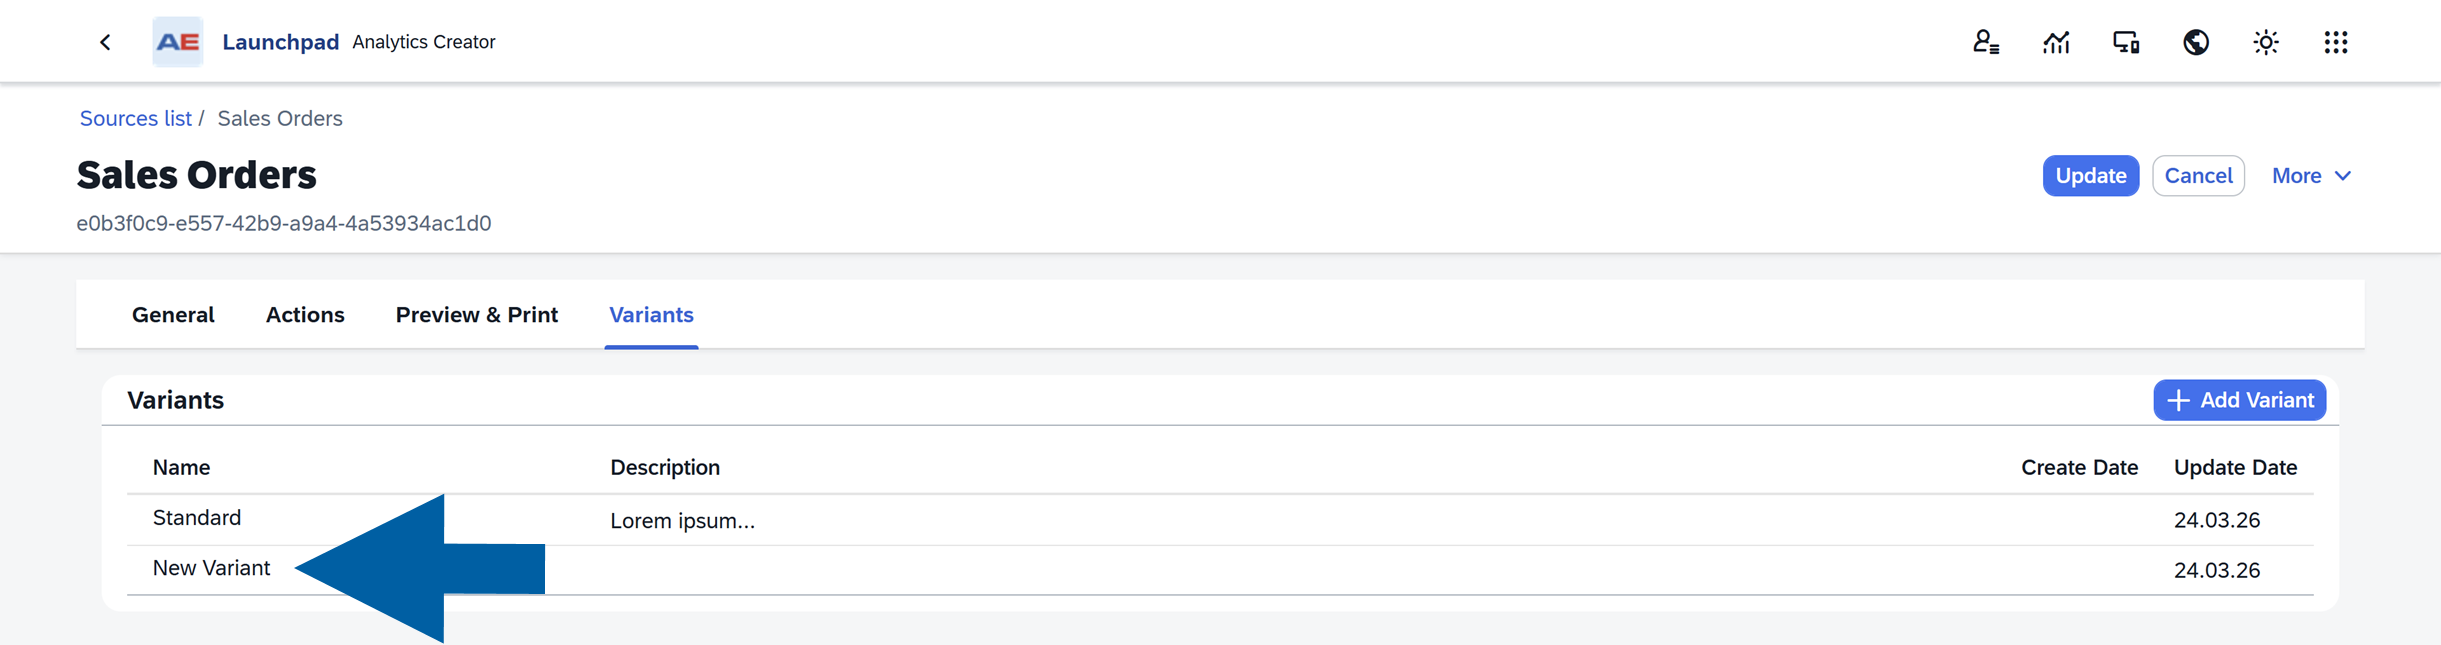
  7. Select the variant you want to edit.

    Analytics Creator Variants page for Sales Orders showing the Standard and New Variant rows in the Variants table. A large blue left-pointing arrow highlights the New Variant row. The page also shows the Sources list / Sales Orders breadcrumb, Update and Cancel buttons, and a clean neutral interface.

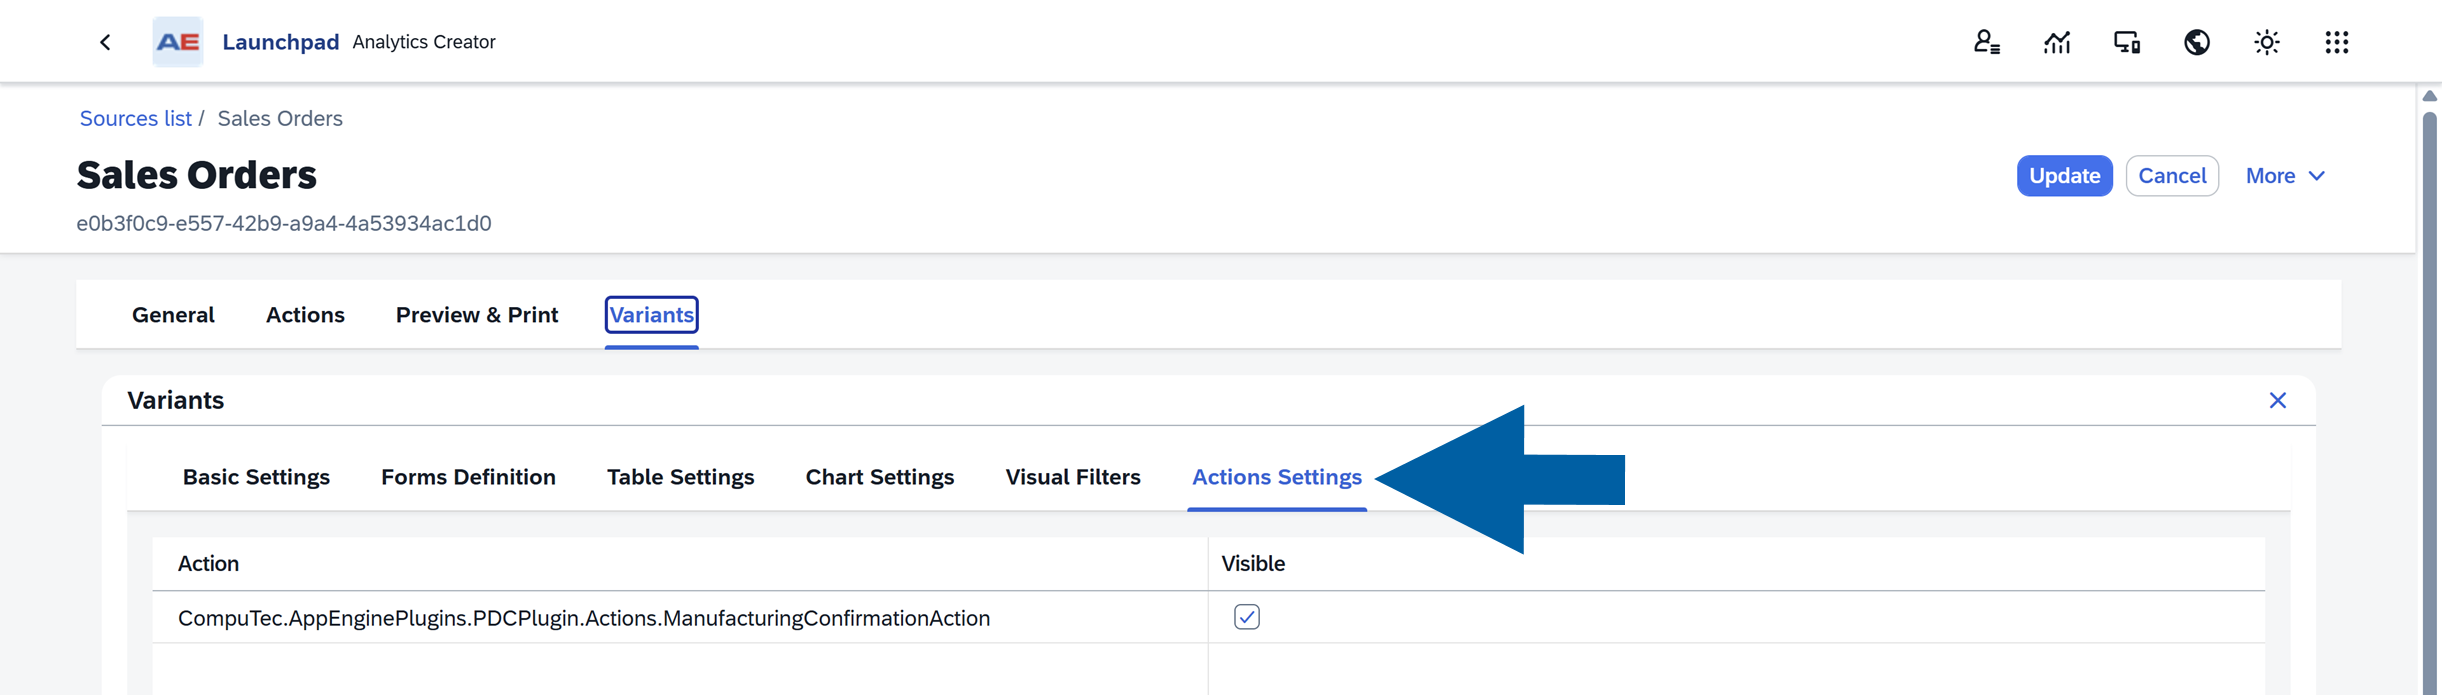
  8. Open Action Settings.

    Analytics Creator Variants settings panel for Sales Orders, with the Actions Settings tab selected and highlighted by a large blue arrow. The panel lists an action named CompuTec.AppEnginePlugins.PDCPlugin.Actions.ManufacturingConfirmationAction and shows its Visible checkbox selected. The surrounding interface has a clean, neutral layout with tabs for Basic Settings, Forms Definition, Table Settings, Chart Settings, and Visual Filters.

  9. Set Visibility to show or hide an Action in a specific Variant.
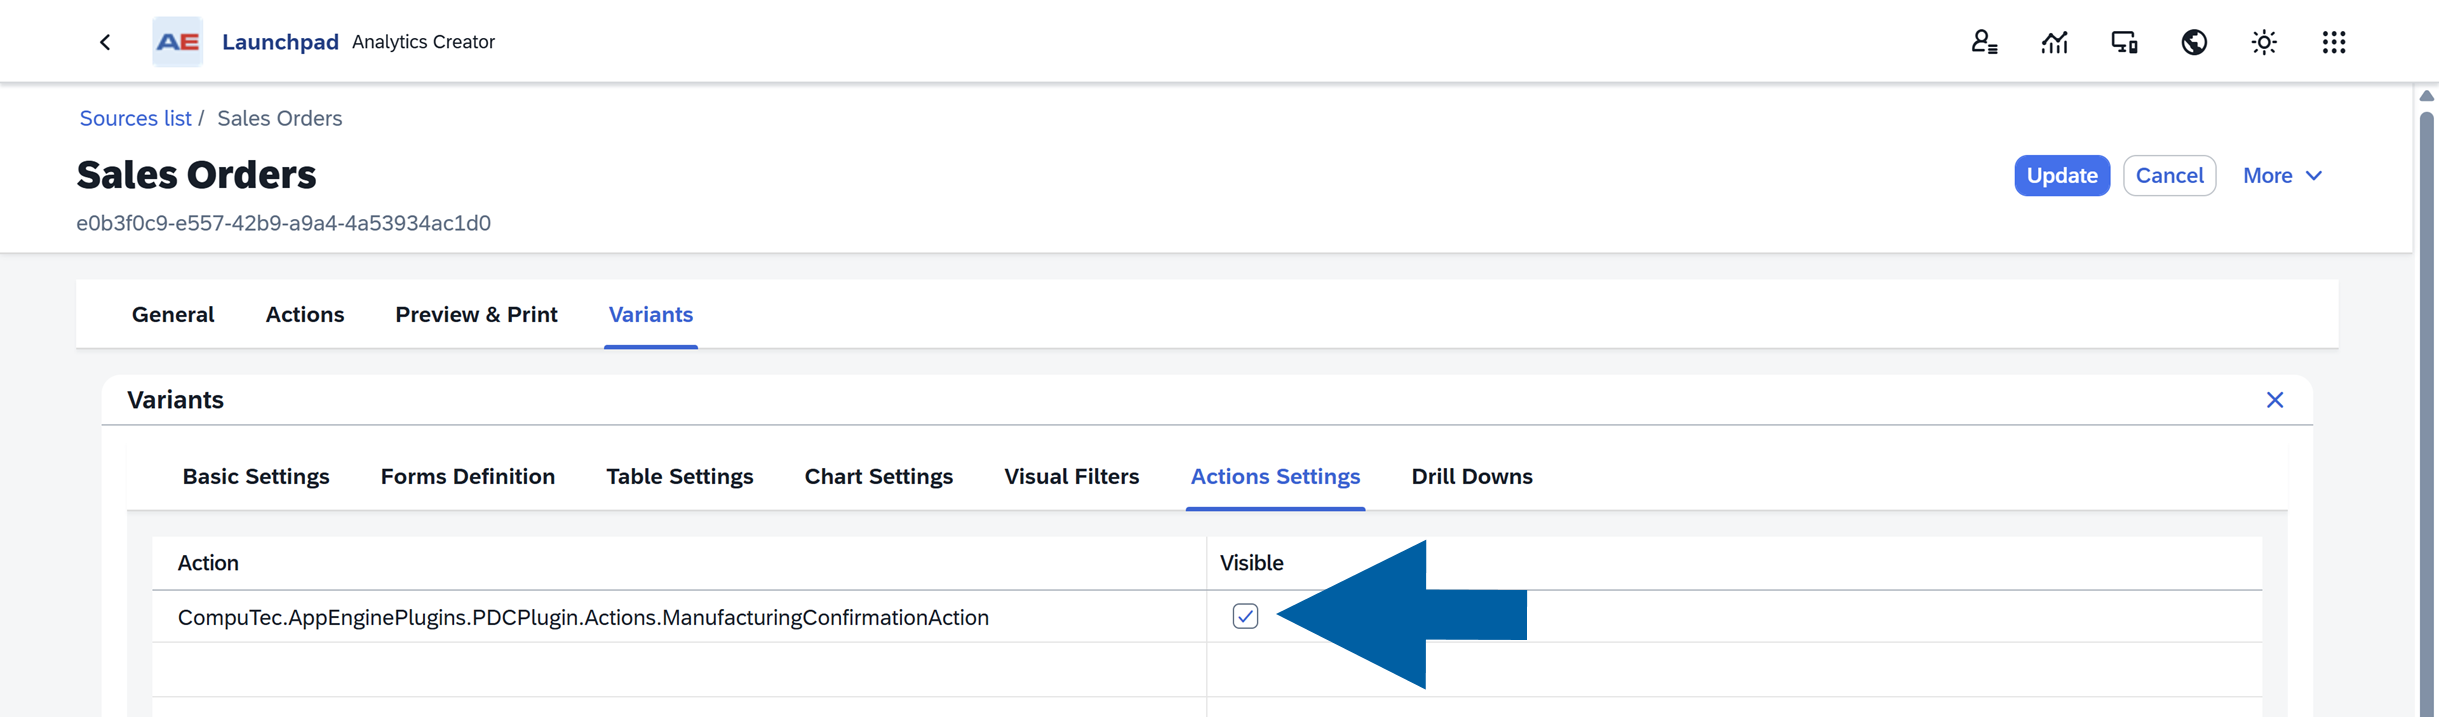
    Analytics Creator Variants page for Sales Orders showing the Actions Settings tab. The table lists the action CompuTec.AppEnginePlugins.PDCPlugin.Actions.ManufacturingConfirmationAction, and its Visible checkbox is selected. The page header shows Sales Orders with Update and Cancel buttons, and the surrounding interface has a clean, neutral administrative layout.

  10. Click Update to save changes in the Variant.
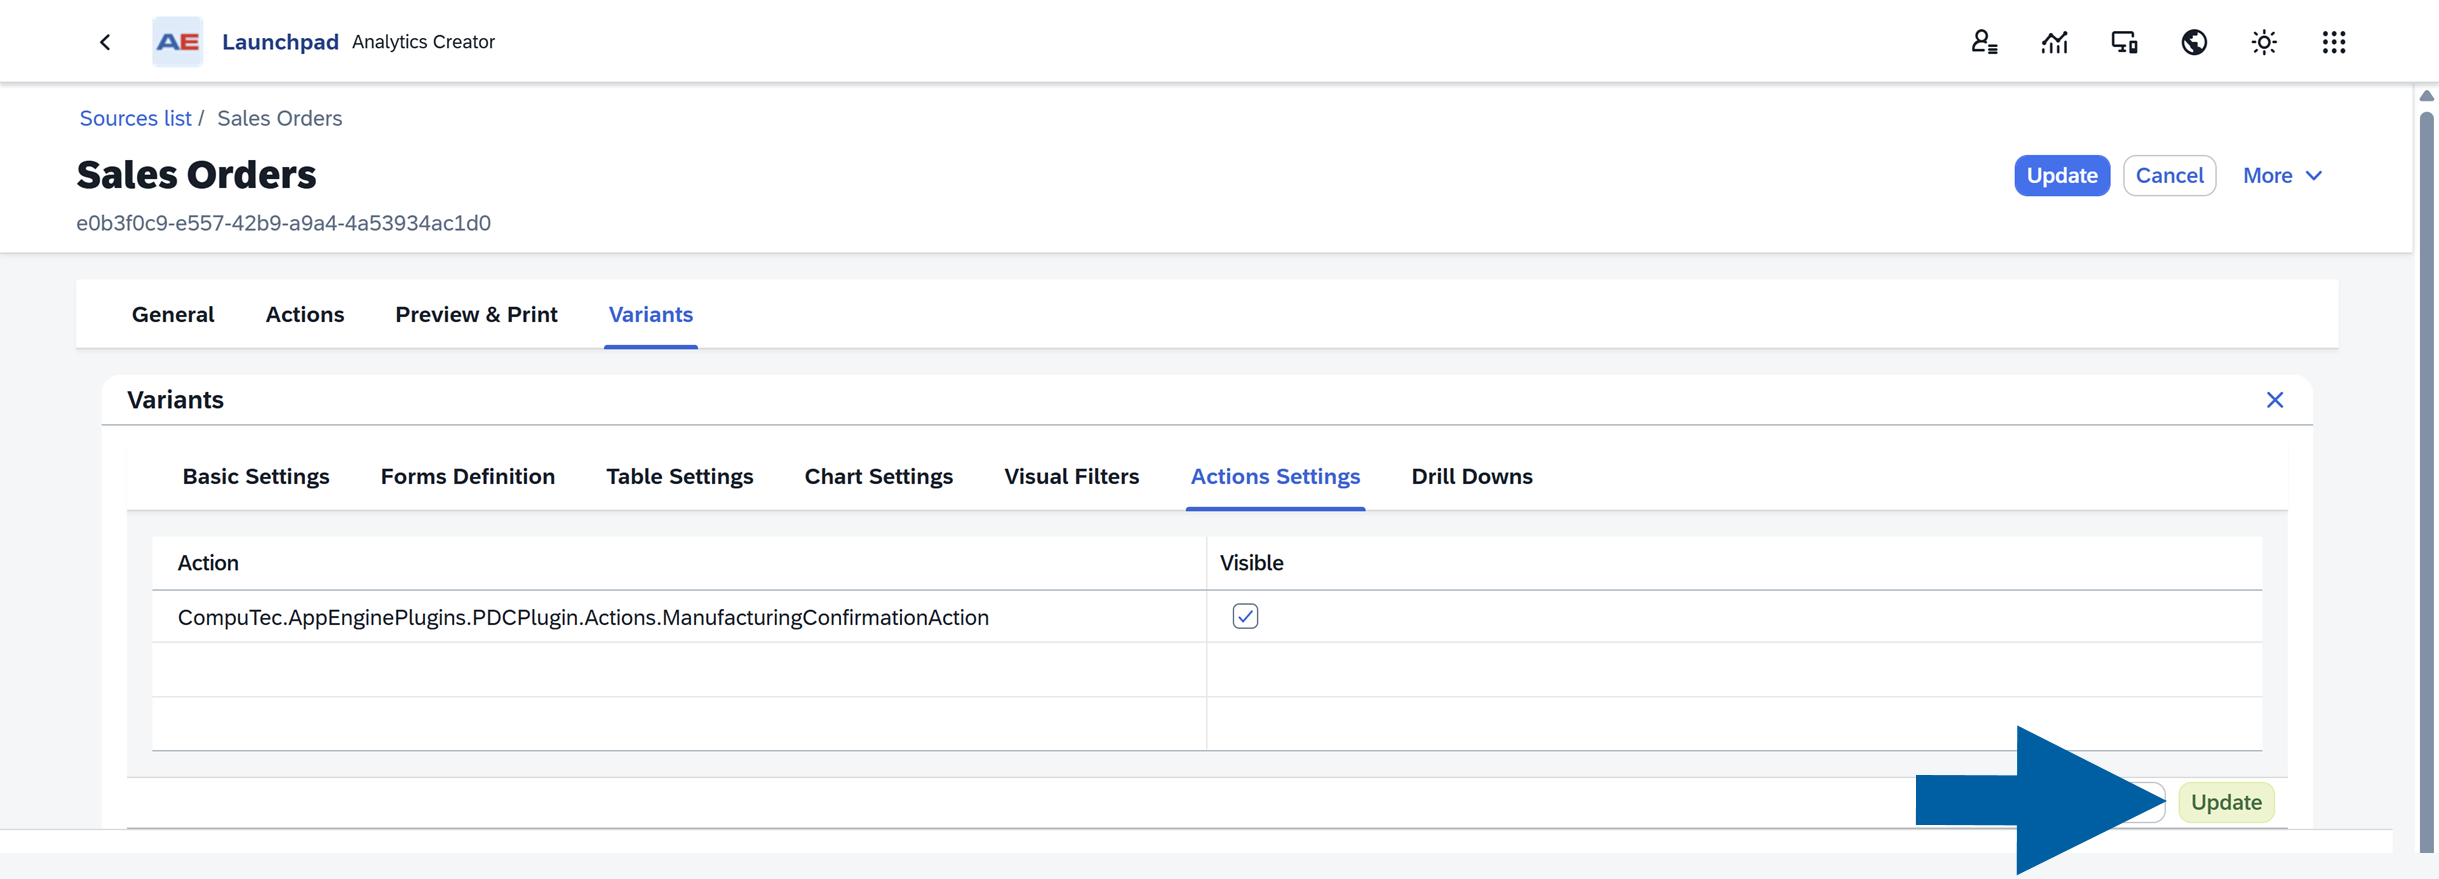
    Analytics Creator shows the Sales Orders variant with the Actions Settings tab selected. The action CompuTec.AppEnginePlugins.PDCPlugin.Actions.ManufacturingConfirmationAction has its Visible checkbox selected. A large blue arrow points to the Update button at the bottom right of the settings panel, indicating where to save the variant changes. The surrounding interface includes the Sources list / Sales Orders breadcrumb, Update and Cancel controls, and tabs for General, Actions, Preview & Print, and Variants in a clean administrative workspace.

  11. Click Update to save the Source changes.

    Analytics Creator shows the Sales Orders source on the Variants tab. The page displays the breadcrumb Sources list / Sales Orders, the title Sales Orders, the identifier e0b3f0c9-e557-42b9-a9a4-4a53934ac1d0, and the Update, Cancel, and More controls. A large blue arrow points to the Update button, indicating where to save source changes. The General, Actions, Preview & Print, and Variants tabs appear below in a clean administrative interface.

  12. The action is now available in the report.

How actions appear in reports

The visibility of the Actions button depends on the actions enabled in the selected variant, the currently selected report rows, and whether all required parameter values are available for those rows.

If a required value is missing, the related action may be hidden or unavailable.

No visible actions

If no actions are visible, the Action button is hidden.

Analytics report for the New Variant with no visible Actions button. The report toolbar shows Open Manager, Adapt Filter, view controls, a refresh message reading The data will be refreshed in: 9:44 min., Download Excel, and settings. The table below includes columns for Doc ID, Document Type, CANCELED, Handwritten, Printed, InventSttus, Transfered, ObjType, and CardC. The clean administrative interface indicates that no report actions are currently available.

info

Action availability is evaluated dynamically.

Depending on the selected rows, some actions may become unavailable when they require a specific document status, or a mandatory parameter value. They may also support only specific object types.

If these specific conditions are not met, you won't see the Action button.

Visible actions

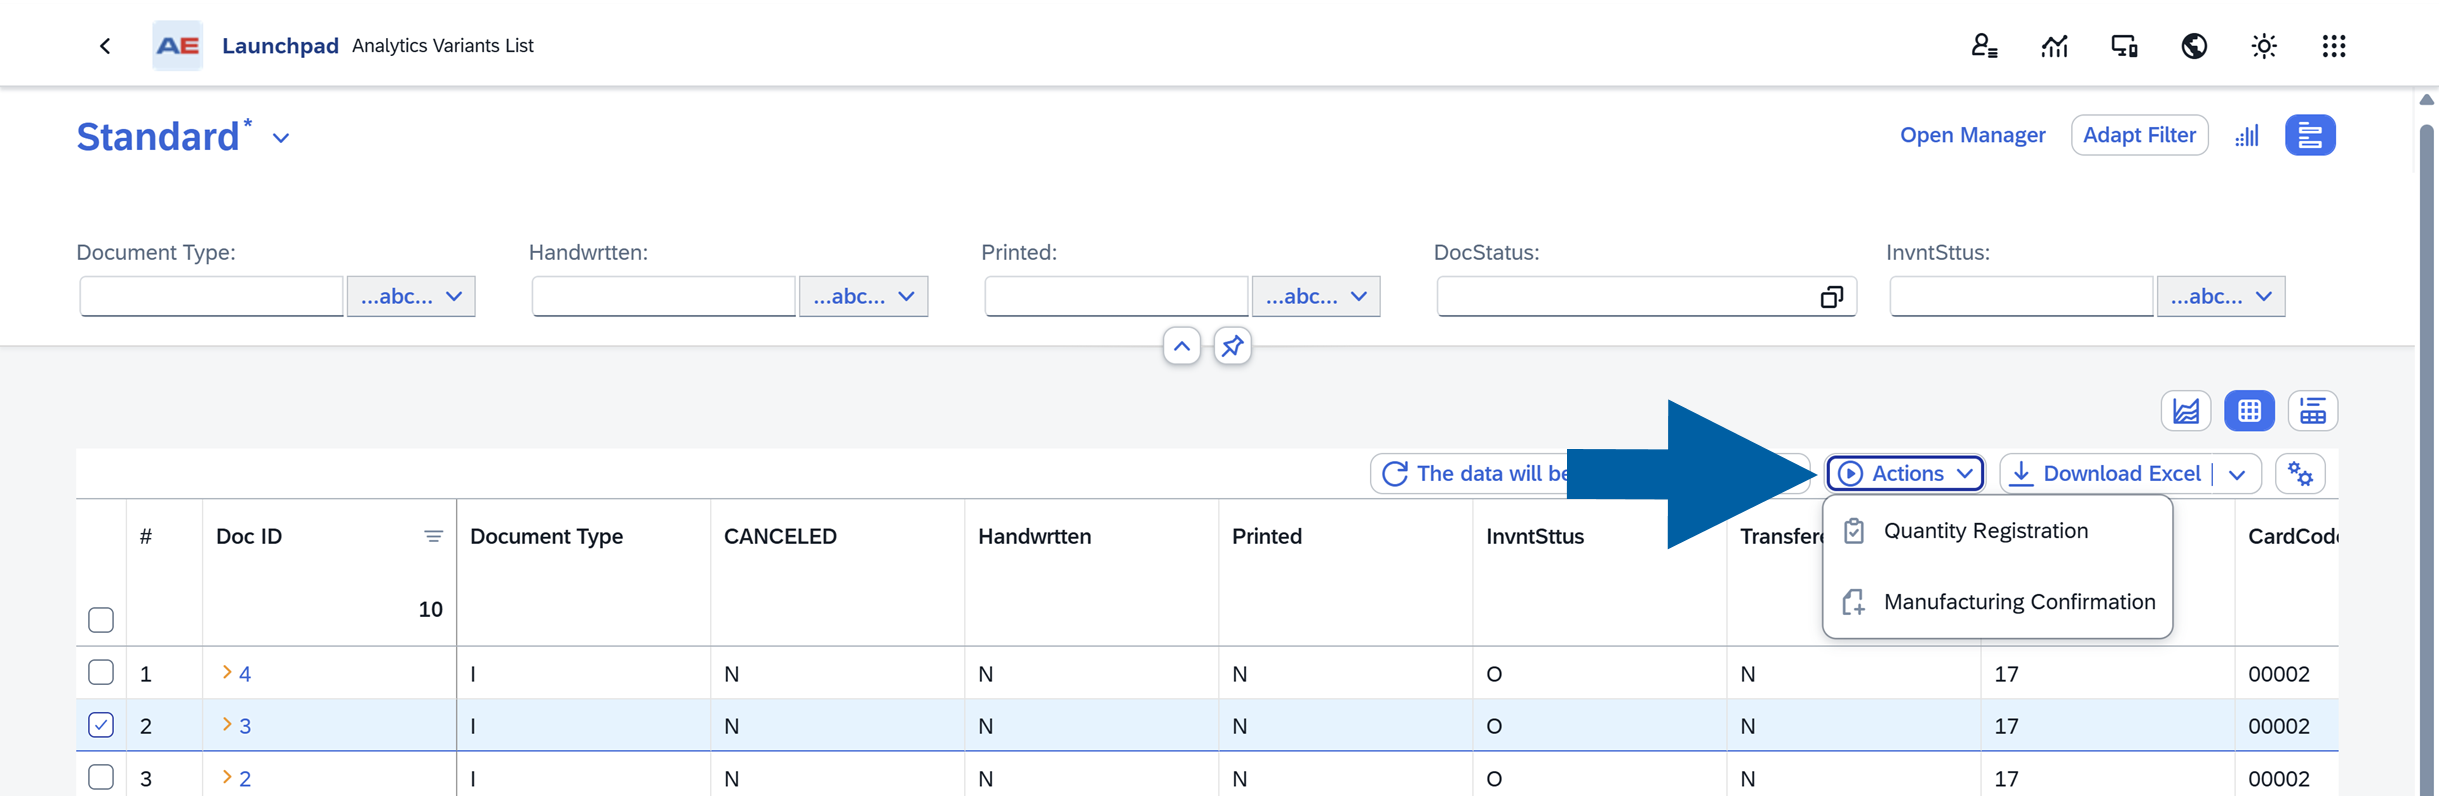
If one or more actions are visible, the report displays the Action button. Clicking it opens the list of available actions.
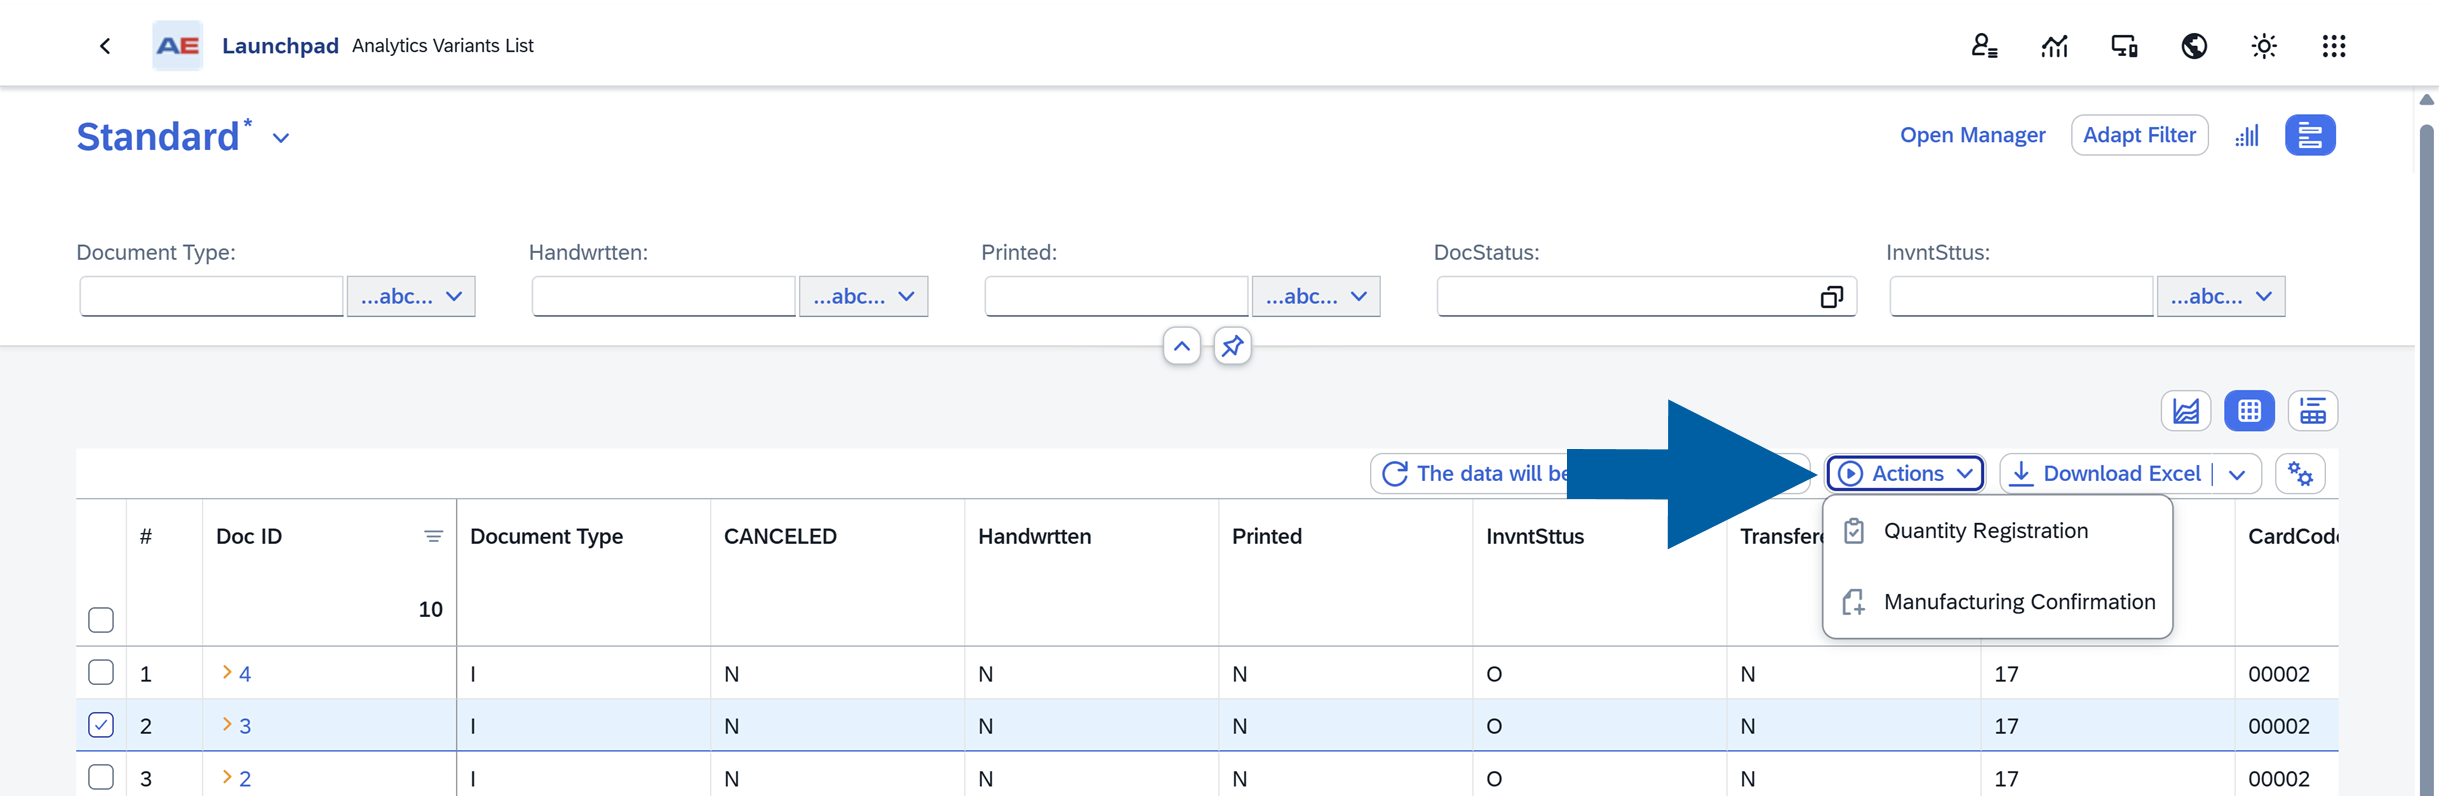
Analytics report in the Standard variant showing the Actions menu expanded above a data table. The Actions button is highlighted by a large blue arrow, and the menu lists Quantity Registration and Manufacturing Confirmation. The toolbar also includes Open Manager, Adapt Filter, and Download Excel. A selected row is highlighted in blue in the clean administrative report interface.

Execute actions in a report

To execute an action:

  1. Open the chosen Variant.

  2. Select one or more rows in the Table View of the report.
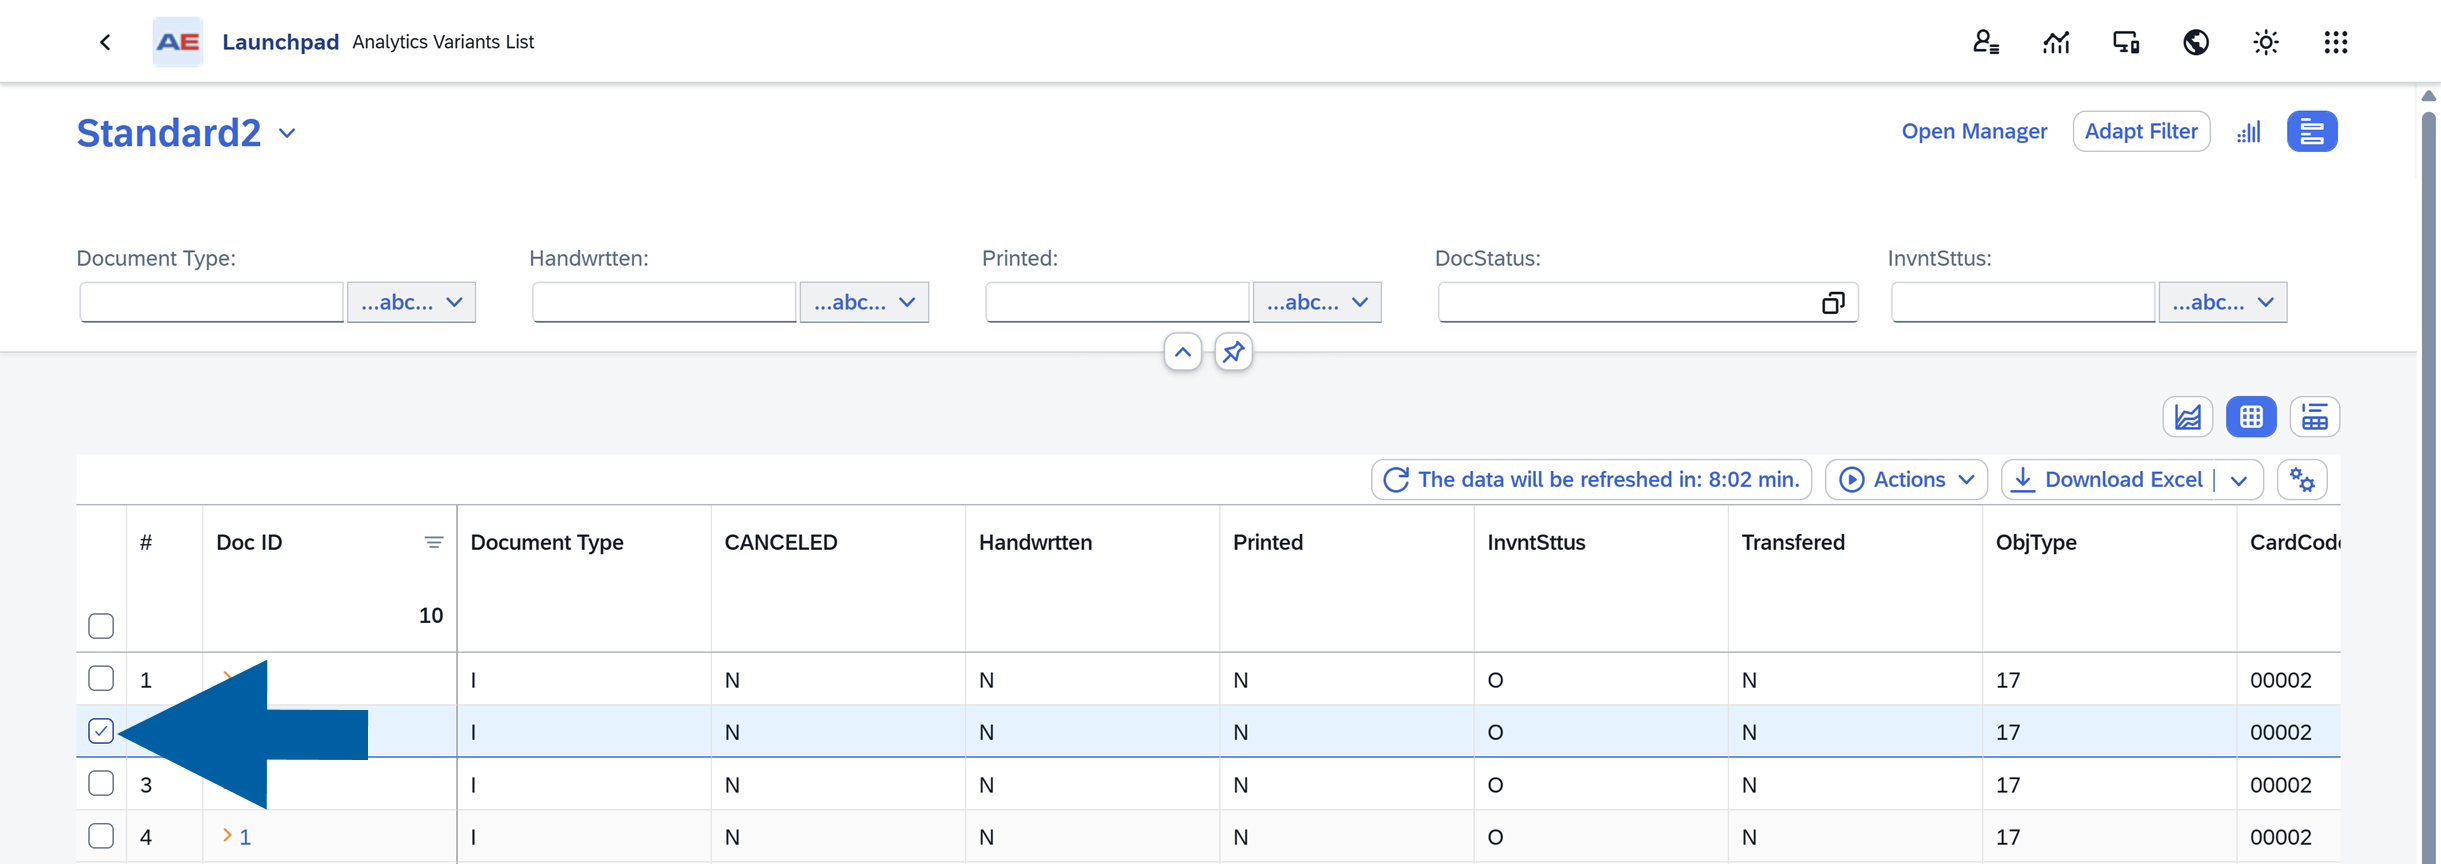
    Analytics report in the Standard2 variant with one table row selected. A large blue arrow points to the selected row checkbox on the left side of the table. The report header shows Open Manager and Adapt Filter, and the toolbar includes The data will be refreshed in: 8:02 min., Actions, Download Excel, and settings. Visible table headers include Doc ID, Document Type, CANCELED, Handwrt ten, Printed, InvntSttus, Transfered, ObjType, and CardCode. The clean administrative interface has a neutral tone.

    info

    Some actions can process multiple selected rows at the same time.

    When a user selects multiple rows, the system passes data from each selected row to the action. Whether multiple-row processing is supported depends on the action implementation.

    For example, users may release multiple production orders in a single operation.

  3. Click Actions.

    Analytics report in the Standard variant with the Actions menu expanded above the table. A large blue arrow points to the Actions button, which is next to Download Excel. The menu lists Quantity Registration and Manufacturing Confirmation. One table row is selected, and the administrative toolbar also shows Open Manager and Adapt Filter.

  4. Choose the action you want to run.

The system uses the selected rows and the configured parameter mappings to execute the action.

If no rows are selected, the action cannot be executed.

Best practices

  • Use Field value mappings whenever the action depends on report data.
  • Use Constant value mappings for fixed values that should always be passed.

Troubleshooting

Action is not visible

Check the following:

  • The action is added to the source
  • The action is enabled in the variant
  • The user has permission to use the action

Action is disabled or does not run

Check the following:

  • At least one row is selected
  • All required parameters are mapped
  • Required values are not empty
  • The action supports the selected row data

Wrong data is passed to the action

  • Review the parameter mappings and verify that the correct report columns are assigned to the correct action parameters.