You are currently viewing documentation for CompuTec AppEngine 3.0 (.NET 8).
If you are working with older environments, you may need the documentation for CompuTec AppEngine 2.0 based on .NET Framework: https://learn.computec.one/docs/appengine/2.0/.
Please note that CompuTec AppEngine 2.0 will be supported only until December 31, 2026. After this date, the product will no longer receive regular support or maintenance updates. Read more
As CompuTec AppEngine 3.0 introduces a new architecture, all CompuTec components must be updated together to ensure full compatibility.
Please review the CompuTec AppEngine 3.0 documentation before starting your installation or upgrade process.
Installation and configuration
Before you start
Before installing CompuTec AppEngine, make sure the following prerequisites are completed:
-
System requirements: All hardware and software requirements are met. Read more
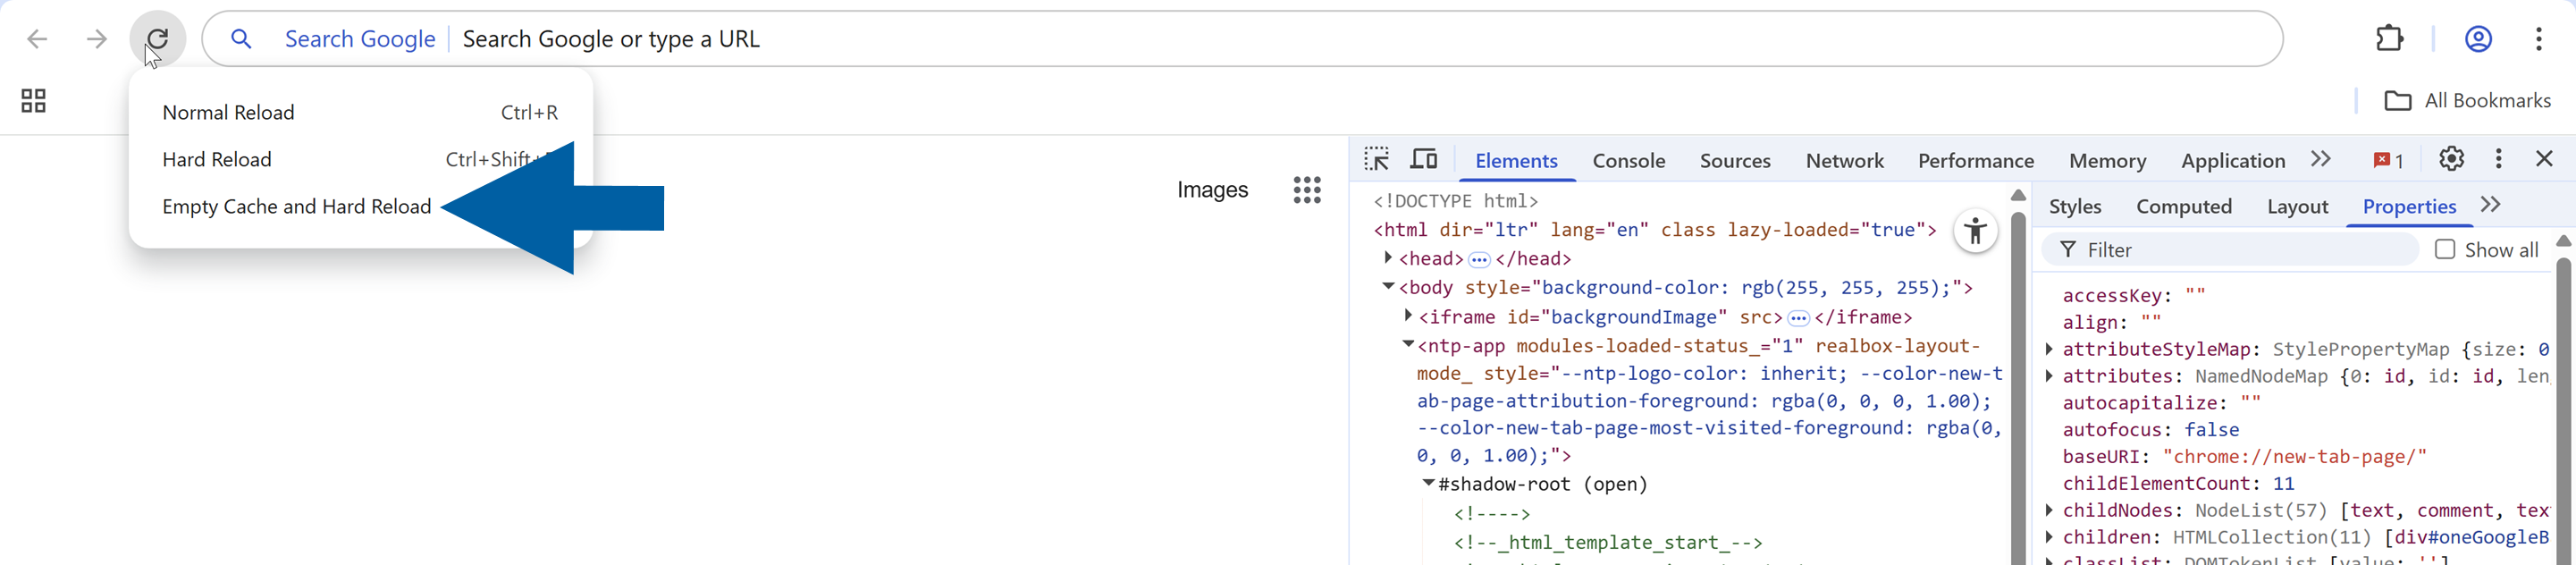
importantAfter upgrading from CompuTec AppEngine version 2.00 to version 3.00, please use the Empty Cache and Hard Reload option in your browser.
Click here to find out more
Here is an example for Google Chrome or Microsoft Edge:
-
Open Google Chrome or Microsoft Edge browser.
-
Click F12 to open Developers Tools.
-
Right-click on the Refresh button.
-
Choose the Empty Cache and Hard Reload option.
-
-
SAP server readiness: Your SAP server is properly configured and running. For detailed configuration steps, refer to the SAP Server Configuration Guides for either SAP HANA or Microsoft SQL Server.
-
Operator credentials in SLD: You've created and configured operator credentials in System Landscape Directory (SLD). Keep the operator password handy – you’ll need it when adding your company during the CompuTec AppEngine configuration. If you are using Cloud Control Center (CCC) for SAP Business One, see the related instructions for creating operator credentials in CCC.
-
Installation file: You have downloaded the CompuTec AppEngine installation file from the Download section of our documentation.
-
Make sure to disable Enable Query Validation for both the UI API and DI API in SAP Business One > Administration > System Initialization > General Settings > Services.
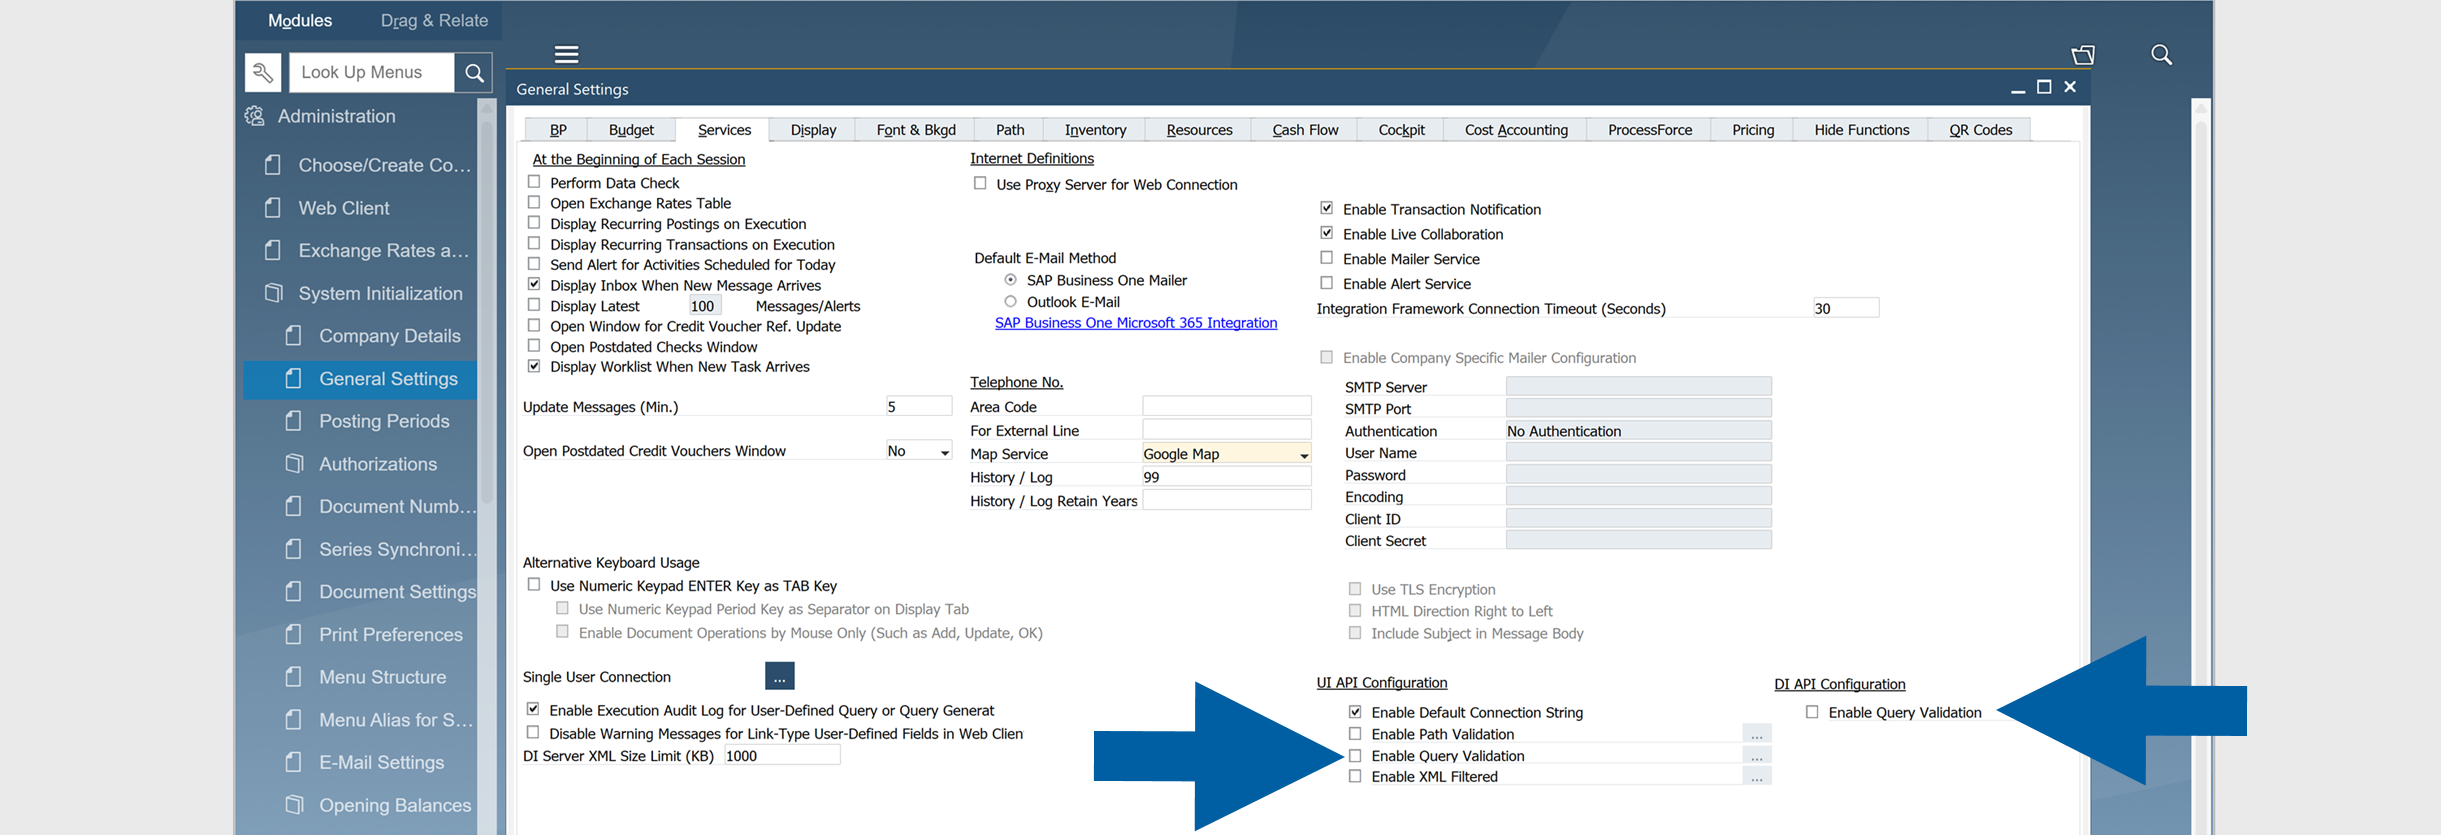 note
noteCompuTec AppEngine does not currently support the Enable Query Validation option. If either setting is enabled, you may see an error during the CompuTec AppEngine installation.
▶︎ Watch: CompuTec AppEngine – Prerequisites and Installation video
This short video will walk you through the required prerequisites and demonstrate the full installation process step by step.
Step 1: Install CompuTec AppEngine
To install CompuTec AppEngine, follow these steps:
-
Run the CompuTec AppEngine installation file downloaded from the Download section of our guide.
-
Click Install.

-
(optional) If it’s your first installation, you may need to install Microsoft .NET Runtime and Microsoft ASP.NET Core Shared Framework. Click Install and follow the on-screen installation steps.

-
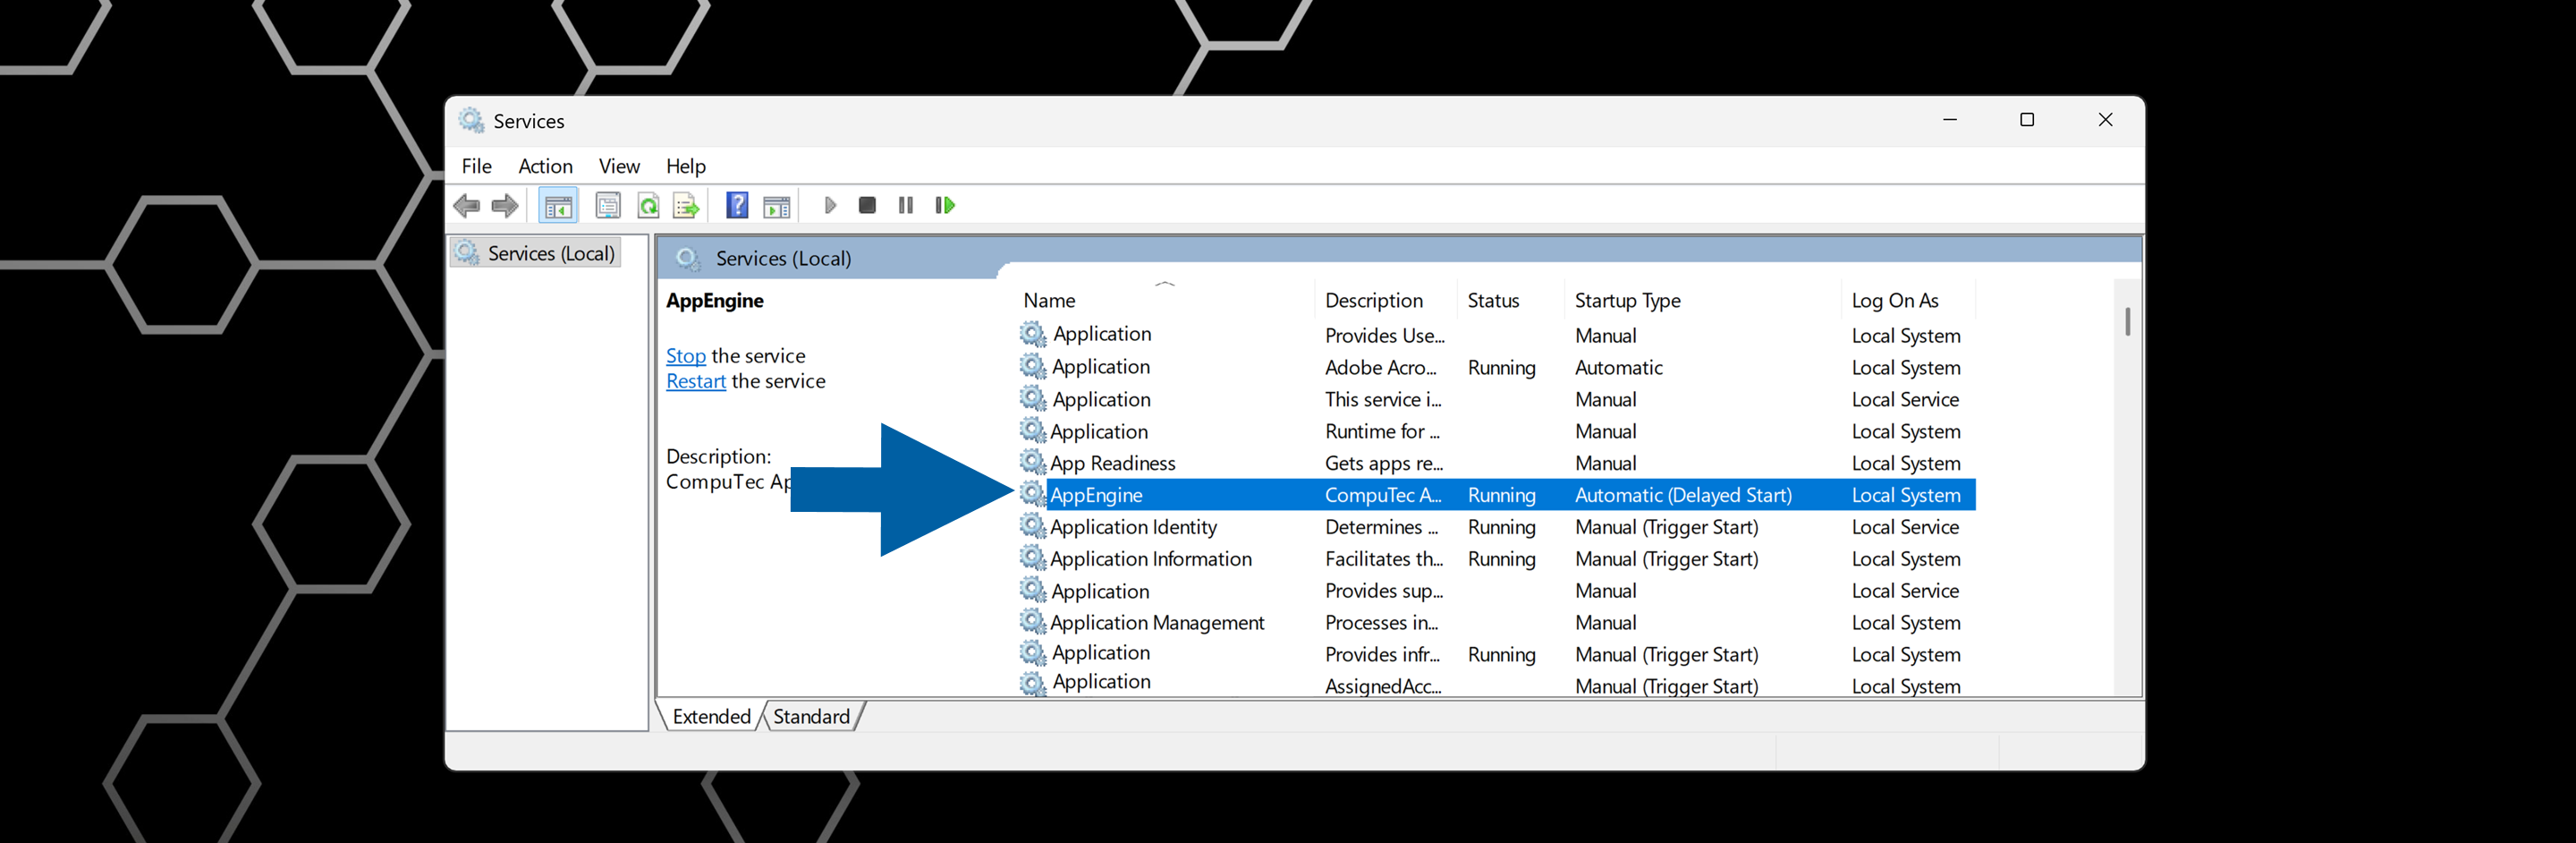
When the installation is completed, click Finish.

-
Open Services on your computer and confirm that the CompuTec AppEngine service is listed and running.
-
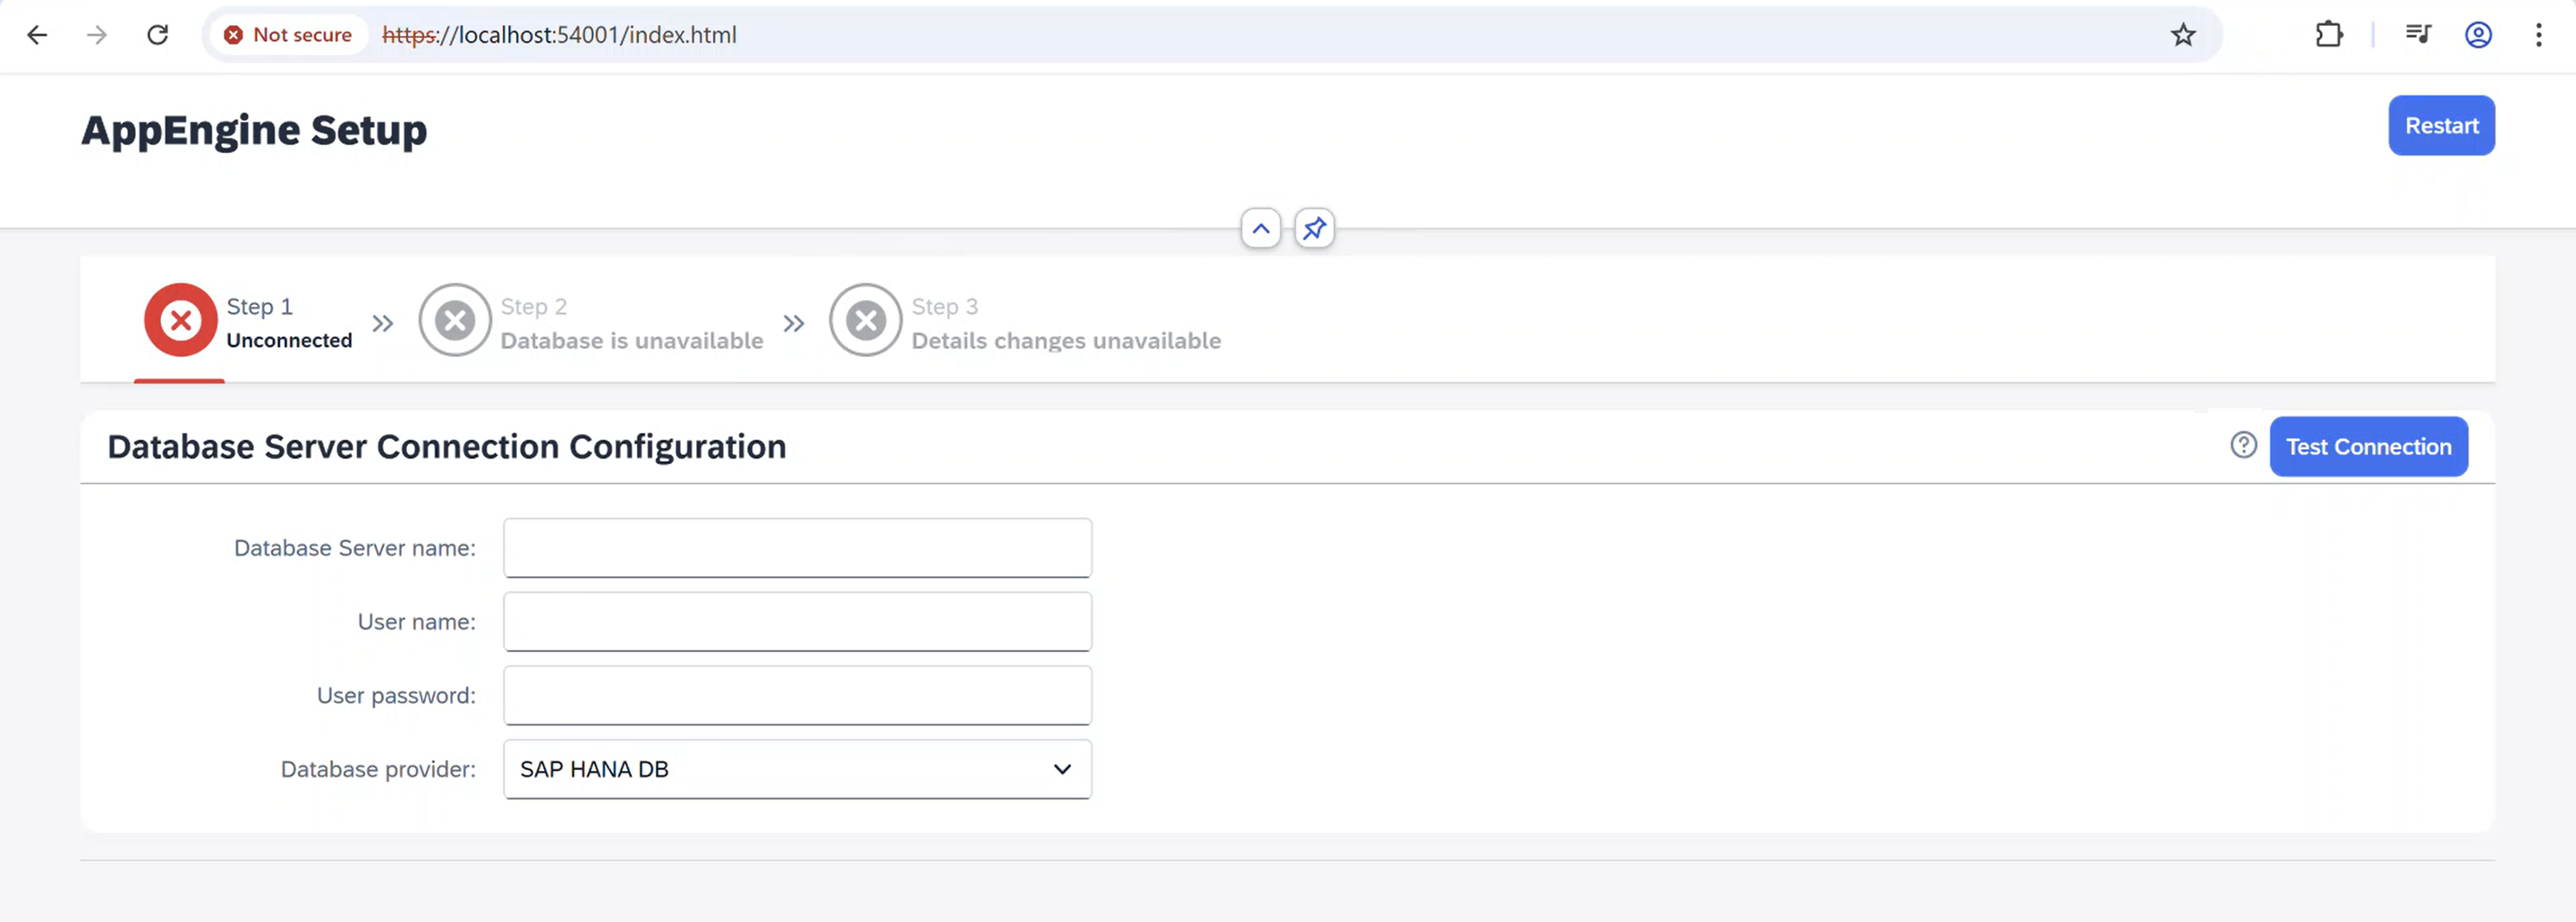
After installation, the CompuTec AppEngine page should open automatically in your default browser in the installation mode at: https://localhost:54001.
 info
infoCompuTec AppEngine starts in either production mode or installation mode, depending on the system state.
CompuTec AppEngine enters installation mode when:-
It can’t connect to the database server storing the CompuTec AppEngine configuration.
-
The configuration database doesn’t exist.
-
The configuration database requires an upgrade.
-
You've updated CompuTec AppEngine to the latest version and now you need to complete the database configuration and update connected companies.
If the CompuTec AppEngine page does not open automatically, you can open it manually at https://localhost:54001.
-
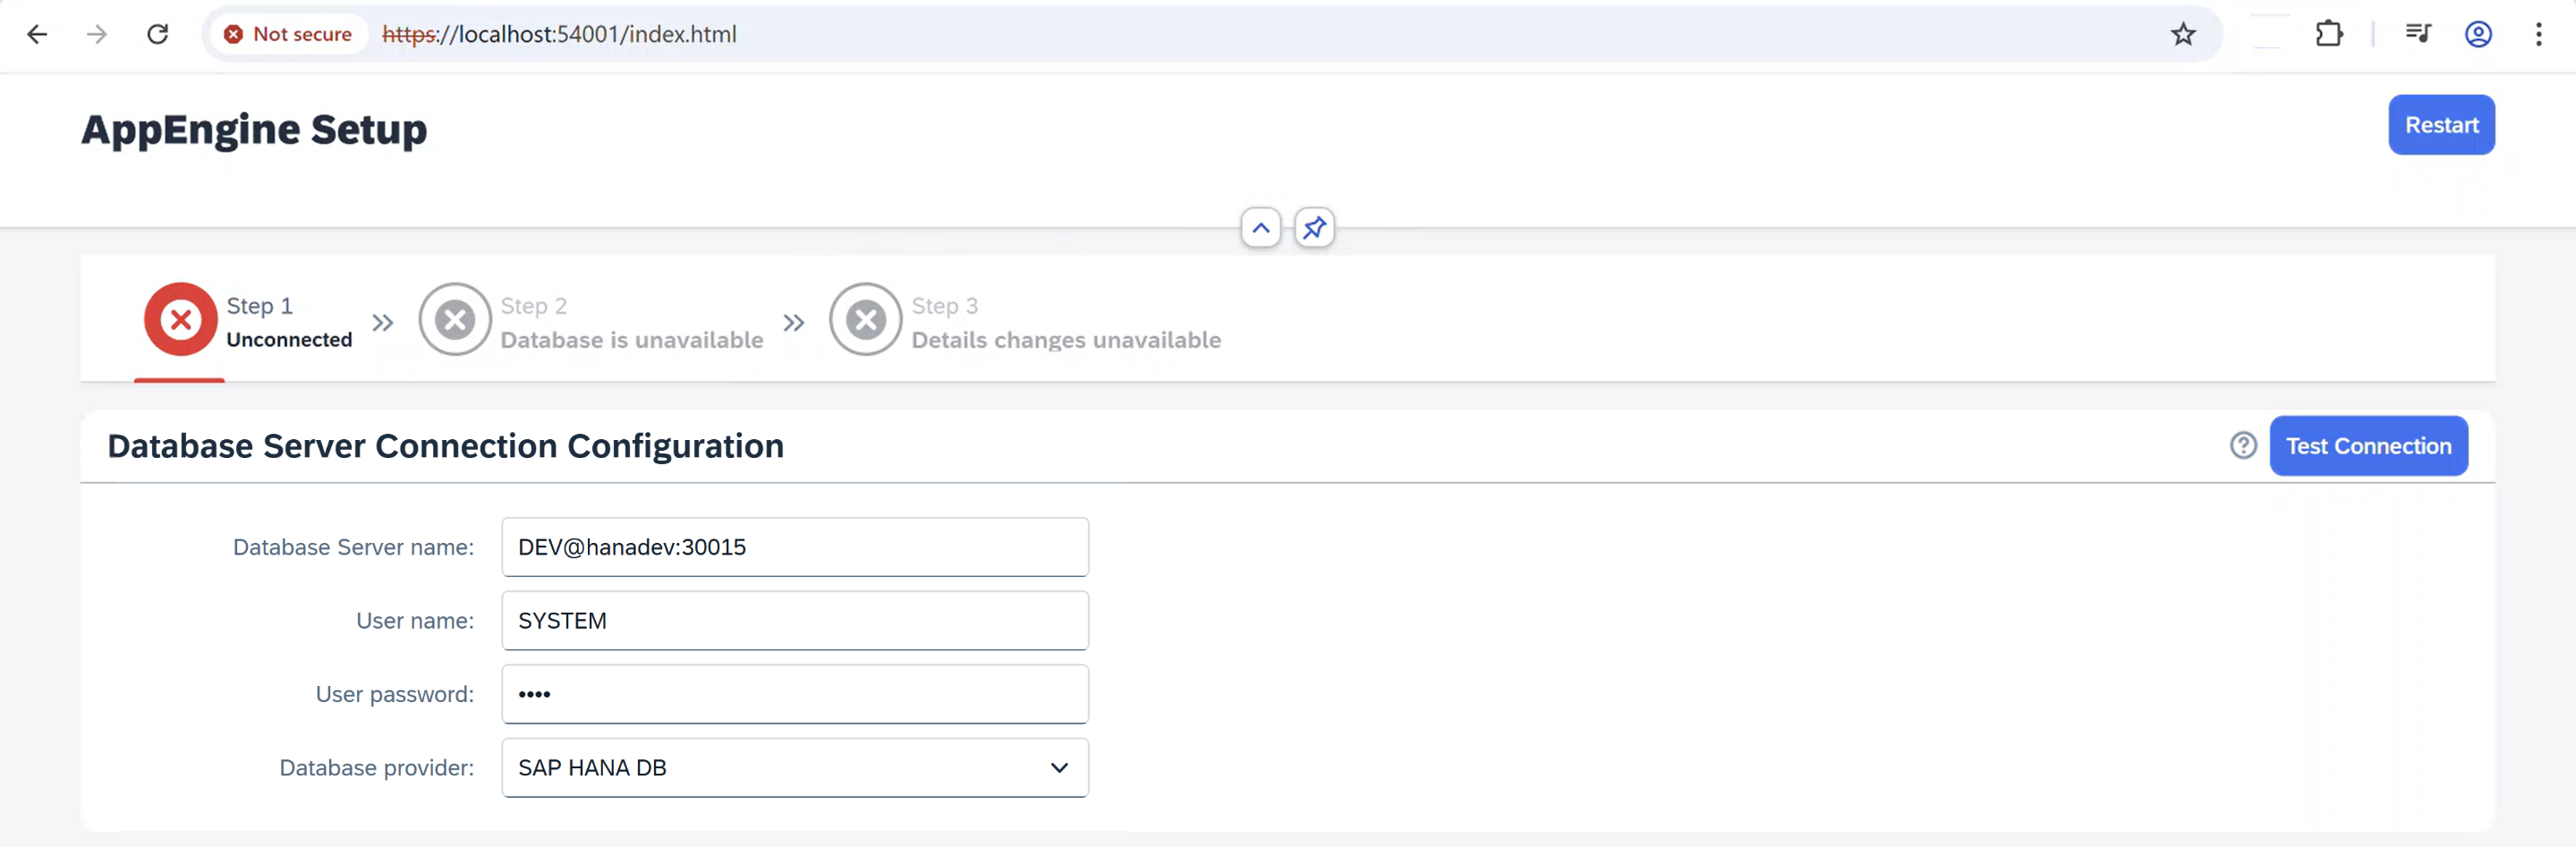
Step 2: Set up CompuTec AppEngine database
To set up a database, follow these steps:
-
On the CompuTec AppEngine page in your browser, enter the database connection details. It’s where the CompuTec AppEngine configuration schema will be created.
- Database Server name
- User name
- User password
- Database provider
-
Click Test Connection.
-
If the CompuTec AppEngine database does not exist, click Create Database. If it exists but requires an upgrade, click Migrate Database.

-
After you create or migrate the database, click Save Changes.
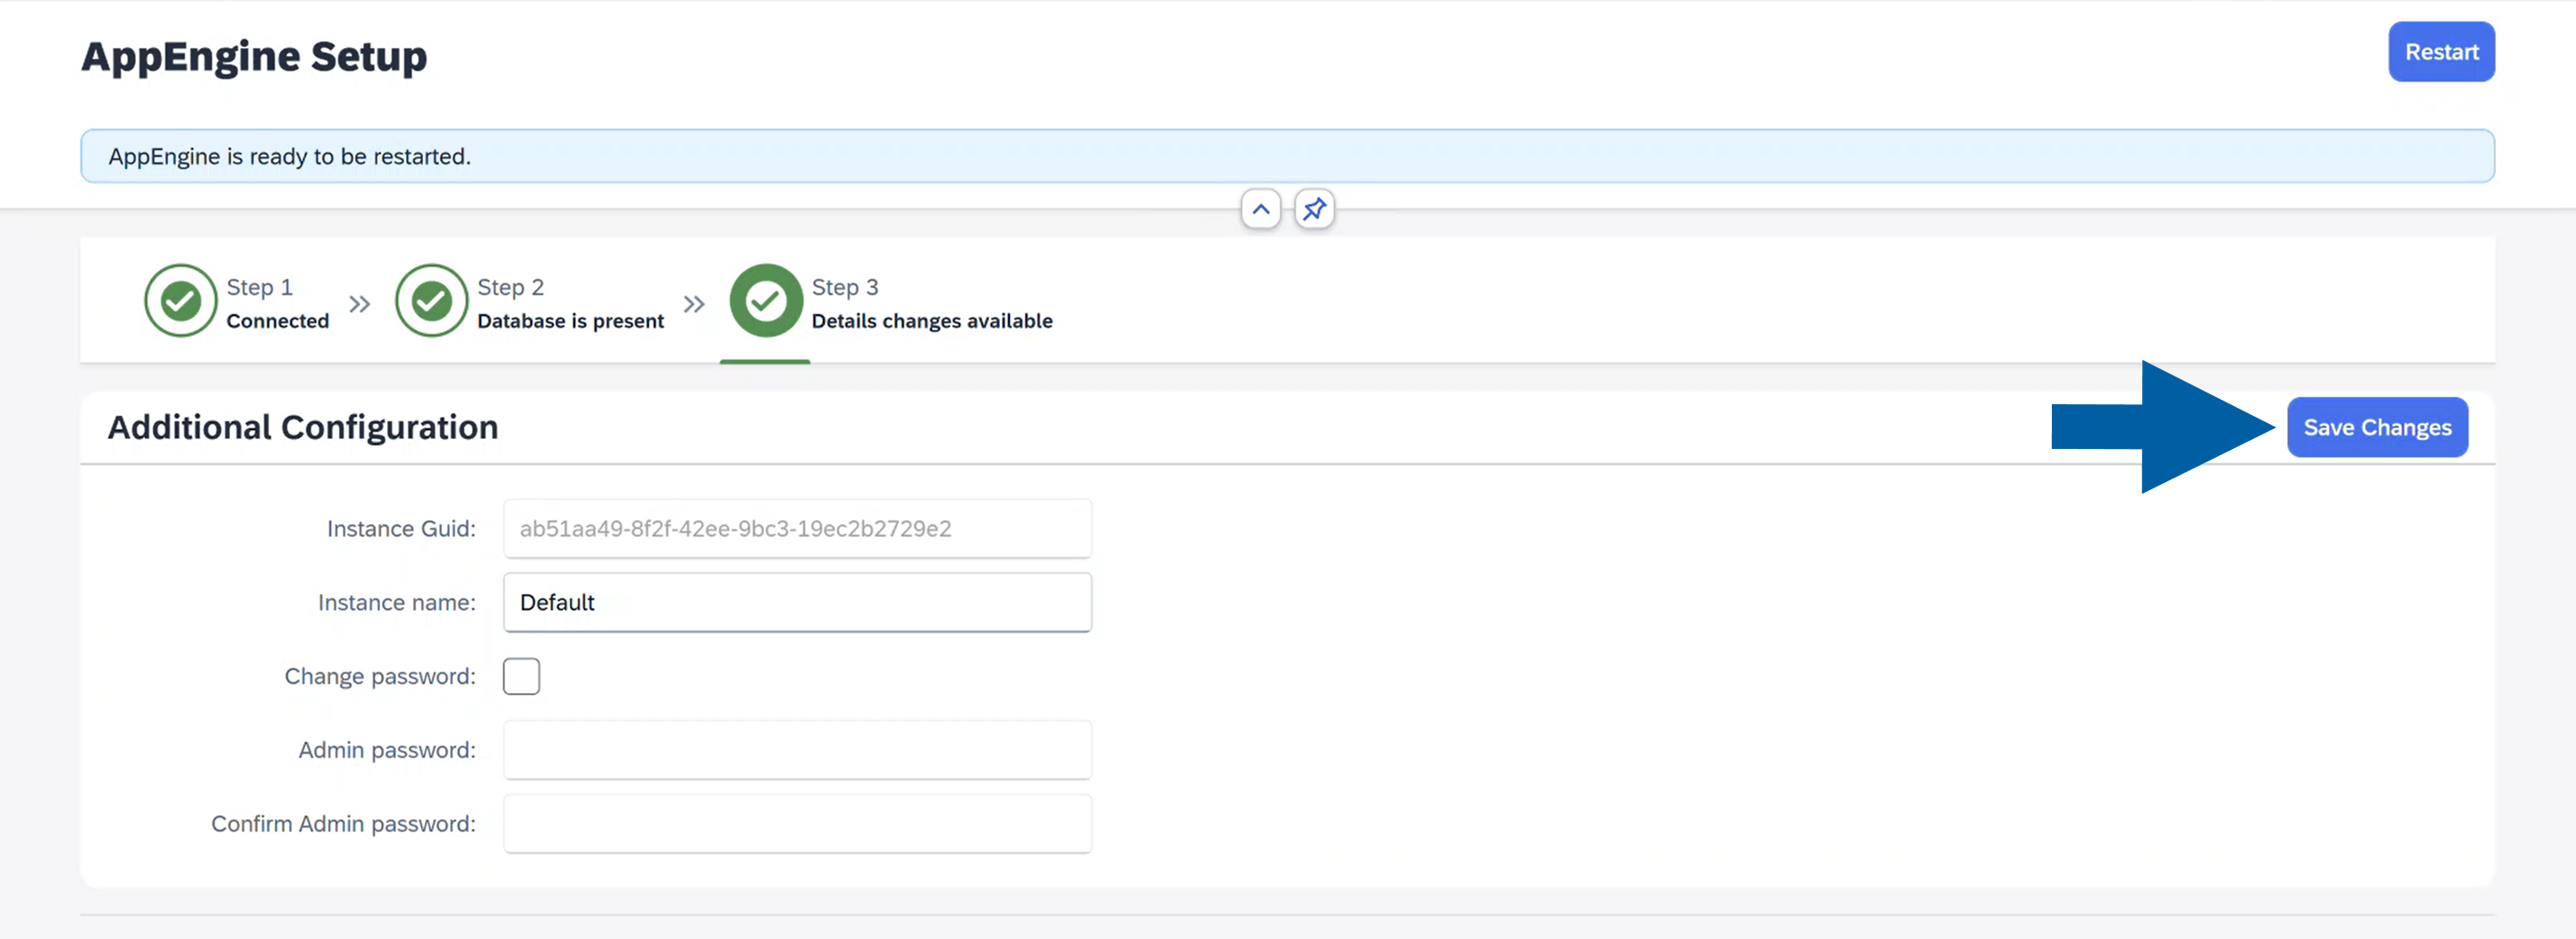
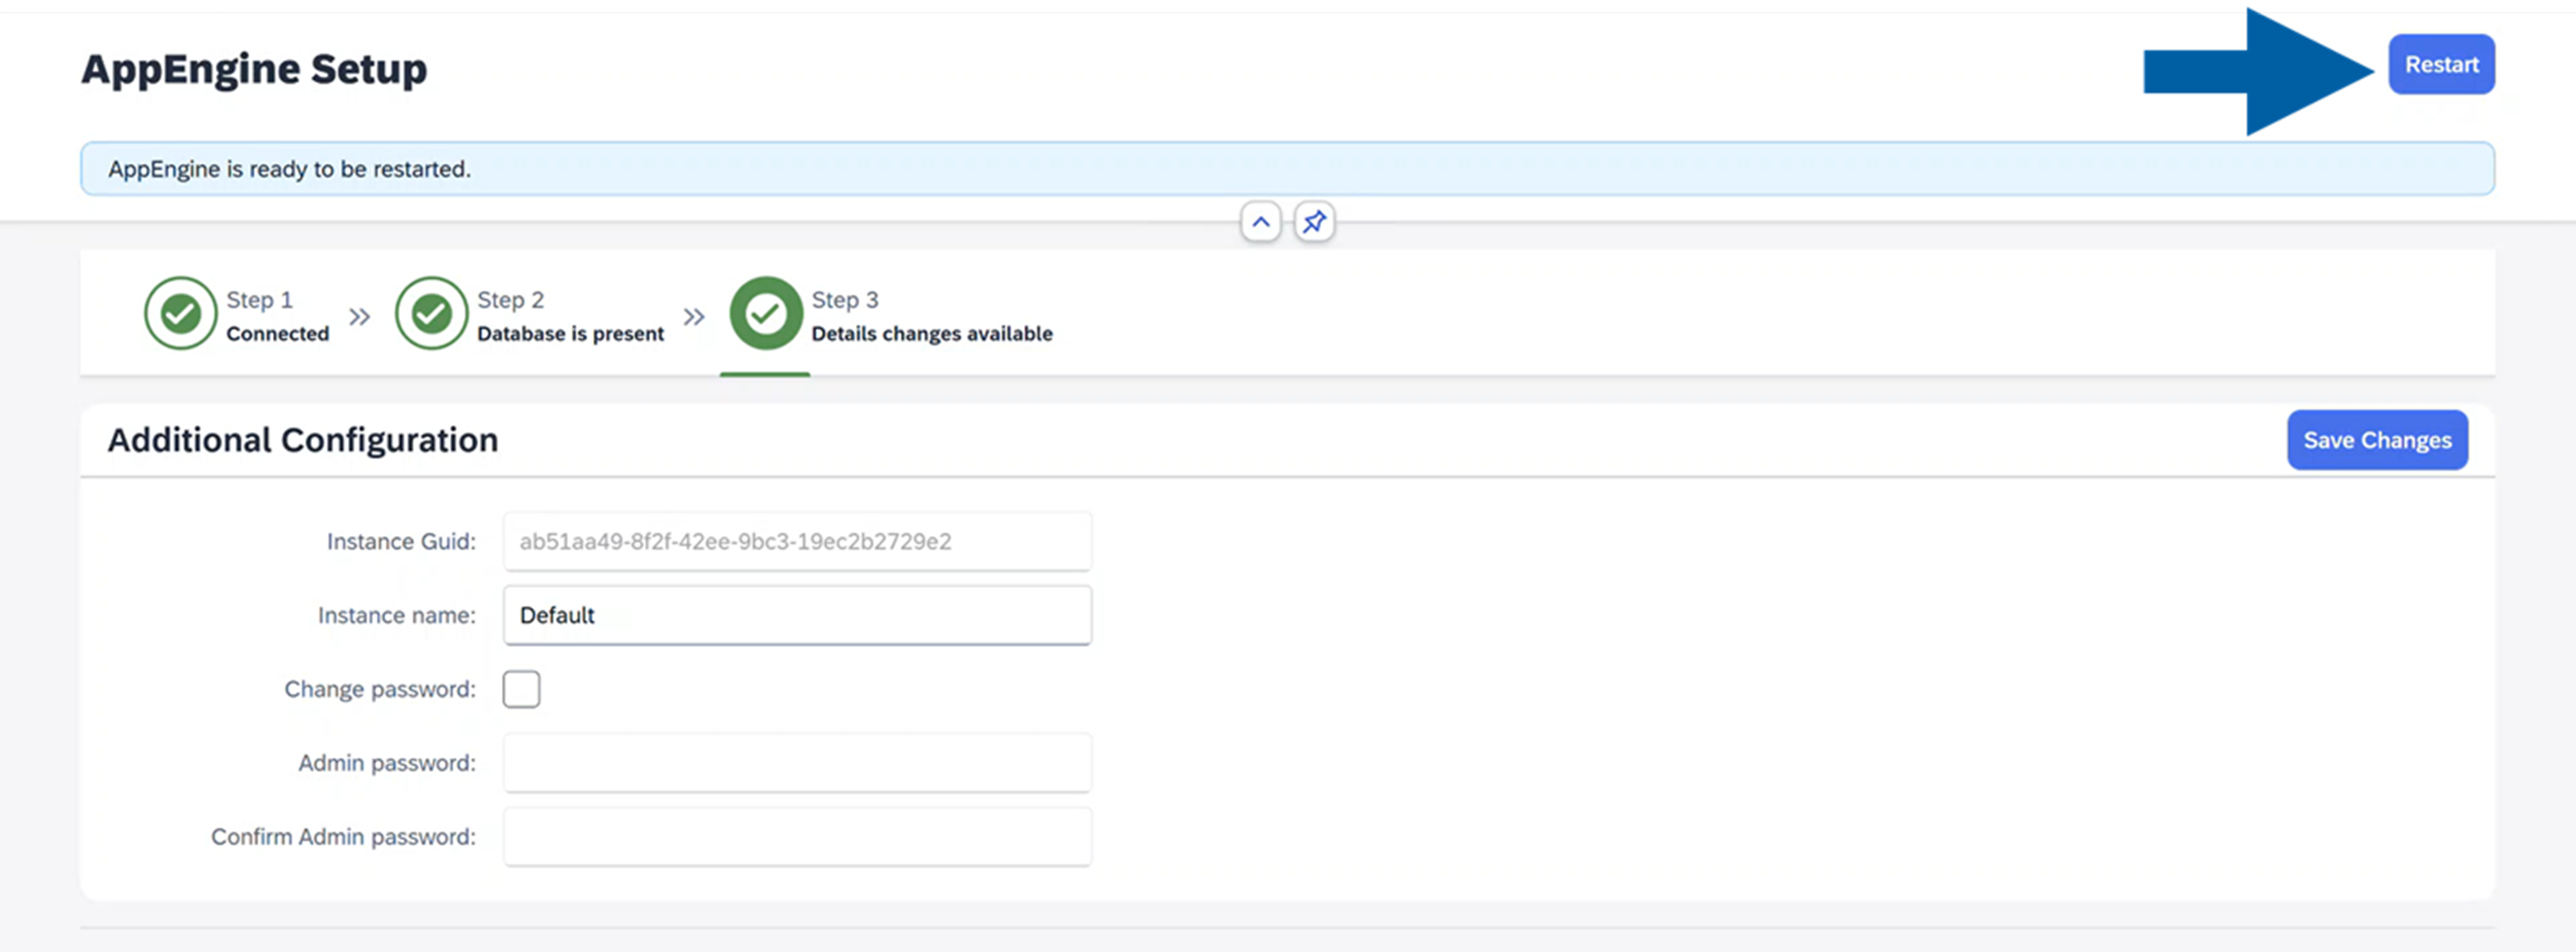
-
Click Restart.
-
After restarting, CompuTec AppEngine will open in your browser at https://localhost:54001. From there, you can access:
- CompuTec AppEngine Administration Panel, where you can manage CompuTec AppEngine settings and plugin (app) configuration and installation,
- CompuTec AppEngine Launchpad, where you can access installed plugins (apps) and analytics.
 info
infoPort 54001 is the default one and can be changed in the Administration Panel > Configuration > Advanced Configuration.

Step 3: Configure CompuTec AppEngine
▶︎ Watch: CompuTec AppEngine Configuration
This short video will walk you through the essential settings in the CompuTec AppEngine Administration Panel.
Follow these steps to configure CompuTec AppEngine after the installation:
-
On the CompuTec AppEngine page in your browser, click Administration.
-
If this is your first installation, log in using the default credentials:
- Administrator ID: CTSiteUser
- Password: 1234
noteYou can change your password in Administration Panel > System > Password.

Step 4: Connect CompuTec AppEngine to the System Landscape Directory (SLD)
System Landscape Directory (SLD) maintains information about the SAP Business One landscape. Connecting CompuTec AppEngine to the SLD enables it to detect and manage SAP companies.
To configure a connection to the SLD server, follow these steps:
-
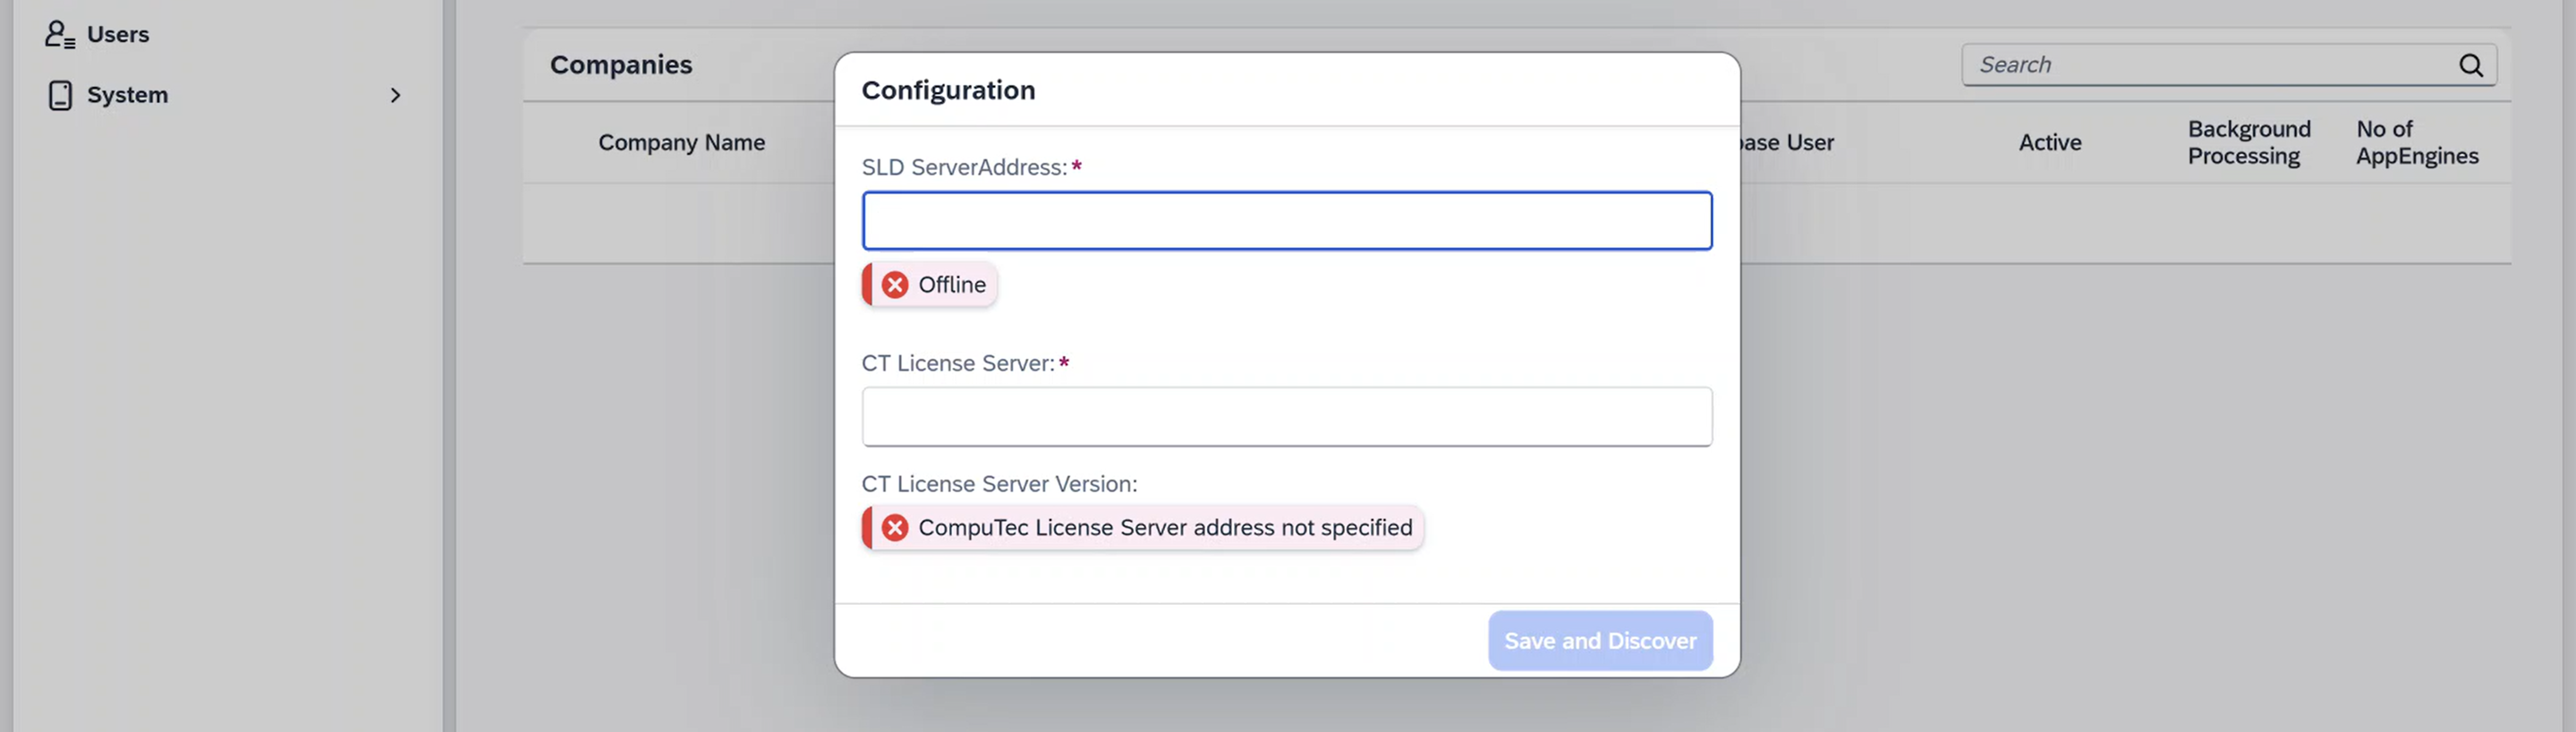
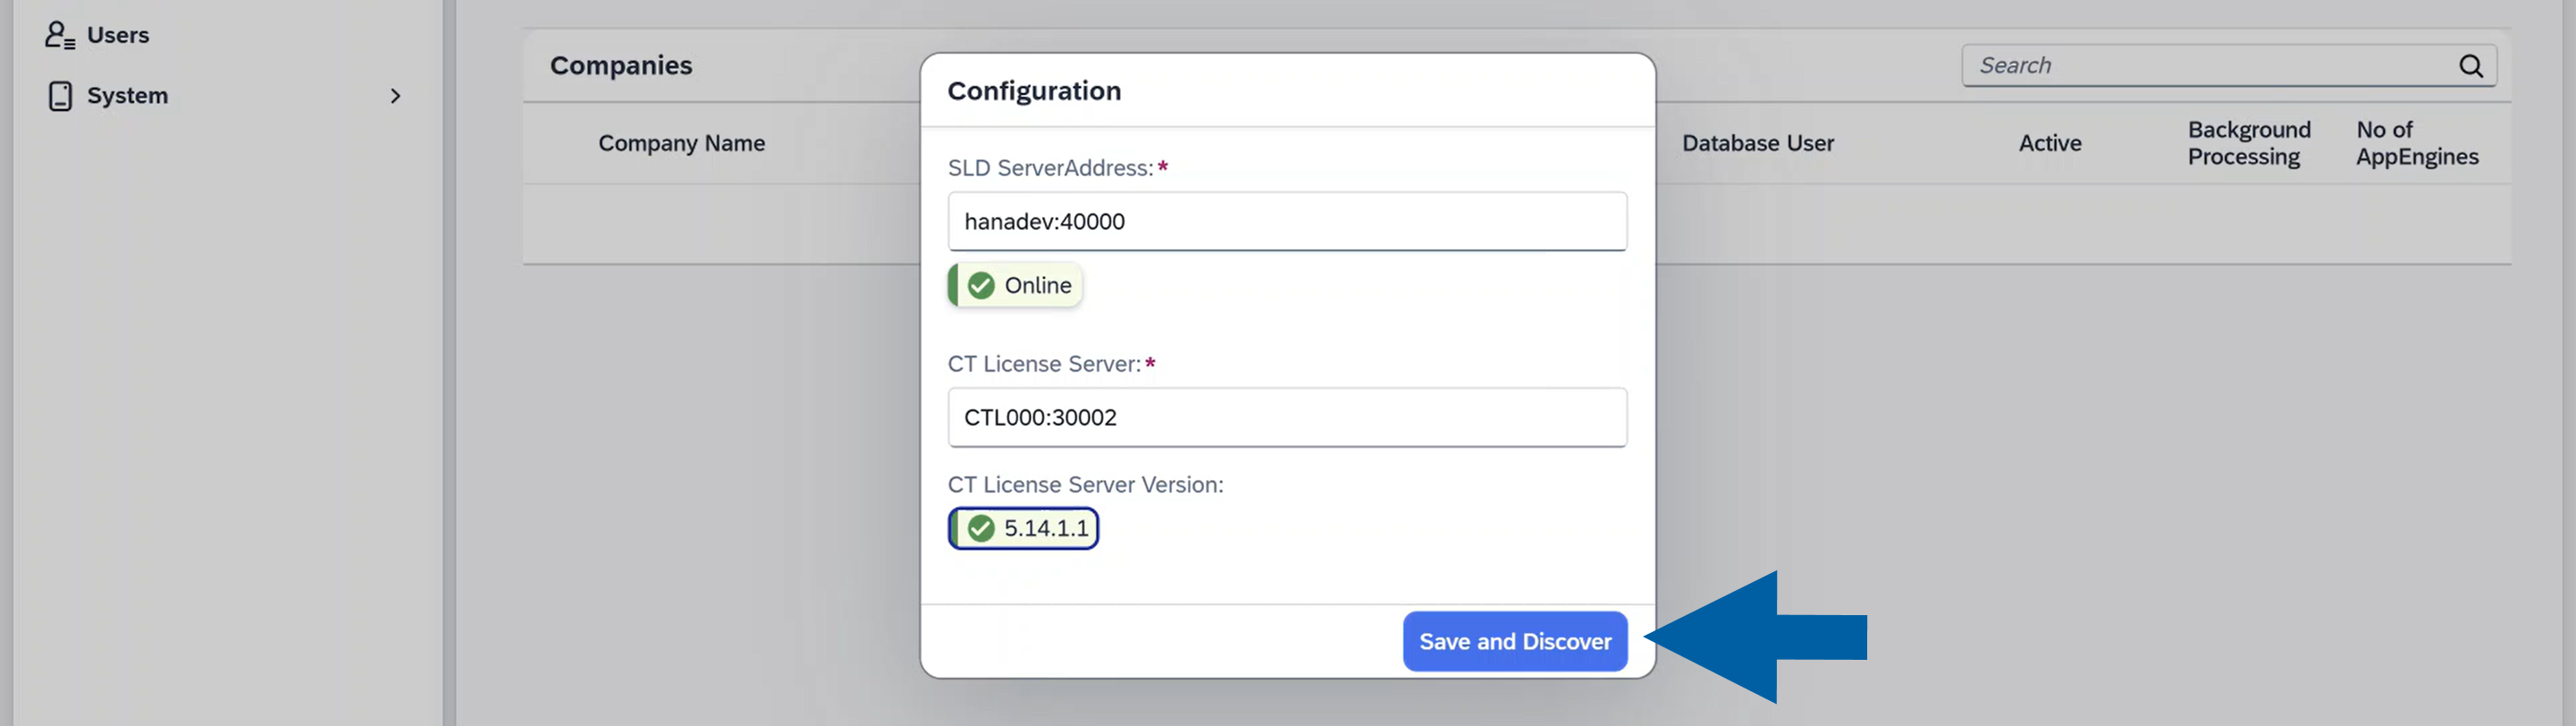
In the CompuTec AppEngine Administration Panel, navigate to Configuration.
-
Click Discover.

-
Enter the SLD Server Address and CompuTec License Server address.
 note
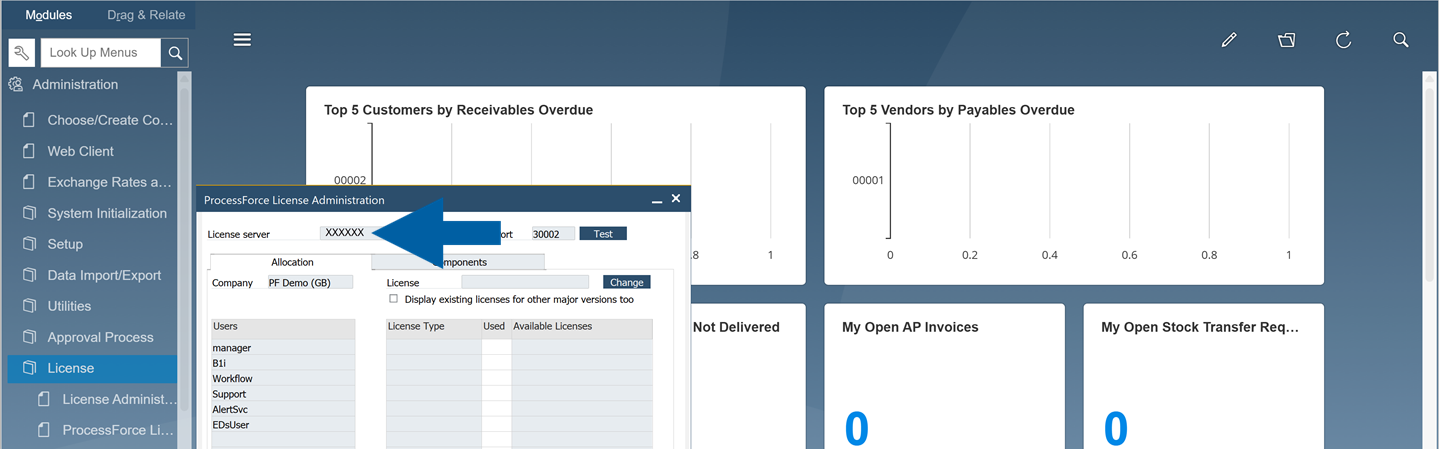
noteYou can find the SLD Server Address in SAP Business One > Administration > License > License Administration.
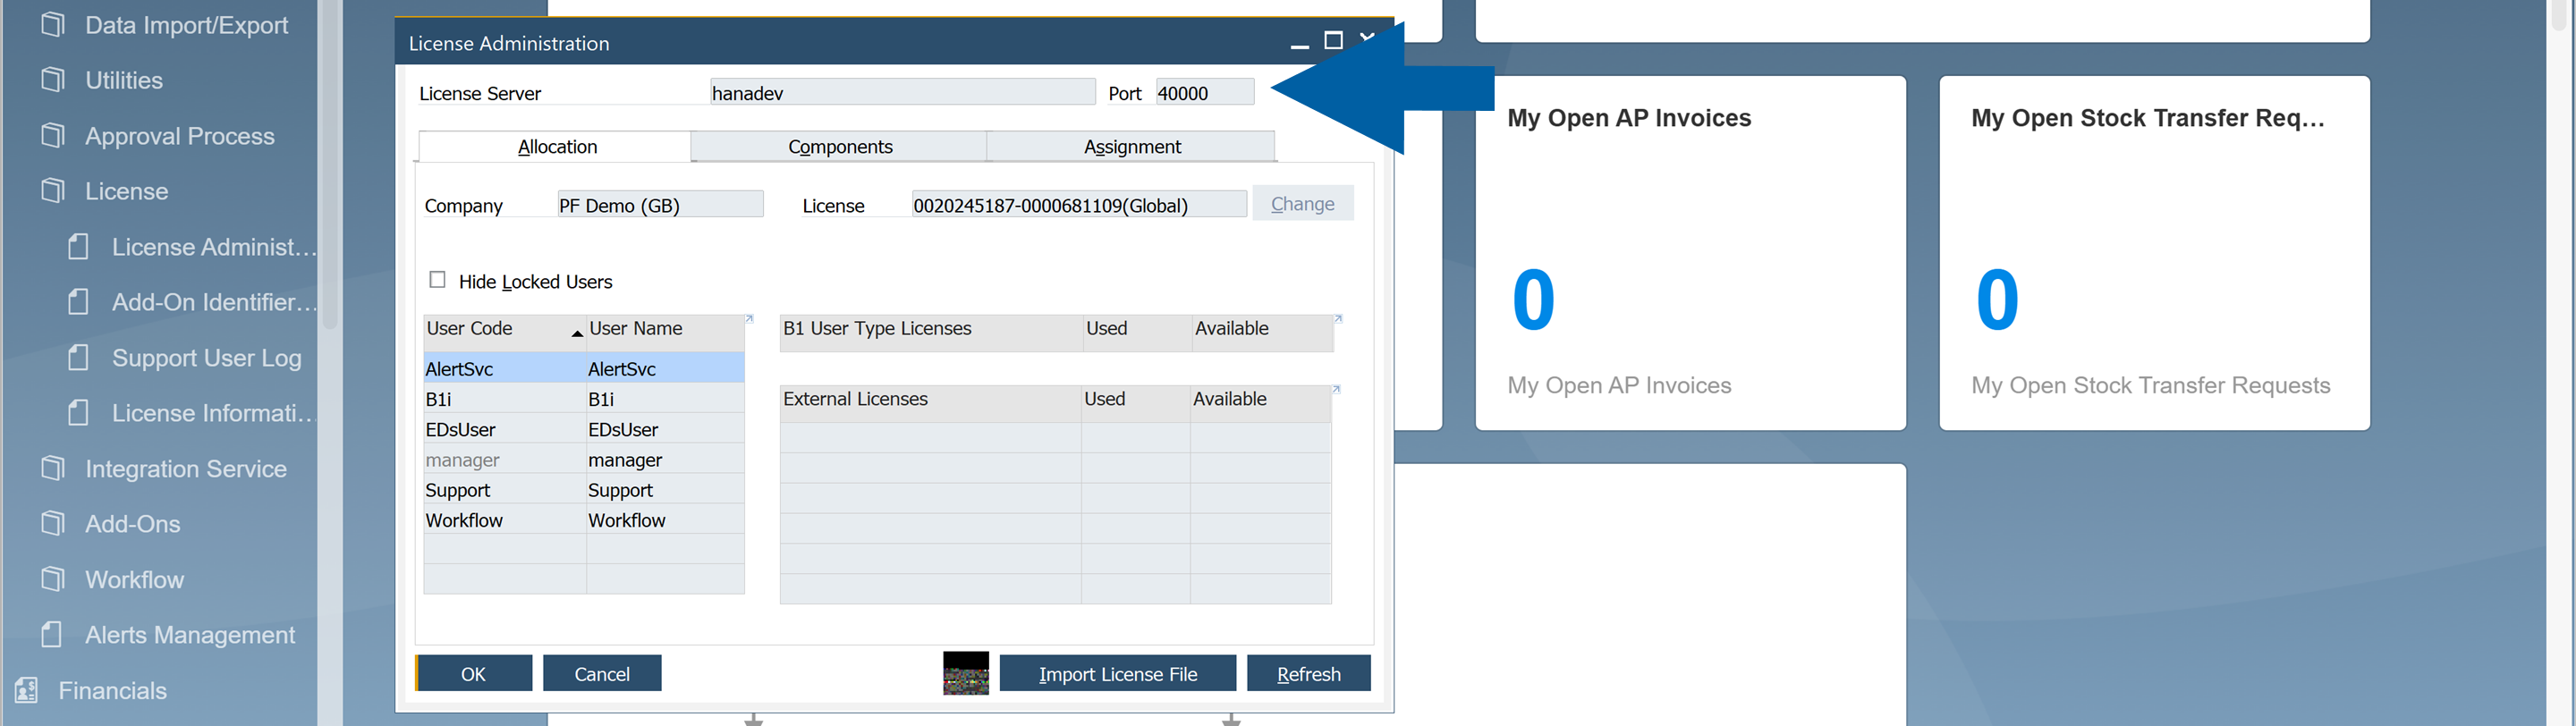
You can check your CompuTec License Server Address in two ways:
Using CompuTec Service Manager
If you have CompuTec Service Manager installed:
-
Run Command Prompt on your computer, type:
hostname, and press Enter. -
Here you’ll find the first part of your server address. In our example, it’s
CTL000.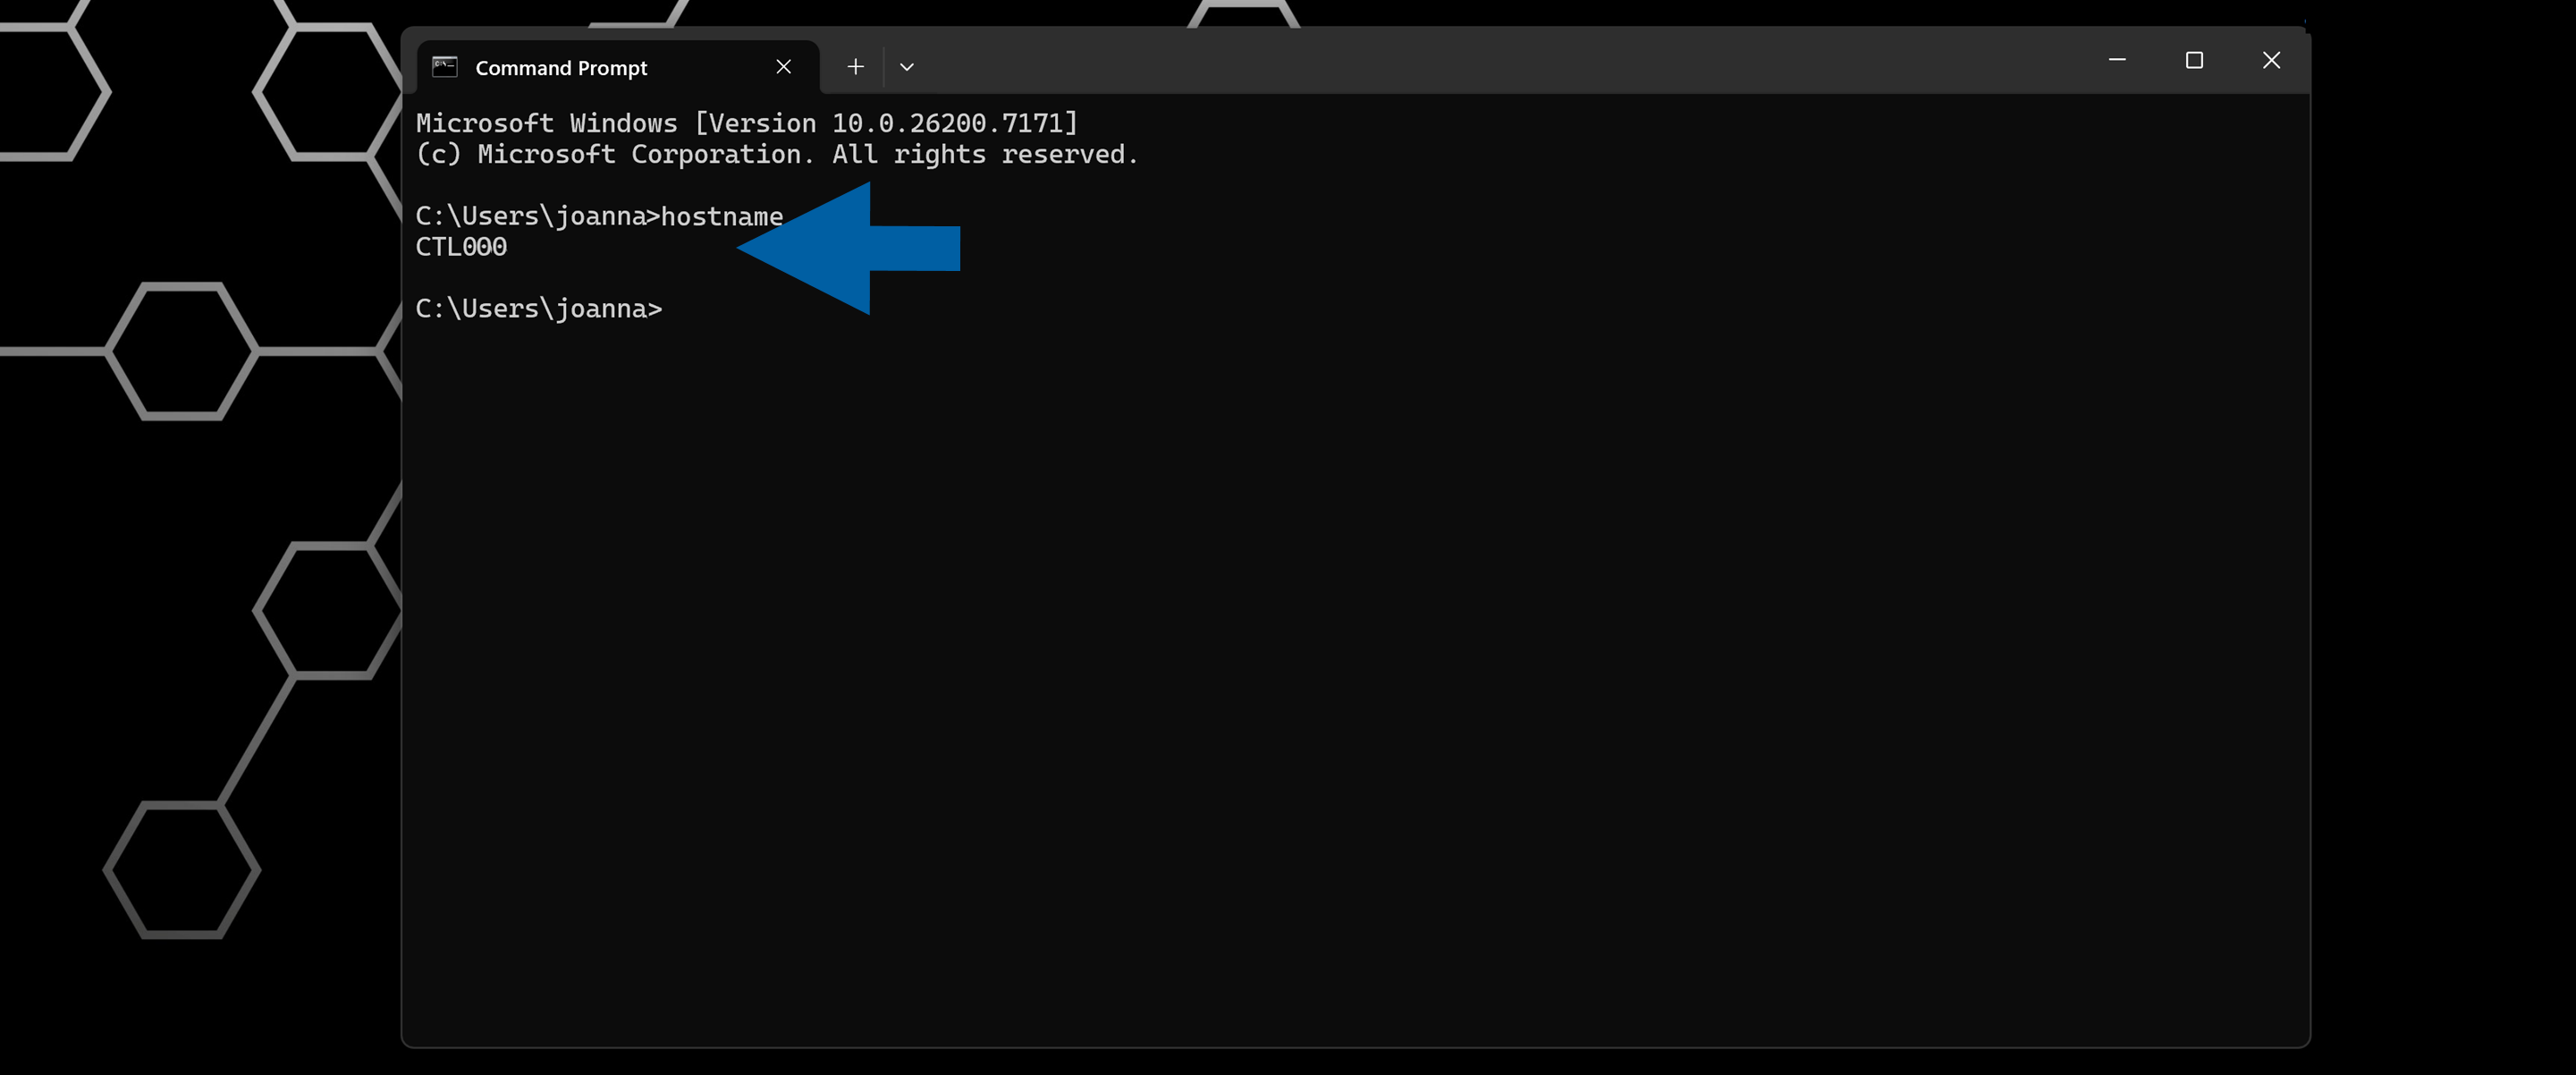
-
Now, run CompuTec Service Manager on your computer and click Settings.

-
Here you’ll find the port number. In our example, it’s
30002.
-
In our example, the CT License Server is
CTL000:30002.
If you have CompuTec ProcessForce installed
-
Open SAP Business One.
-
Go to Administration > License > ProcessForce License Administration.
-
Here you’ll find the CompuTec License Server Address.
-
-
Click Save and Discover.
-
When prompted, enter the B1SiteUser password. This is the password you created for the operator in the System Landscape Directory (SLD).

-
Click Yes to restart CompuTec AppEngine.

-
Done! CompuTec AppEngine will now retrieve the list of all available companies.
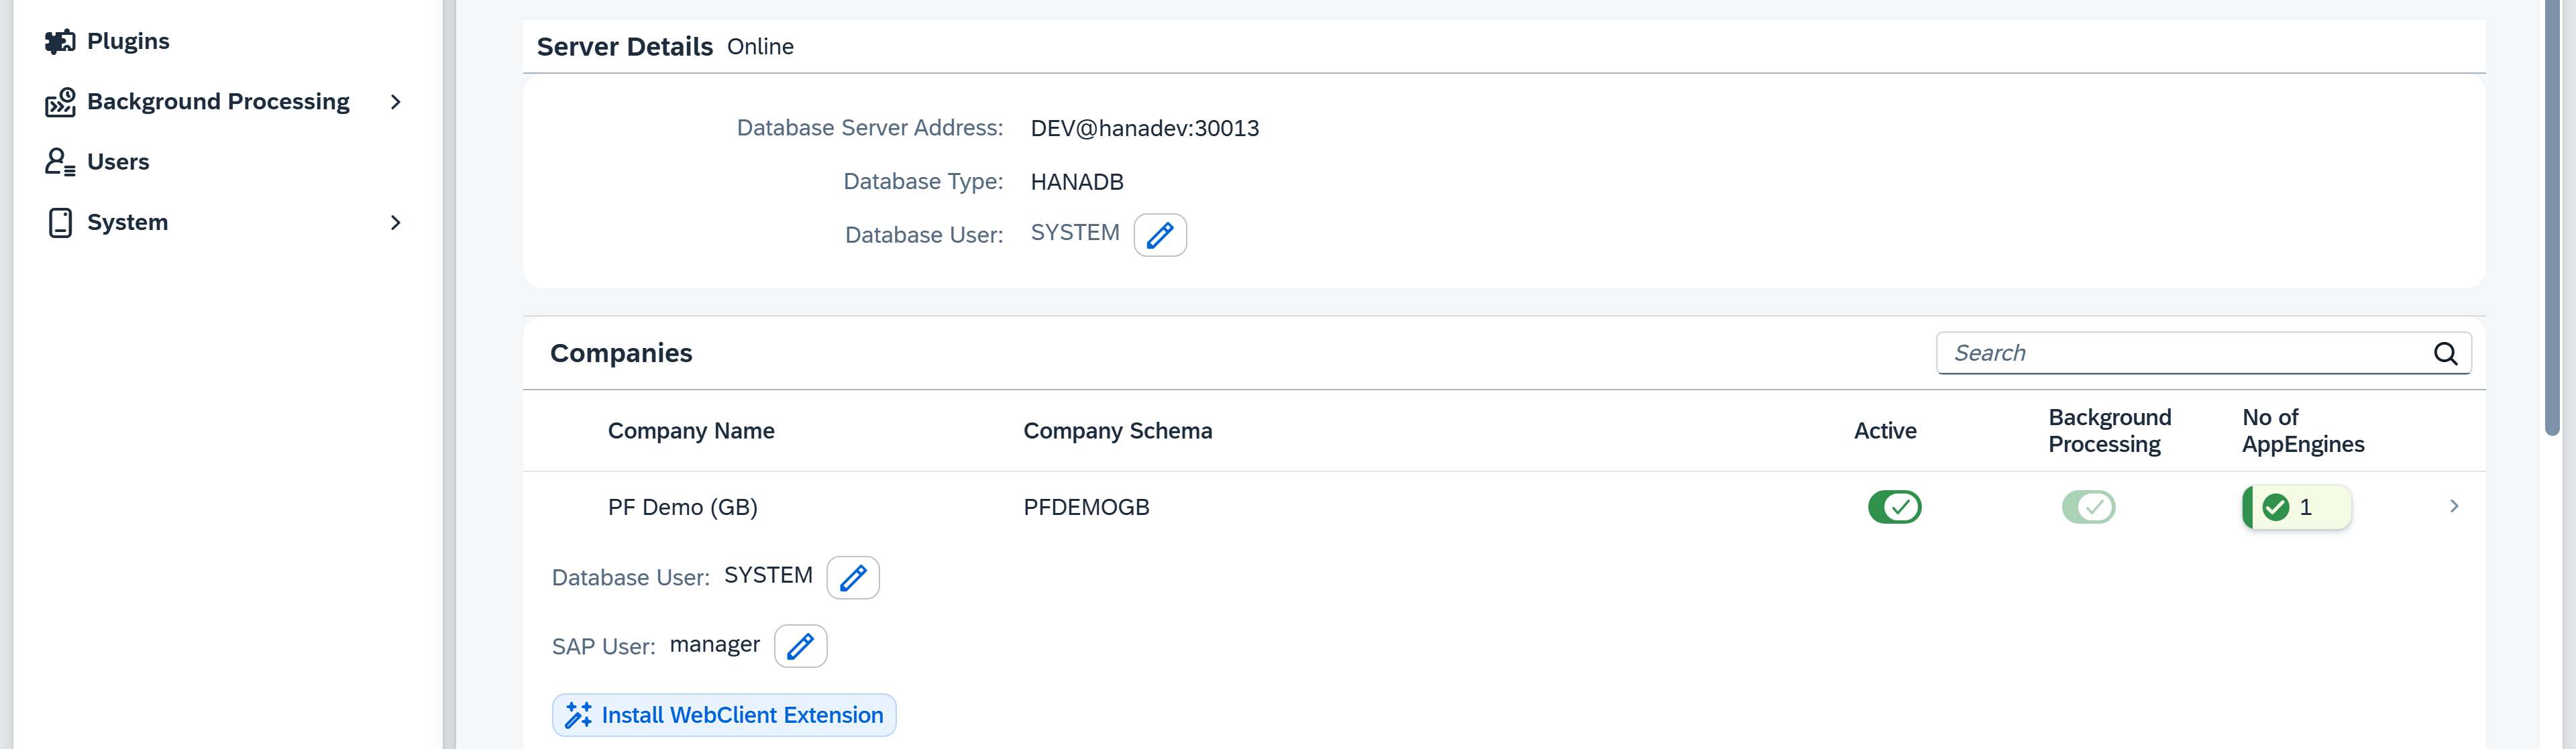
Step 5: Activate a company in CompuTec AppEngine
To activate a company in CompuTec AppEngine, follow these steps:
-
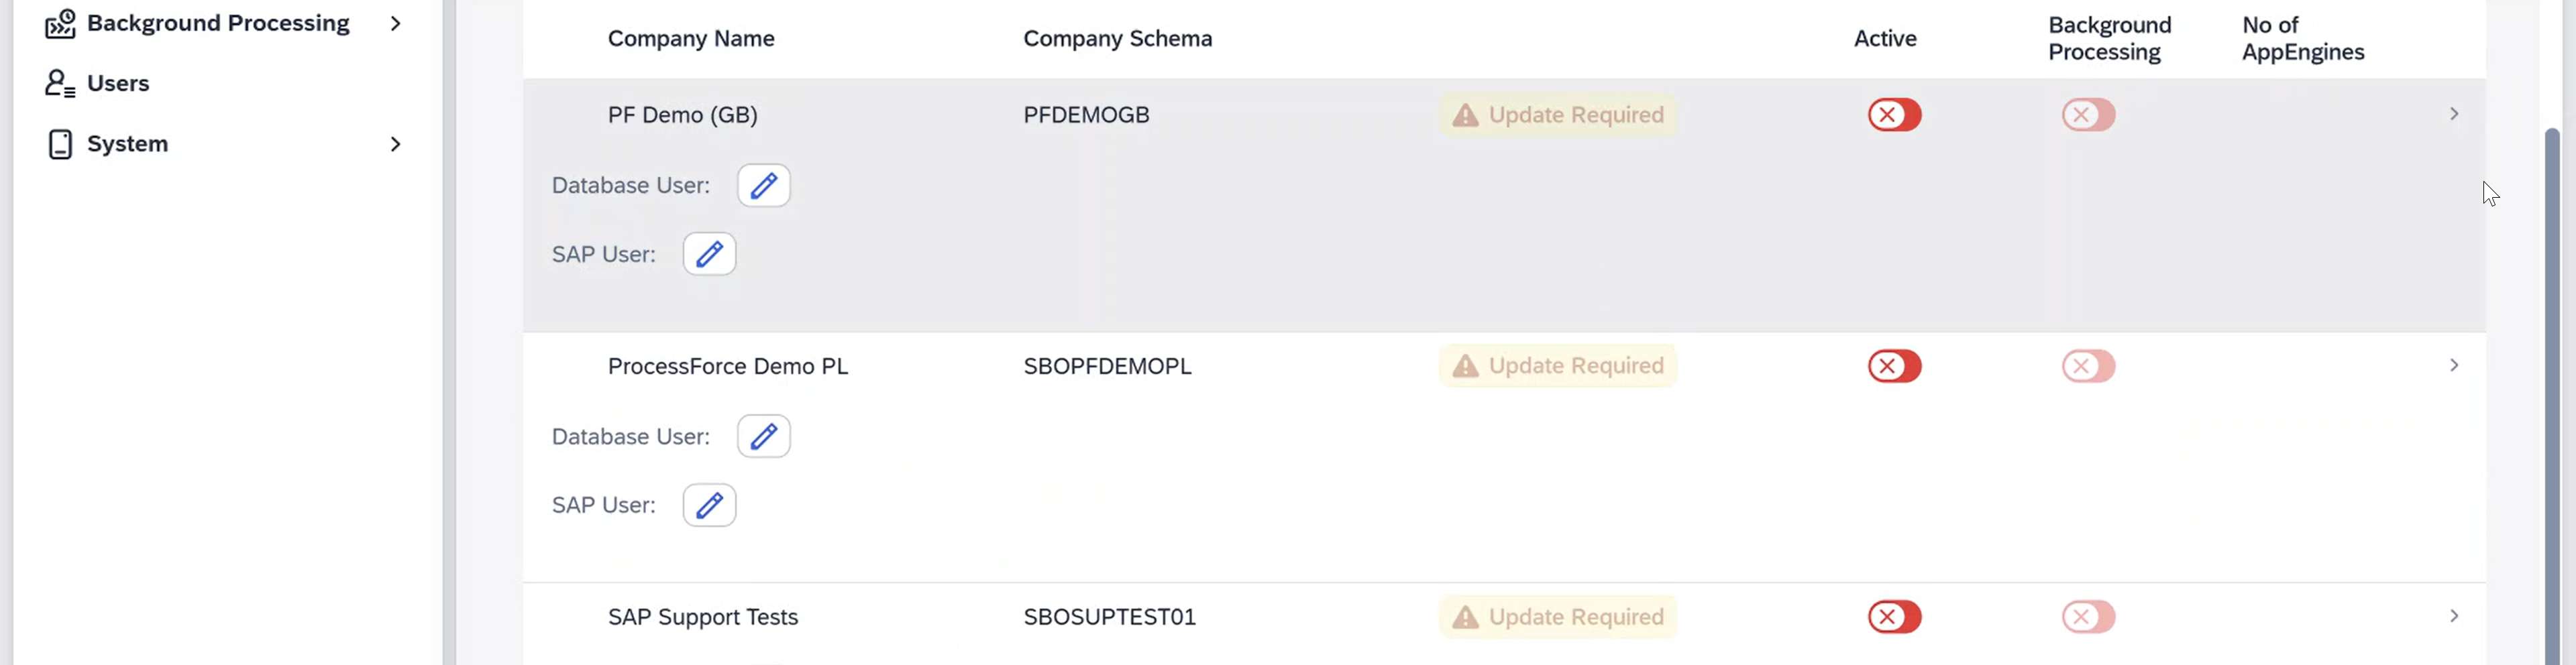
In CompuTec AppEngine Administration Panel > Configuration > Companies, find the company you want to activate.
noteIf you can’t see your company, click Discover to refresh the list.
-
Click the edit icon to set Database User credentials in the Server Details section.
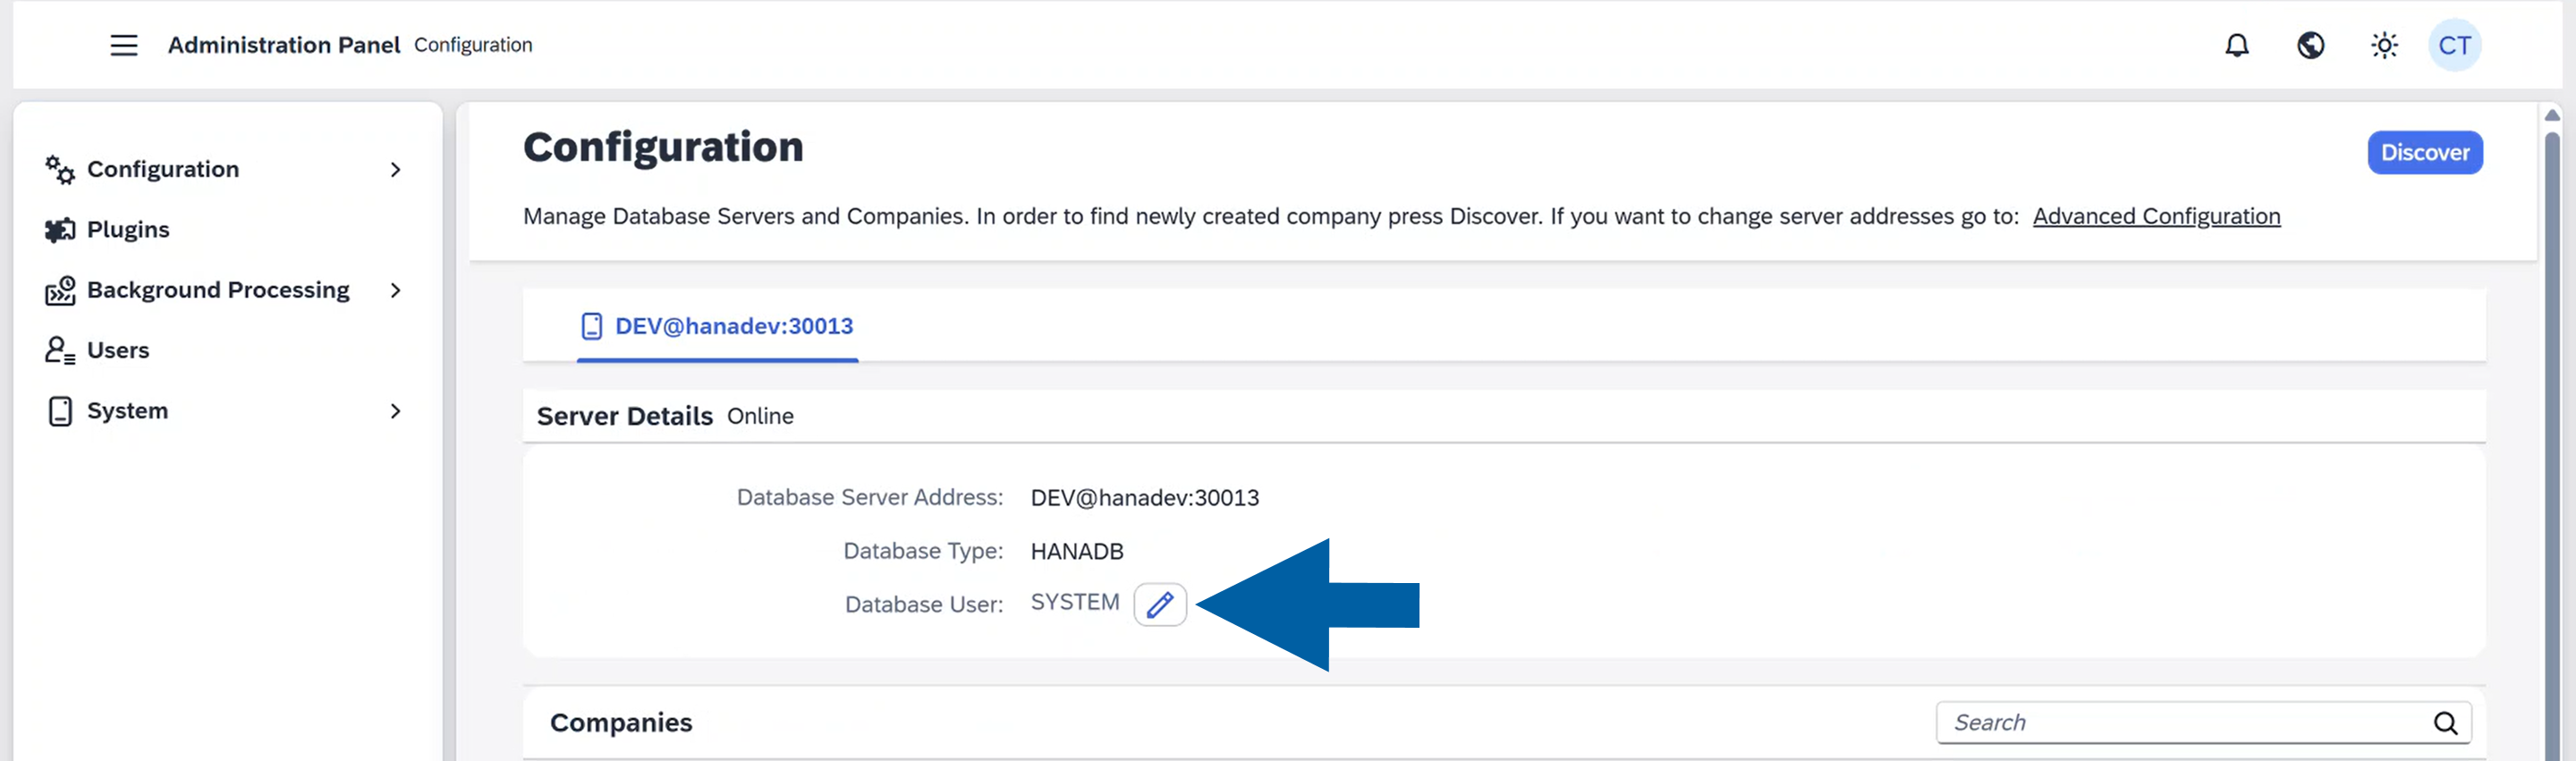
-
Click the edit icon next to Database User in the Companies section and enter the credentials for the company you want to activate.

-
Click the edit icon next to SAP User.
 important
This process creates a CompuTec AppEngine user, not an SAP user.
The selected user must have the right SAP Business One permissions for installation and configuration tasks. -
Assign default user for the company you want to activate. You can select an existing SAP Business One user or create a new one by clicking Add User.
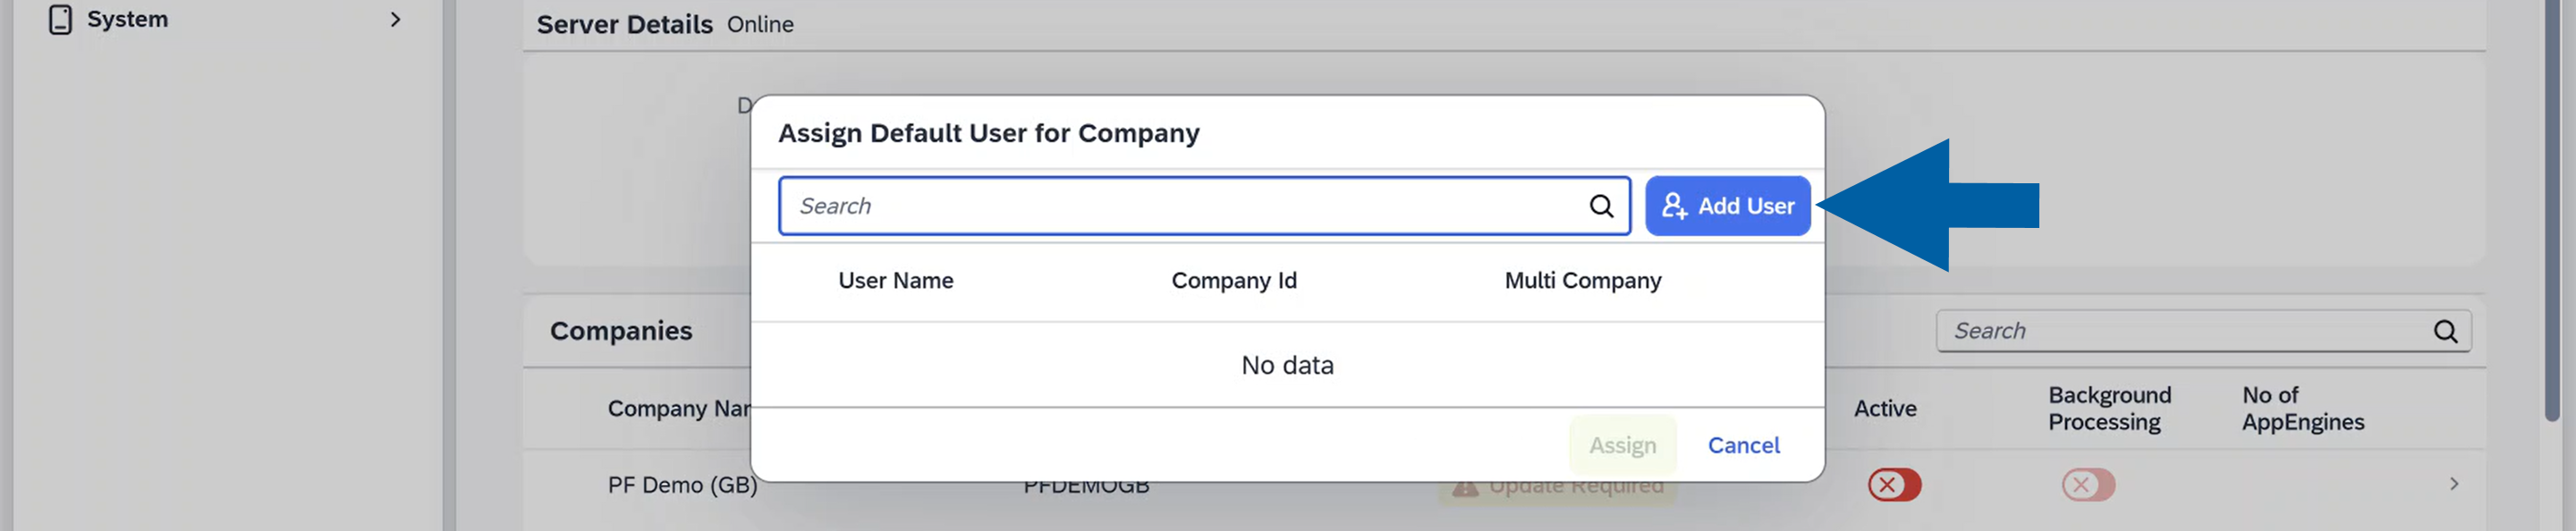
-
Enter User Name and Password and assign the new user to the company.
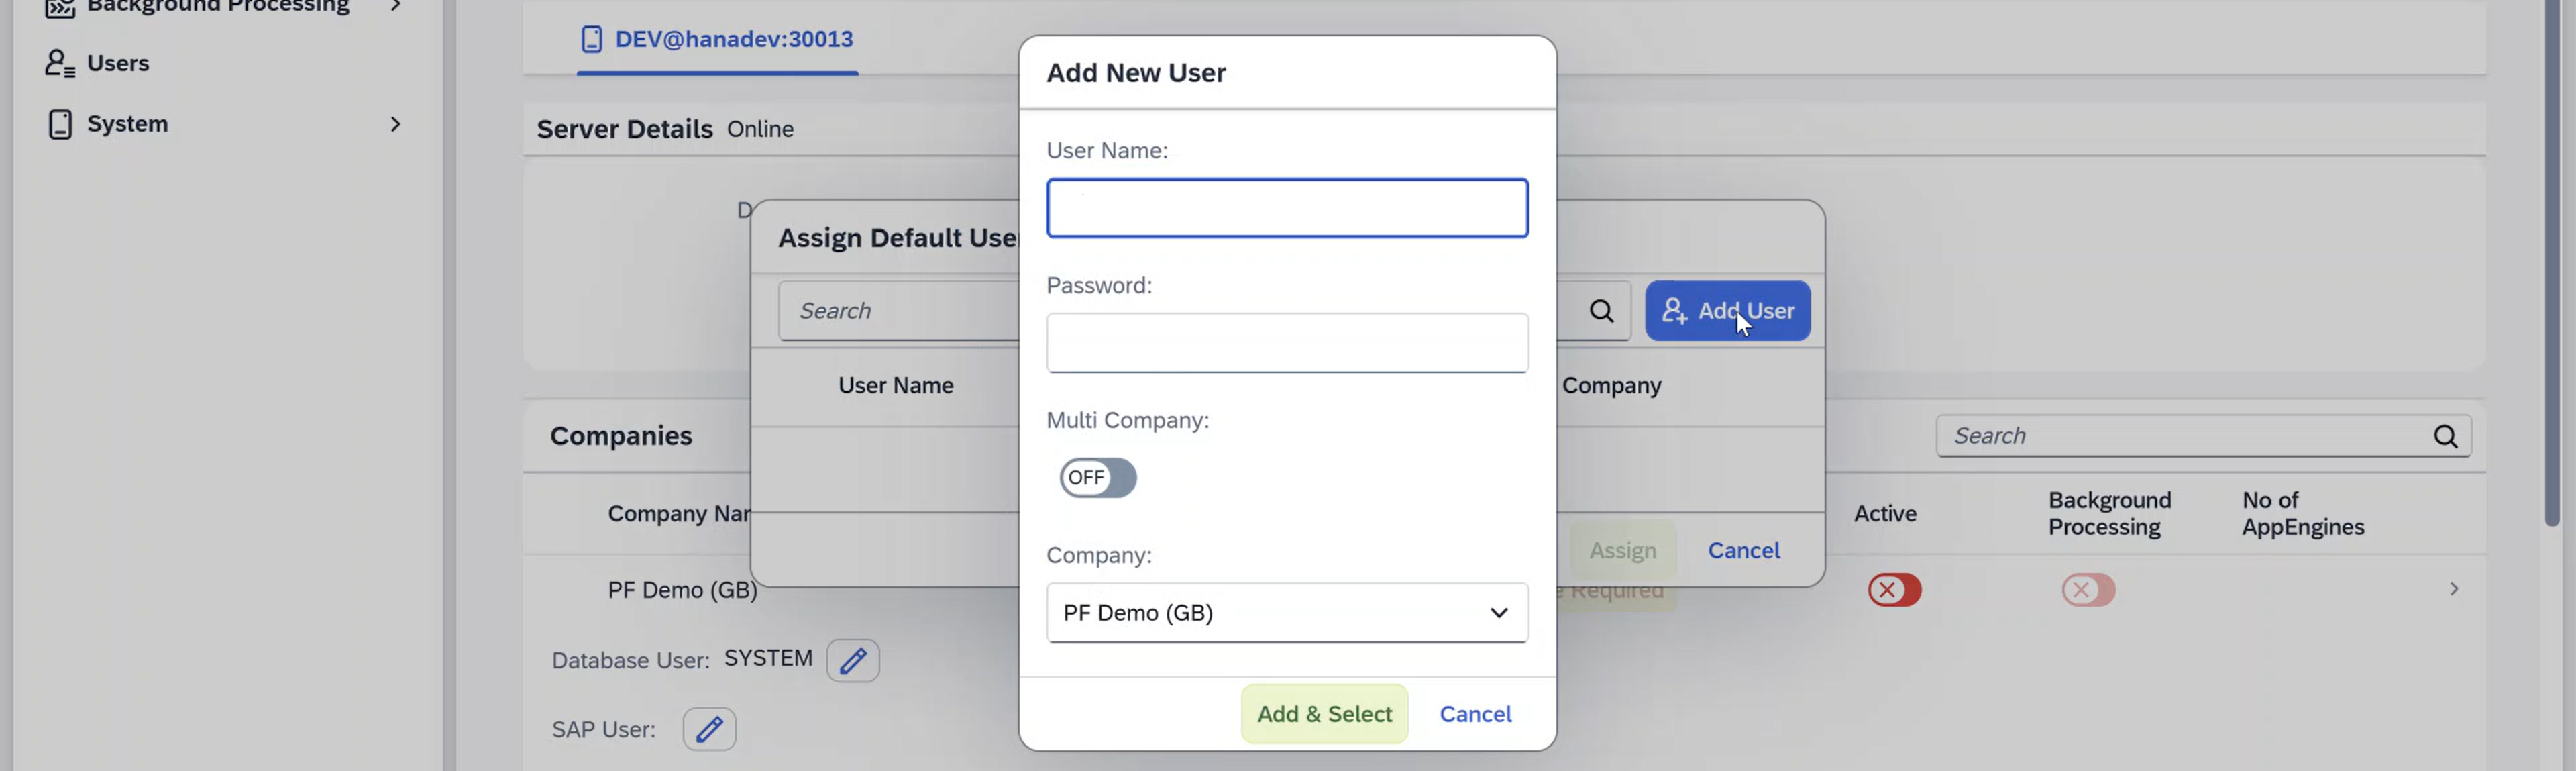
-
Click Add & Select.
-
Switch the Active toggle to activate the company.
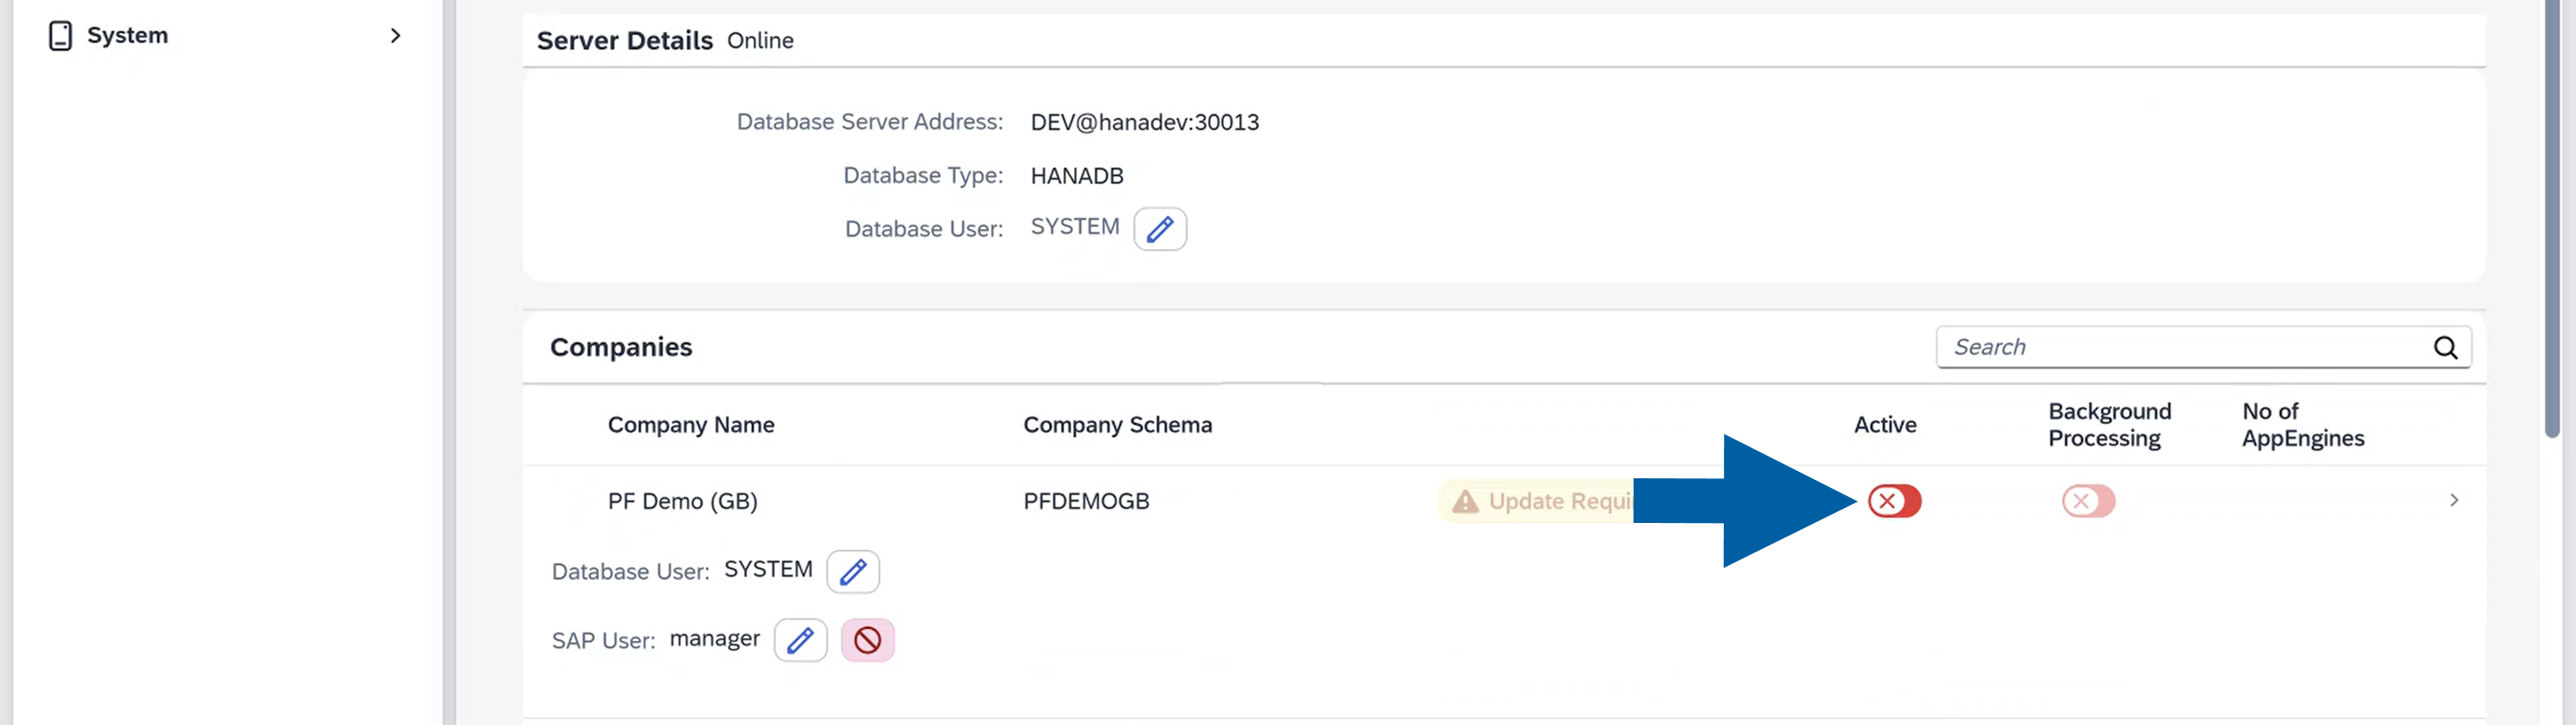
-
Log in using your SLD Server user credentials to activate the company within the SAP system.

-
You can view the company's activation progress.
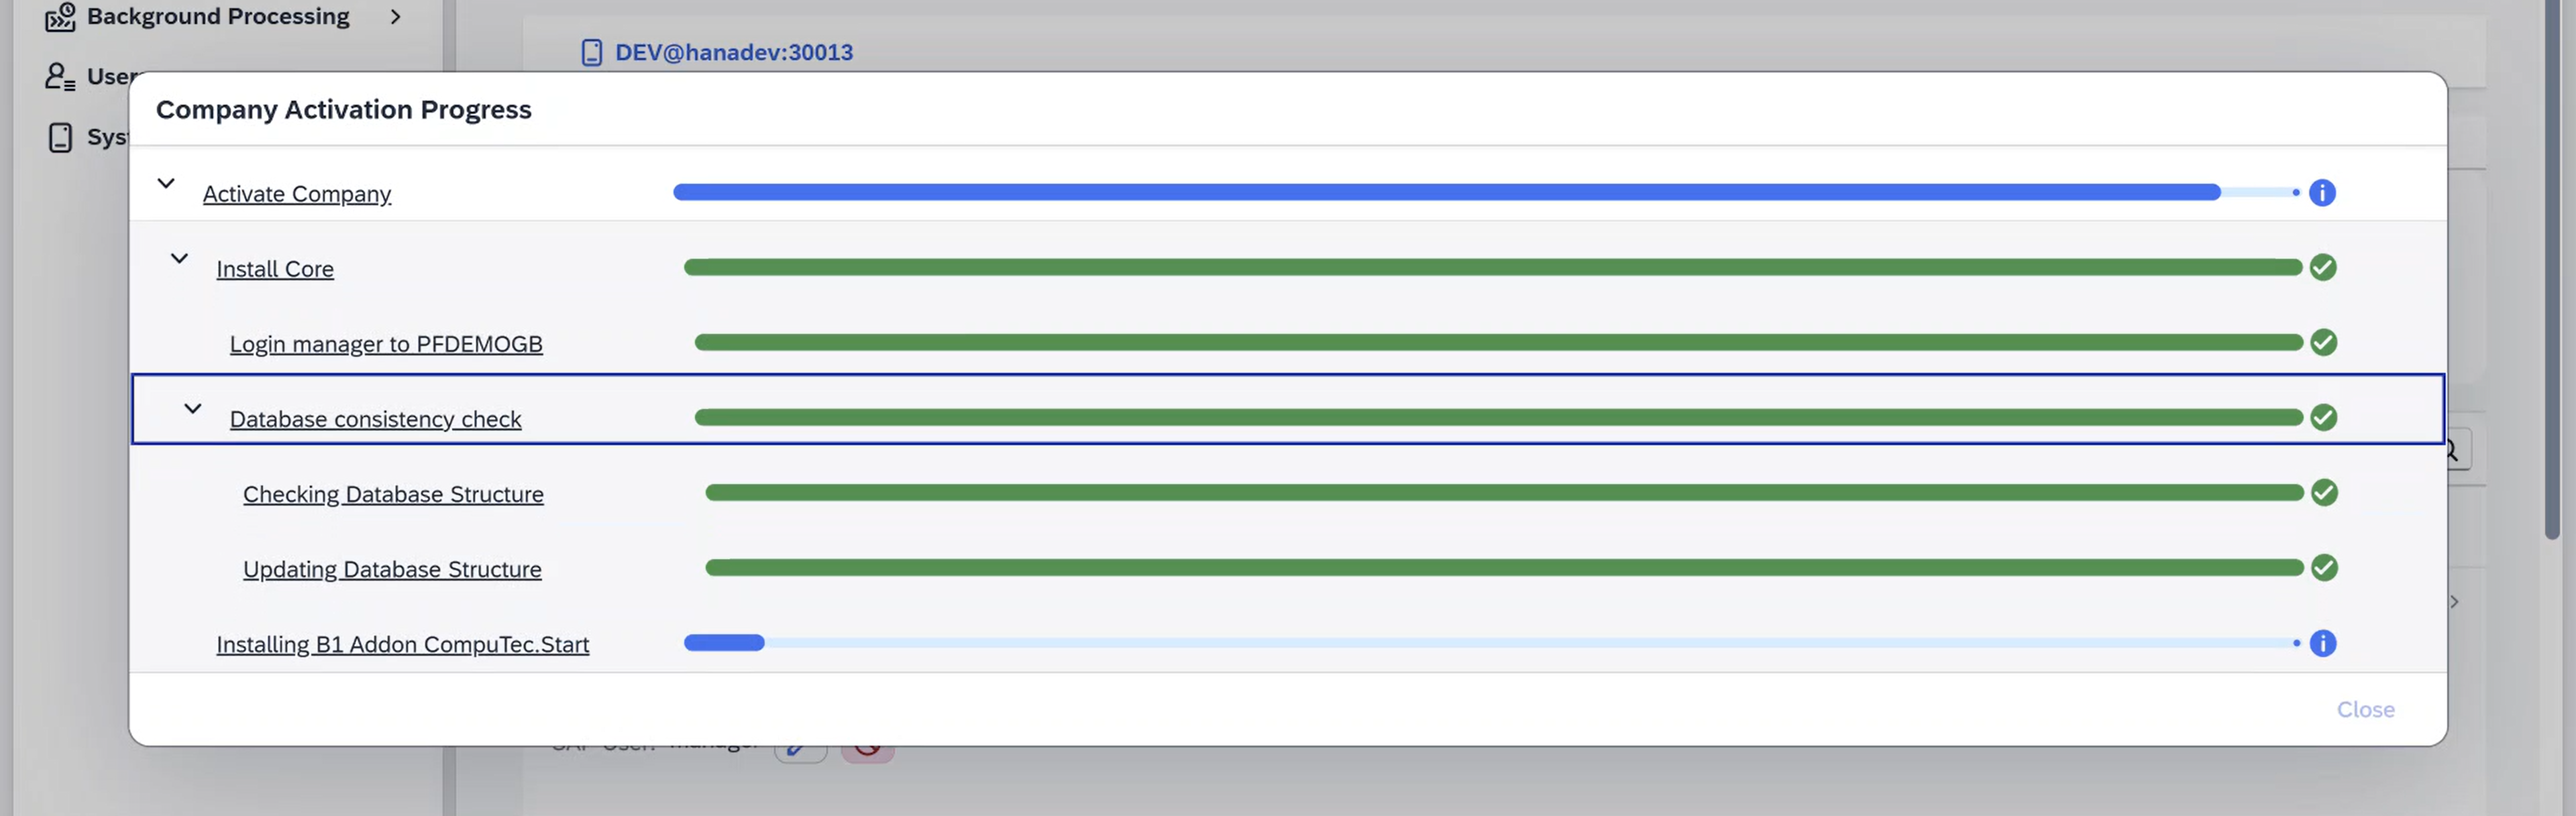 info
infoThis process may install necessary SAP extensions such as CompuTec Start.
In Cloud Control Center for SAP Business One environments, CompuTec Start must be installed manually. -
Click Close.
-
Done! Now your company is activated.
 note
noteAfter you update CompuTec AppEngine to the latest version, you may see
Update requiredlabel next to your company name.
Click the Update required label and complete the guided steps to finish the company update process.
Step 6: Configure background processing within the SAP environment
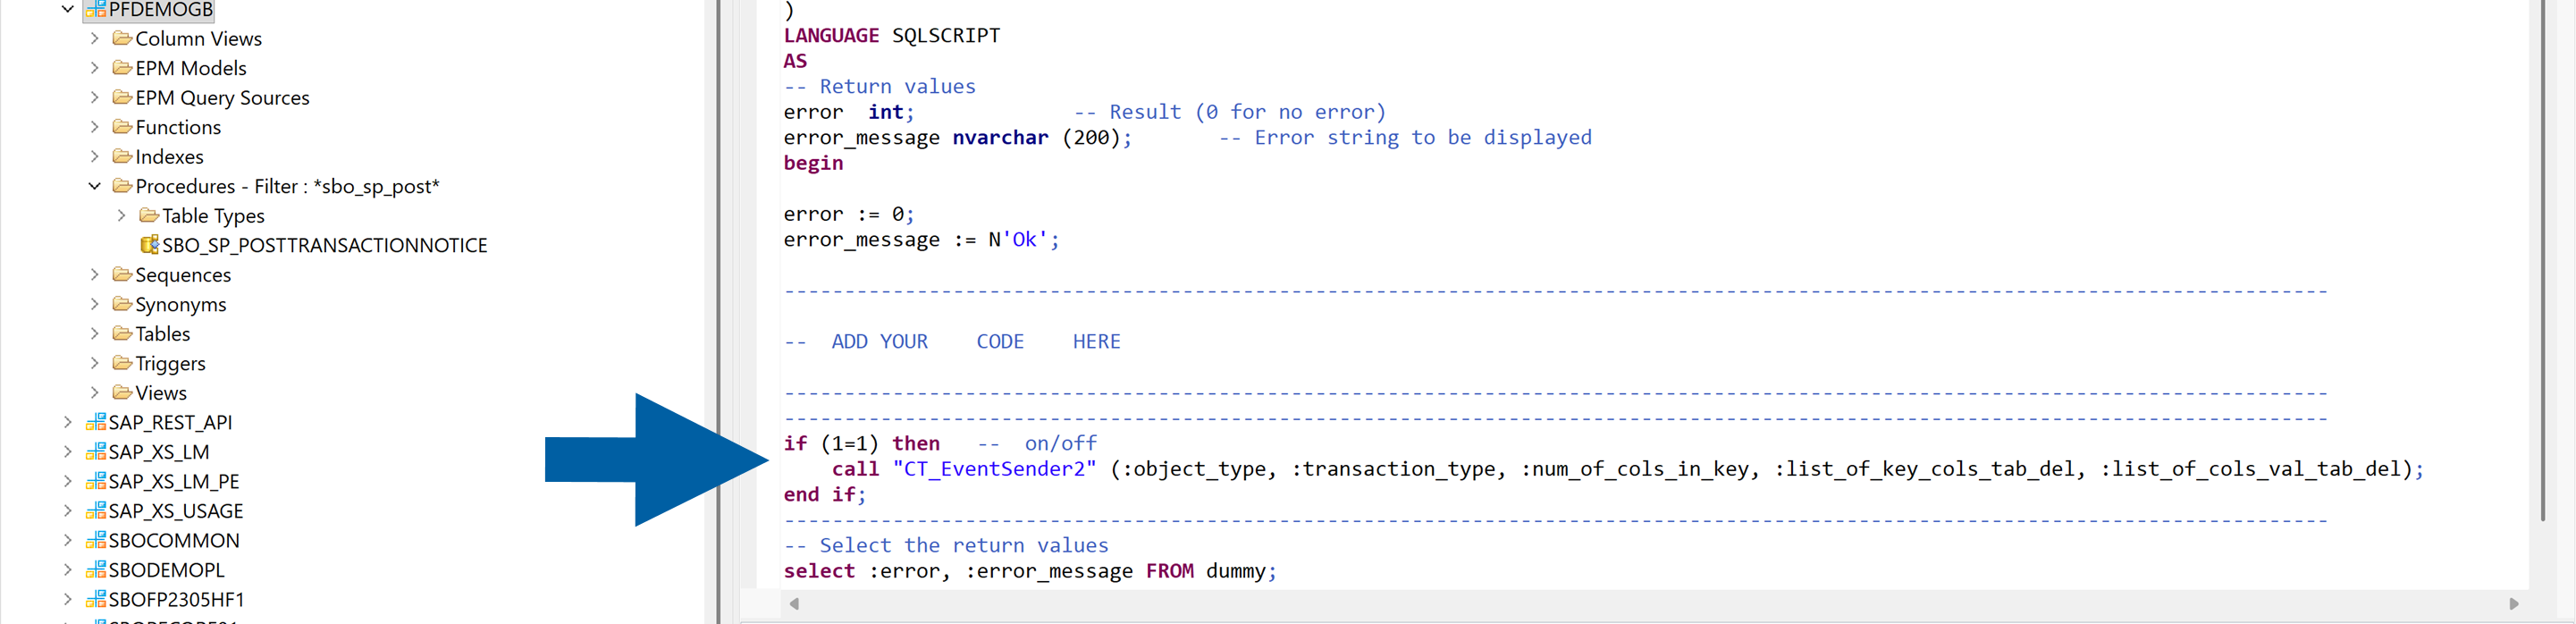
CompuTec AppEngine can run plugins and background jobs that react to events occurring in SAP Business One, for example, when a document is added or updated. To enable this event-driven functionality, SAP Business One must forward these events to CompuTec AppEngine. This is done by adding a small block of code to the SAP system procedure SBO_SP_POSTTRANSACTIONNOTICE, which is responsible for handling post-transaction events.
Once updated, this procedure records and passes the required events to CompuTec AppEngine, where they can trigger jobs and background tasks.
To configure background processing within the SAP environment, follow these steps:
-
First, you’ll see a message with the CompuTec AppEngine code snippet. Keep this window open - you'll need to copy the code snippet into the database procedure in the next steps.

-
Follow the configuration steps according to the database you’re using:
For SAP HANA users
-
Open SAP HANA Studio on your computer and log in.
-
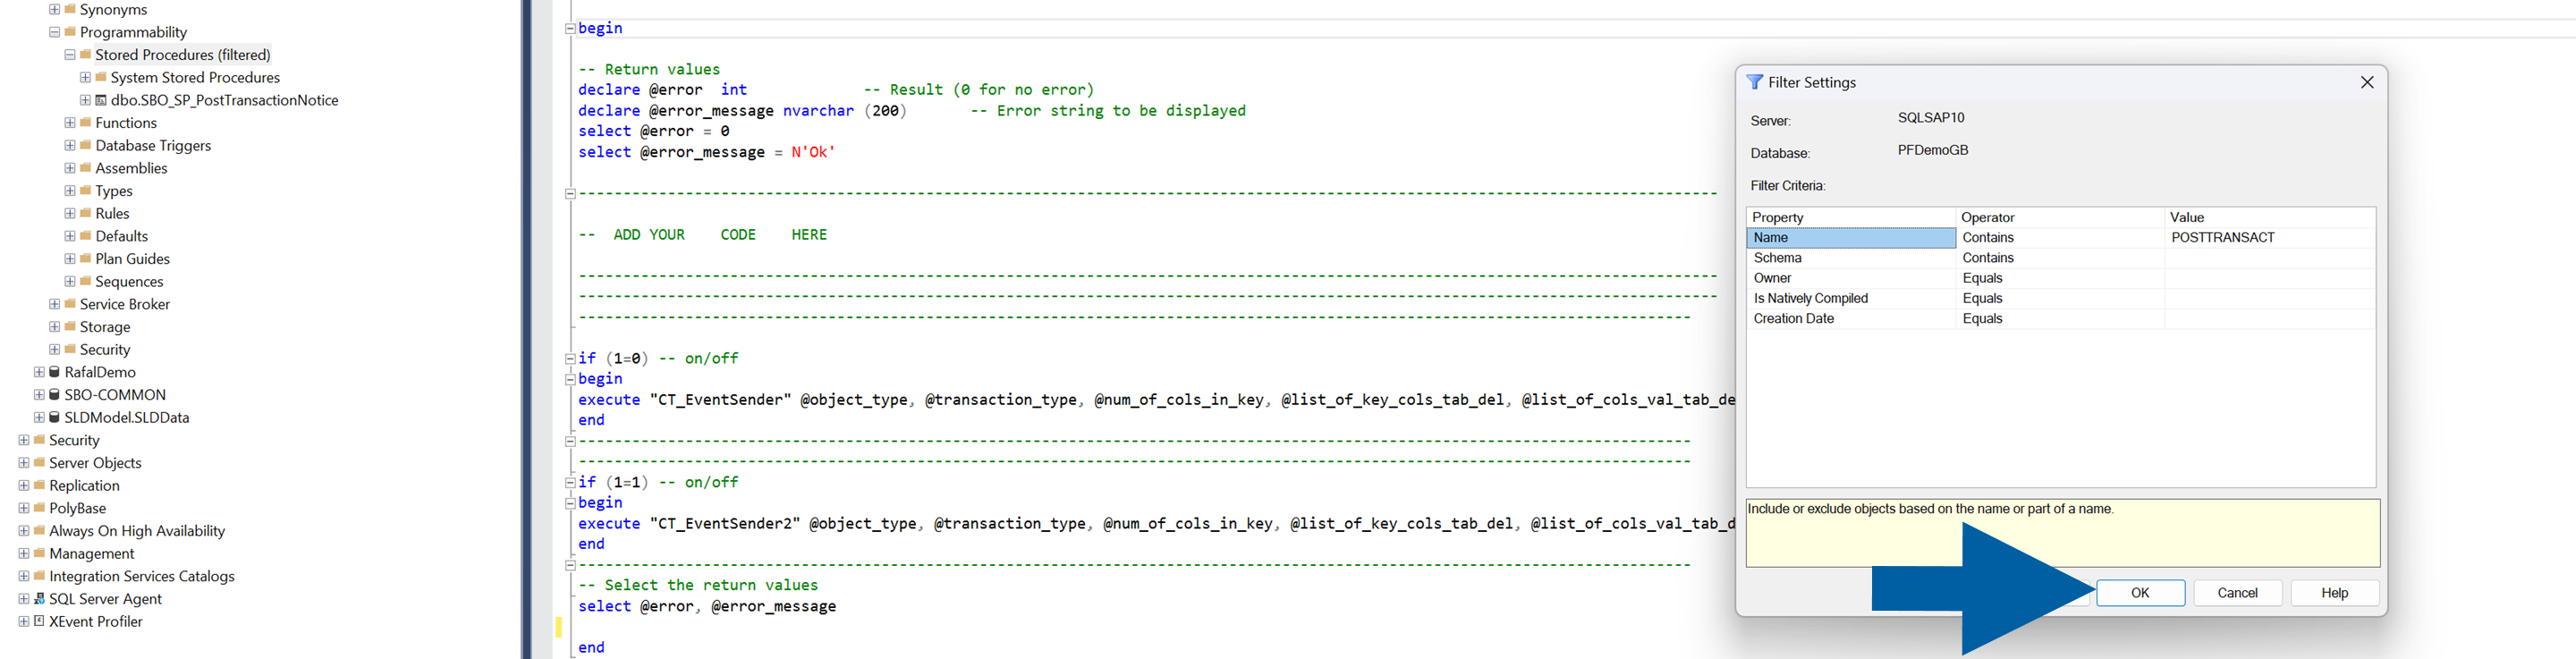
Look for the Procedures folder, right-click on it and use filtering to find SBO_SP_POSTTRANSACTIONNOTICE procedure in your database.
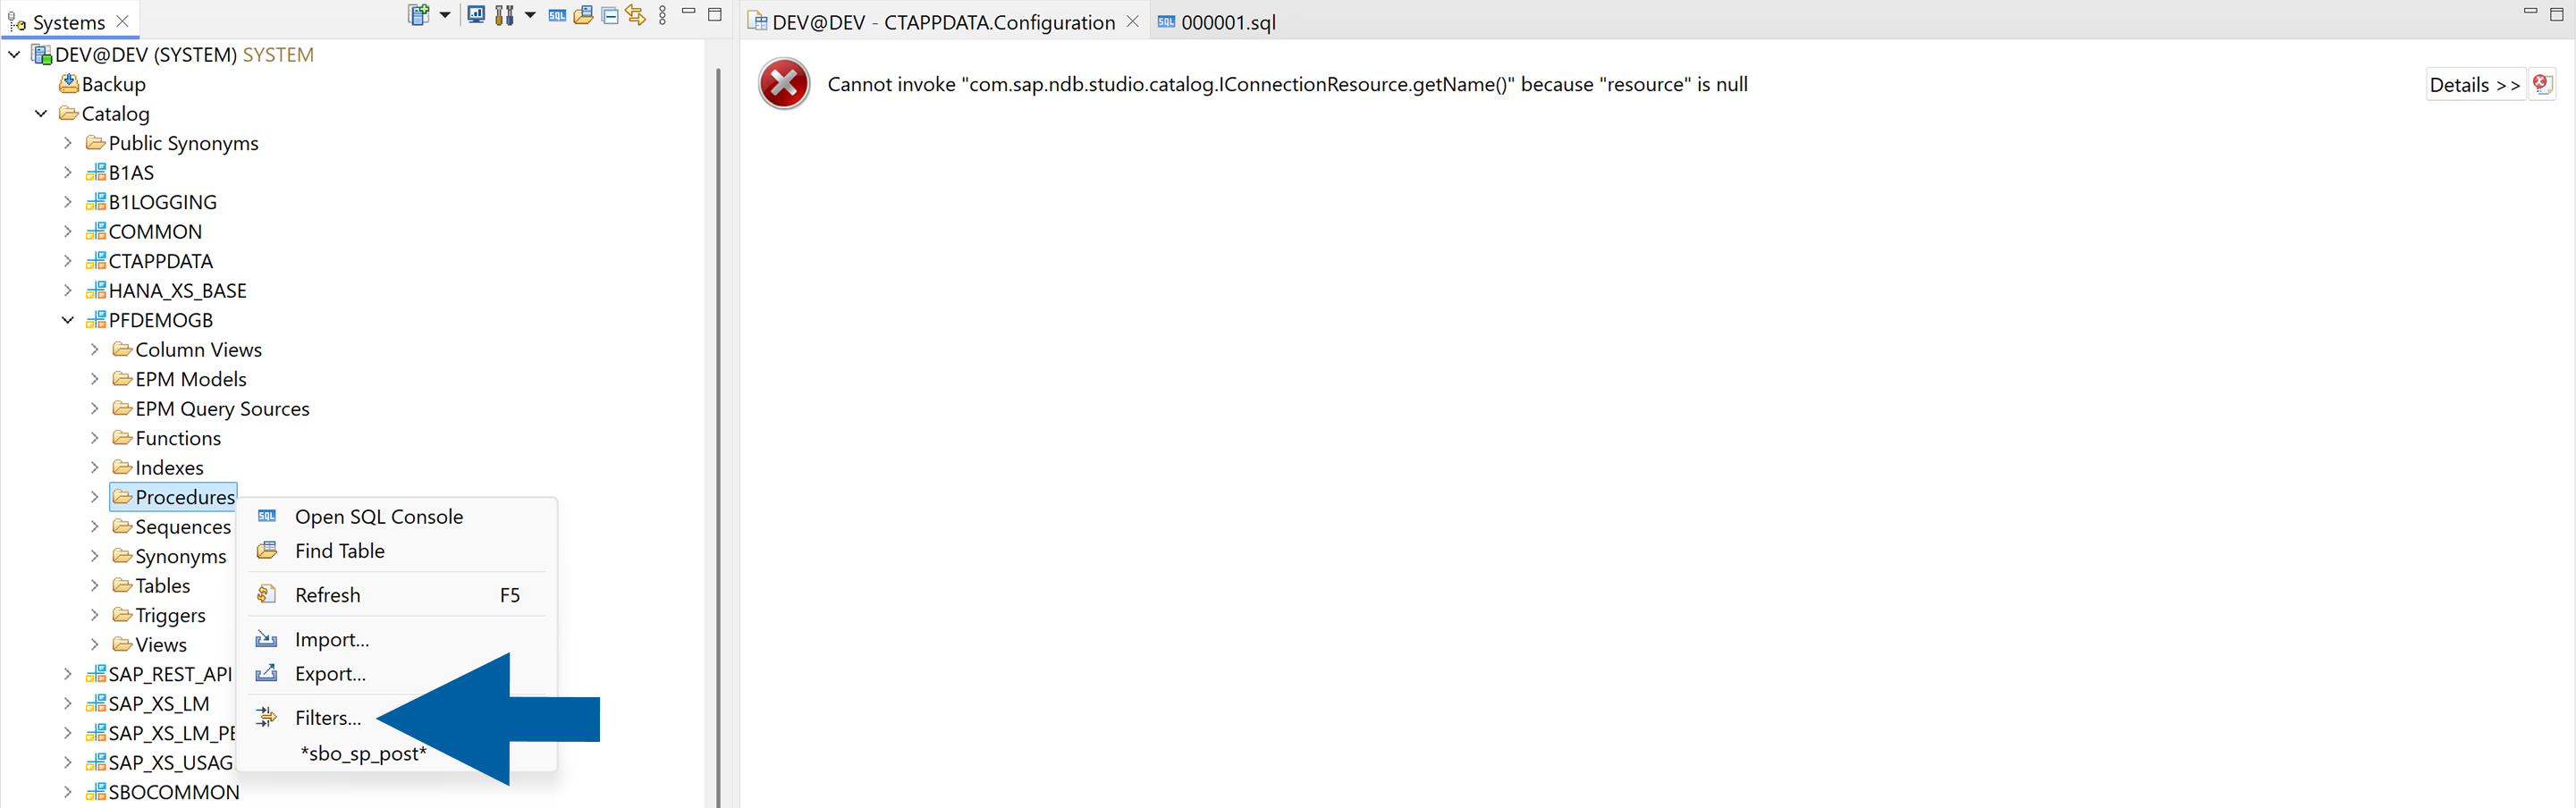
-
Right-click on the SBO_SP_POSTTRANSACTIONNOTICE procedure and choose Open Definition.

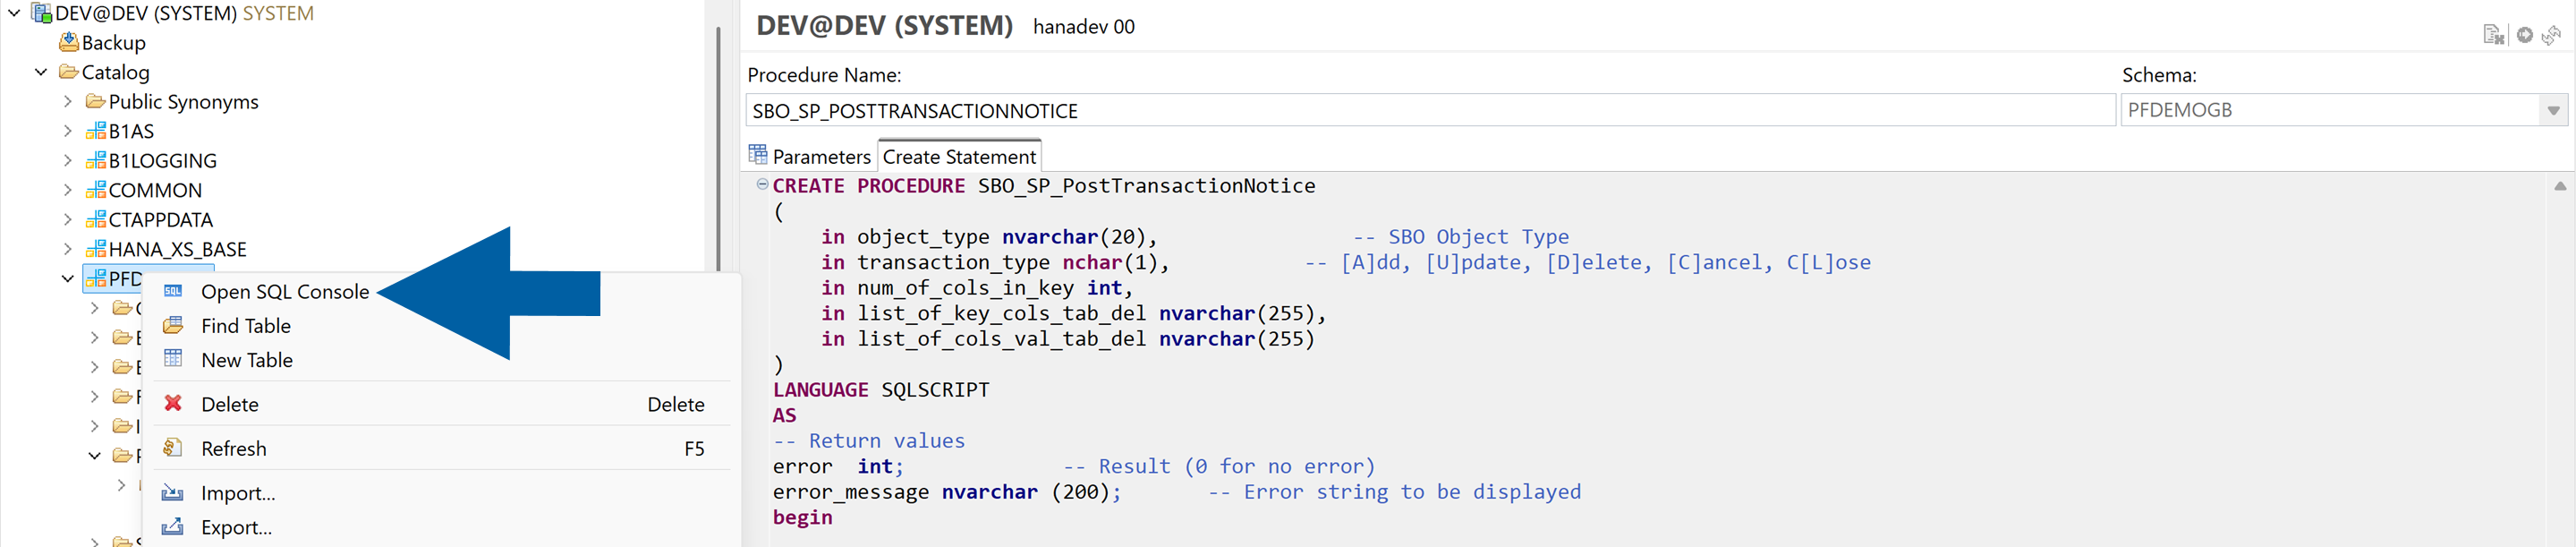
-
Navigate to the Create Statement tab.

-
Copy the whole content of the tab.
-
Navigate to your database name and right-click on it.
-
Click Open SQL Console.
-
Paste the copied content in the SQL console.
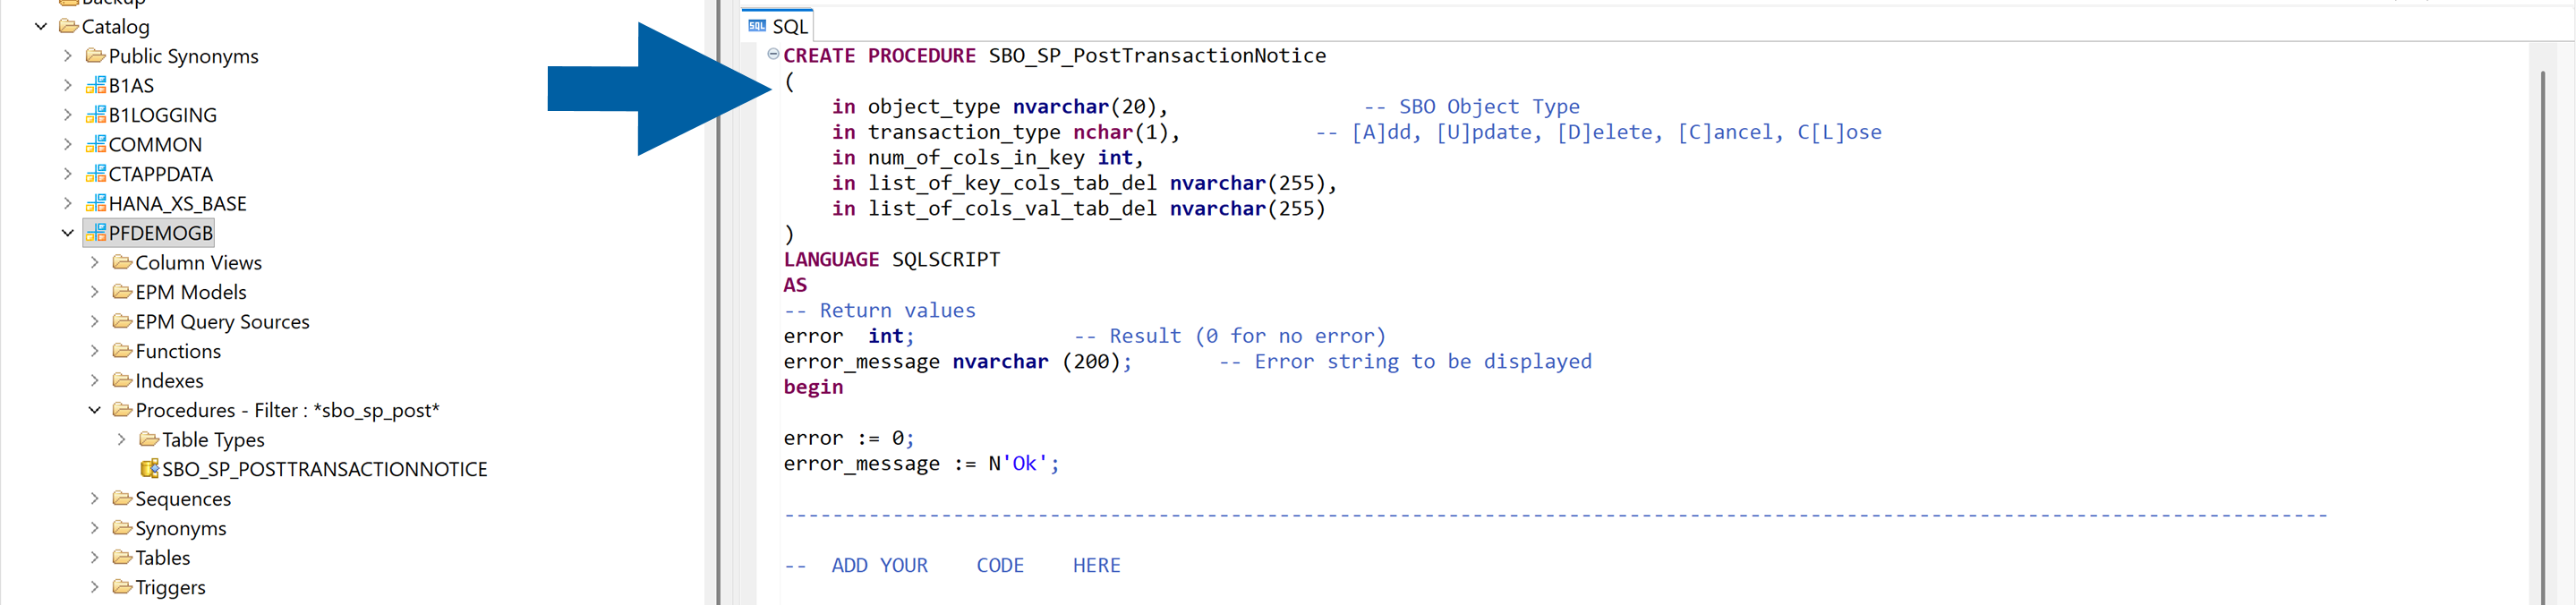
-
Copy the code snippet from the CompuTec AppEngine Administration Panel.
-
In SAP Hana Studio, paste the code under the -- ADD YOUR CODE HERE line. If there are other pieces of code there, add the code at the end of the section.
-
Change
CREATEtoALTER.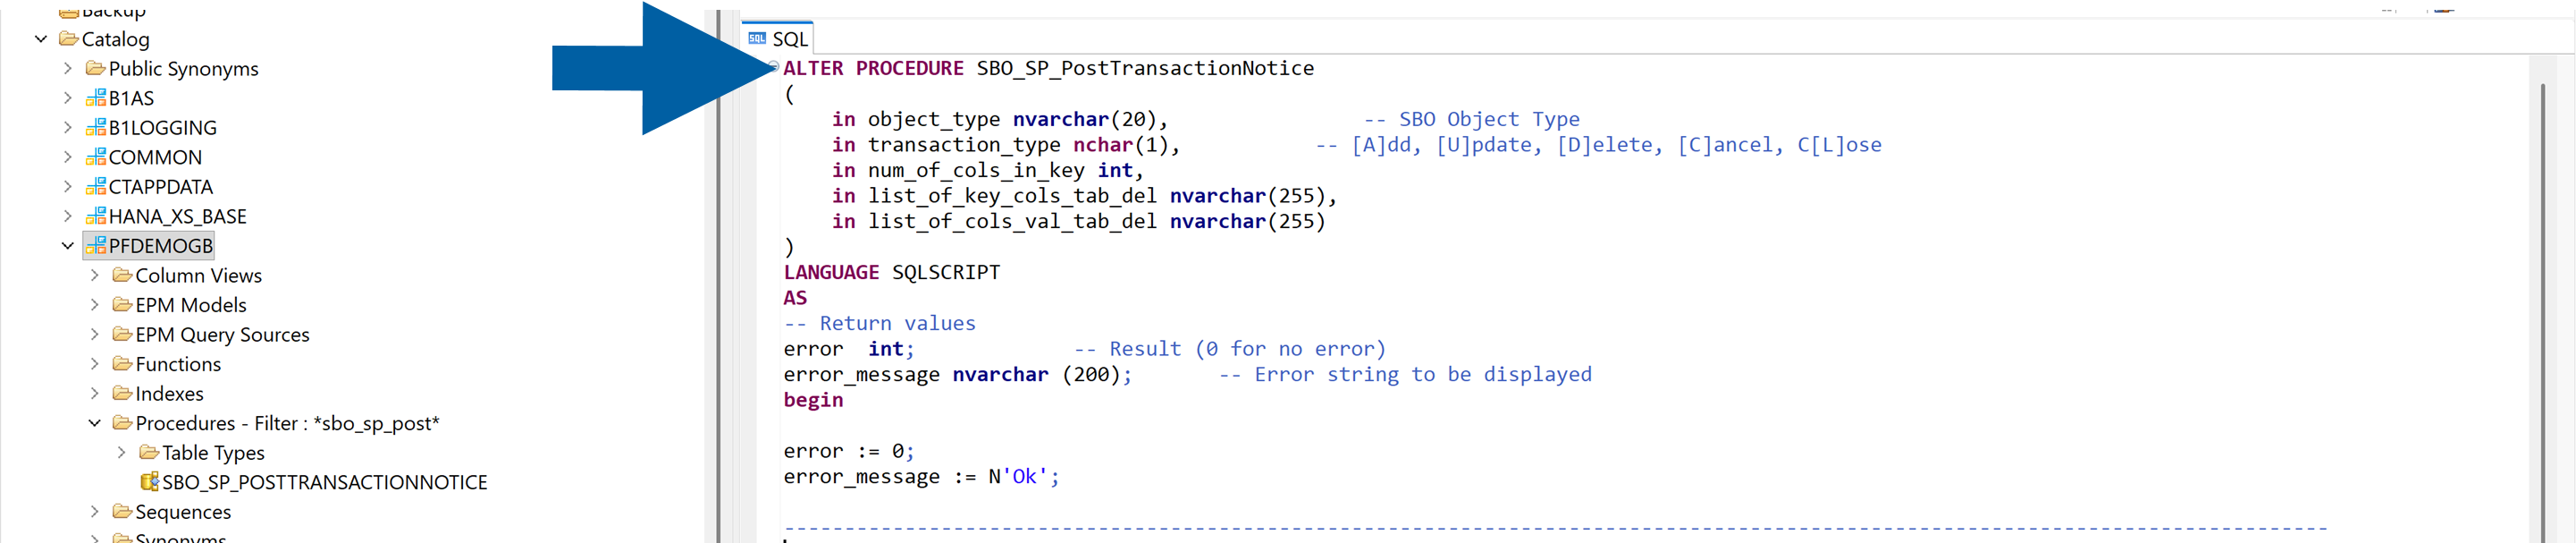
-
Click the Execute icon.

For Microsoft SQL users
-
Open Microsoft SQL Server Management Studio on your computer and log in.
-
Look for the Programmability folder, right-click on it and use filtering to find the SBO_SP_PostTransactionNotice procedure in your database.
-
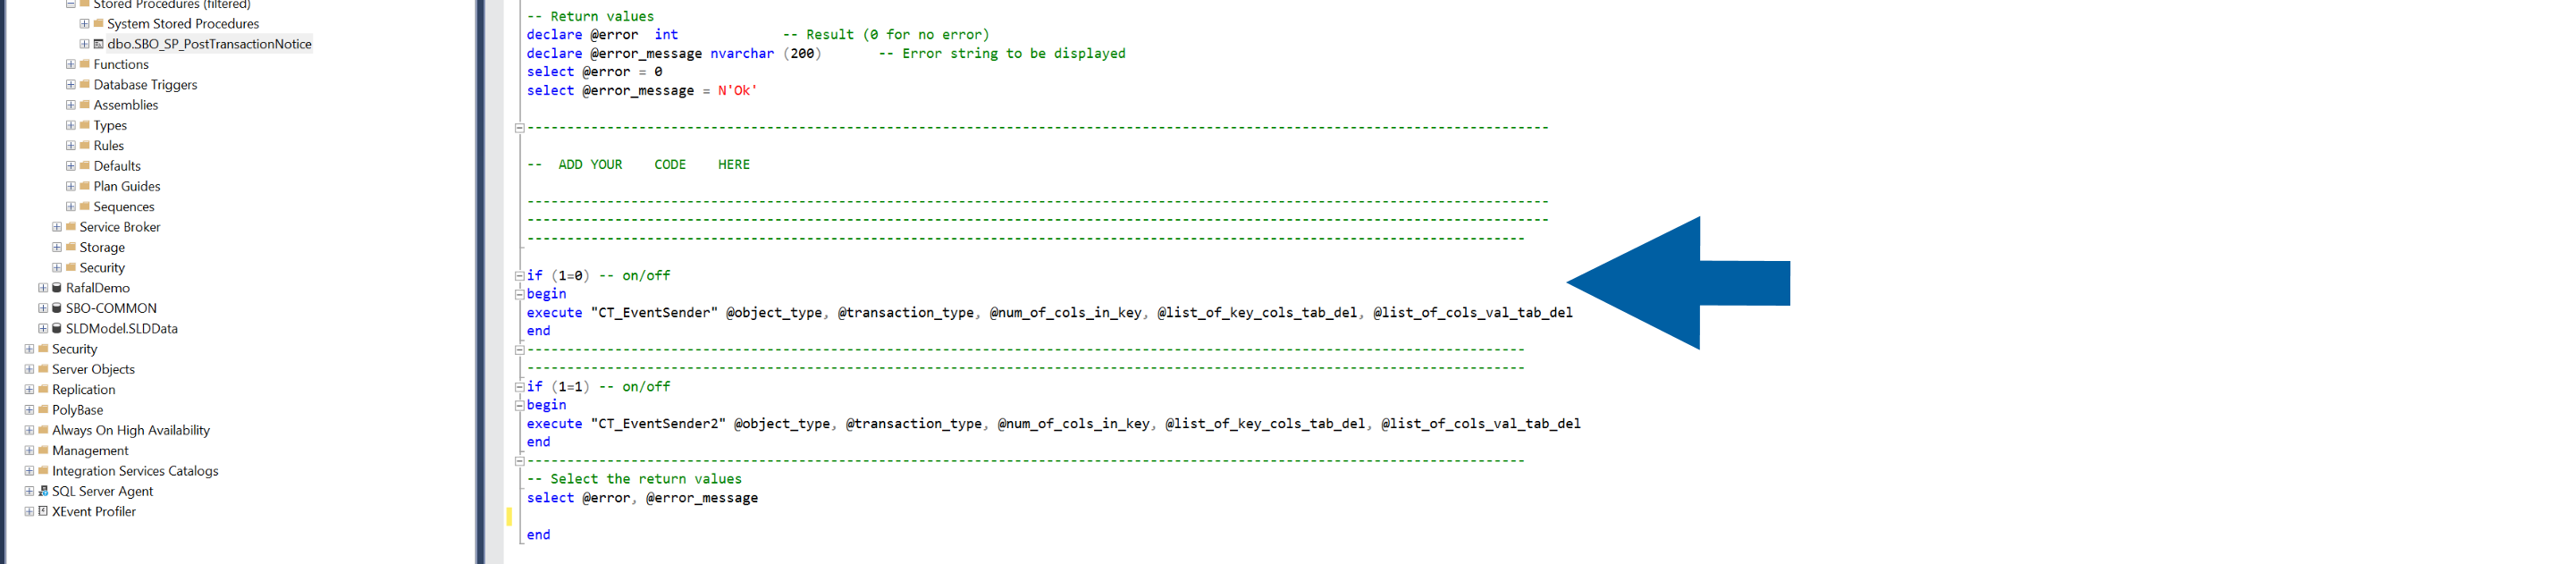
Right-click on the SBO_SP_PostTransactionNotice procedure and choose Modify.

-
Copy the code snippet from the CompuTec AppEngine Administration Panel.
-
In Microsoft SQL Server Management Studio, paste the code under the -- ADD YOUR CODE HERE line. If there are other pieces of code there, add the code at the end of the section.
-
Click the Execute icon and click OK.

-
-
In CompuTec AppEngine, click Confirm.

-
Choose a CompuTec AppEngine instance to assign to the activated company, and click Accept.

-
After it’s finished, click Close.
Step 7: (optional) Advanced configuration
Once the basic setup is complete, you can refine your configuration in the Advanced Configuration and AppEngine Servers sections.
In the Advanced Configuration section of CompuTec AppEngine Administration Panel, you can edit the following settings:
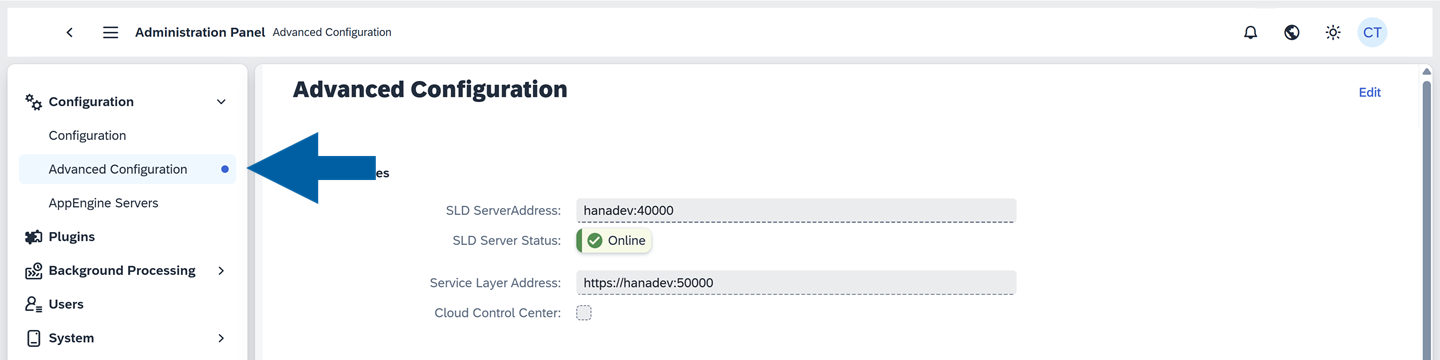
- SAP Services: Edit the SLD Server Address
- CompuTec Services: Update the CompuTec License Server information
- OpenId Settings: Configure the CompuTec AppEngine External Address
- OIDC (OpenID Connect): Manage secure authentication settings
- EventBus: Configure real-time communication between services
- Jobs: Manage scheduled tasks
- Plugin Repository: Install and manage custom plugin repository
In the AppEngine Servers section of CompuTec AppEngine Administration Panel, you can edit the following settings:
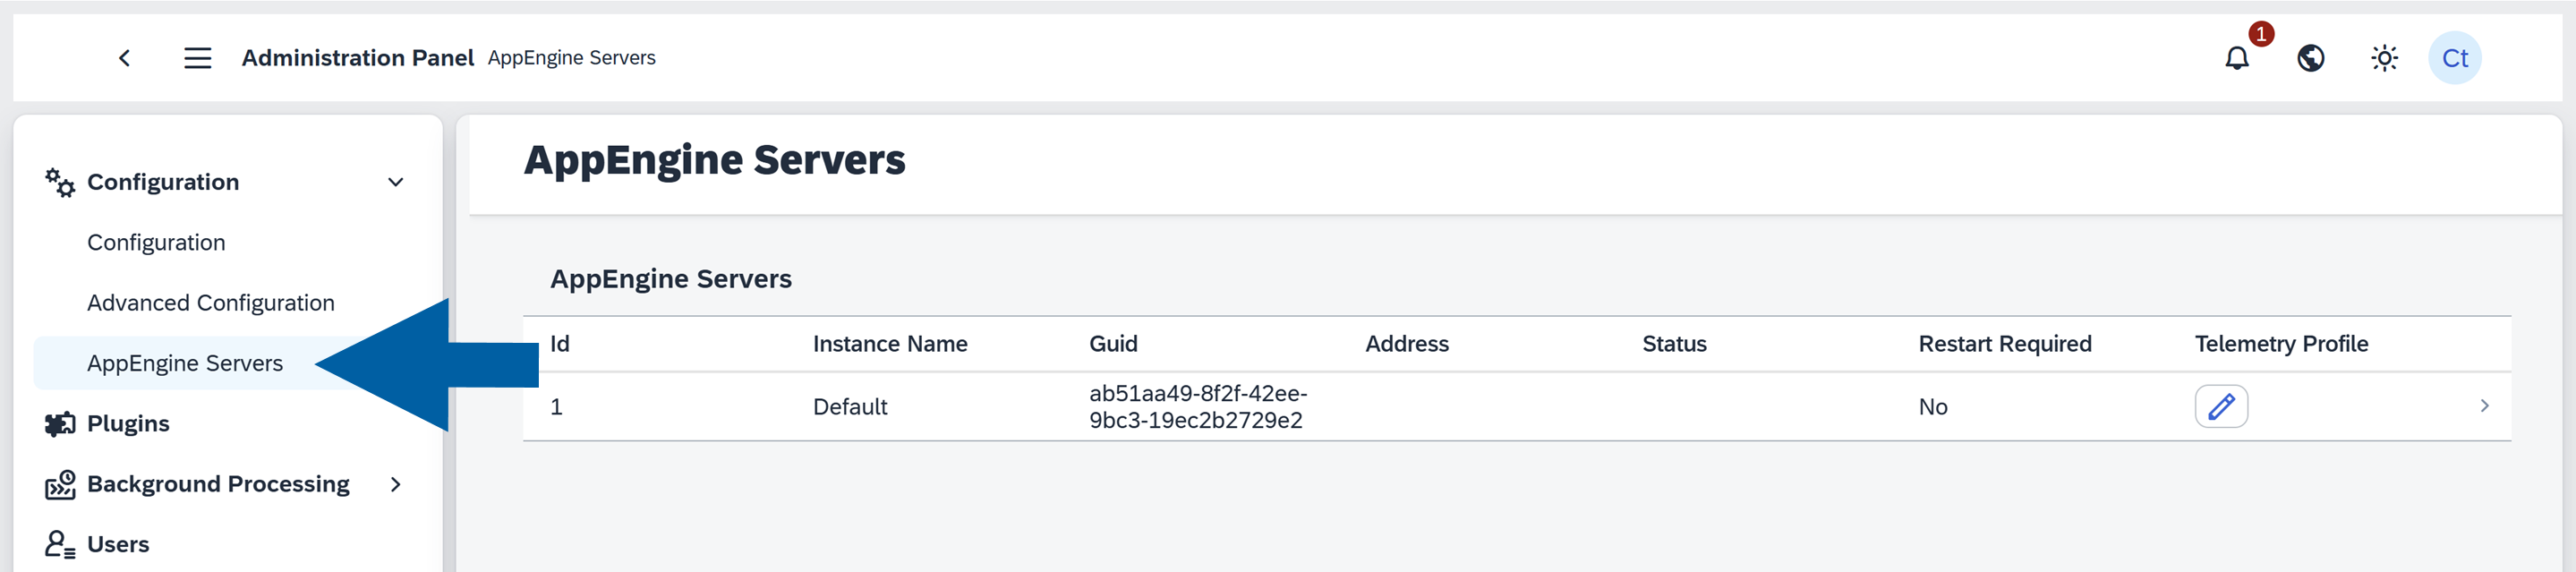
-
Id: Numeric identifier of the server instance
-
Instance Name: The name assigned to the server instance (e.g., default)
-
GUID: A globally unique identifier for each server instance
-
Address: Indicates the network address or host name of the server
ImportantSpecify the AppEngine Server Address using its host name or fully qualified domain name (FQDN).
Do not use
localhost.localhostrefers to the local machine, so client applications and other servers cannot use it to connect to the CompuTec AppEngine service.Examples:
https://APPSERVER:50000https://appserver.company.com:50000
-
Status: Displays the operational status of the server (e.g., active/inactive)
-
Restart Required: Shows if a restart is needed
-
Telemetry Profile: Access server-specific settings