You are currently viewing documentation for CompuTec ProcessForce 3.0, which is a plugin installed and managed through CompuTec AppEngine 3.0, built on .NET 8. If you are working with older environments, you may need the documentation for CompuTec ProcessForce 2.0: https://learn.computec.one/docs/processforce/2.0/.
Please note that CompuTec ProcessForce 2.0 will be supported only until December 31, 2026. After this date, the product will no longer receive regular support or maintenance updates. Read more
CompuTec AppEngine 3.0 introduces a new architecture, and all CompuTec components, including the CompuTec ProcessForce 3.0 plugin, must be updated together to ensure full compatibility.
Before starting your installation or upgrade process, we strongly recommend reviewing the CompuTec AppEngine 3.0 and CompuTec ProcessForce 3.0 documentation.
Scheduling Board
The Scheduling Board is a production planning tool that helps you schedule and reschedule Manufacturing Orders.
You can use it to:
- Schedule one or multiple Manufacturing Orders.
- Plan production based on available capacity and lead times.
- Manage multi-level production structures with semi-finished products.
- Identify Manufacturing Orders that cannot be completed on time.
- Calculate the earliest possible production completion date.
- Recalculate schedules after changes to delivery requirements.
The Scheduling Board uses production dates, times, and lead times to determine whether a Manufacturing Order can meet its required delivery date.
Open the Scheduling Board
You can open the Scheduling Board from several areas in the system.
From Manufacturing Orders
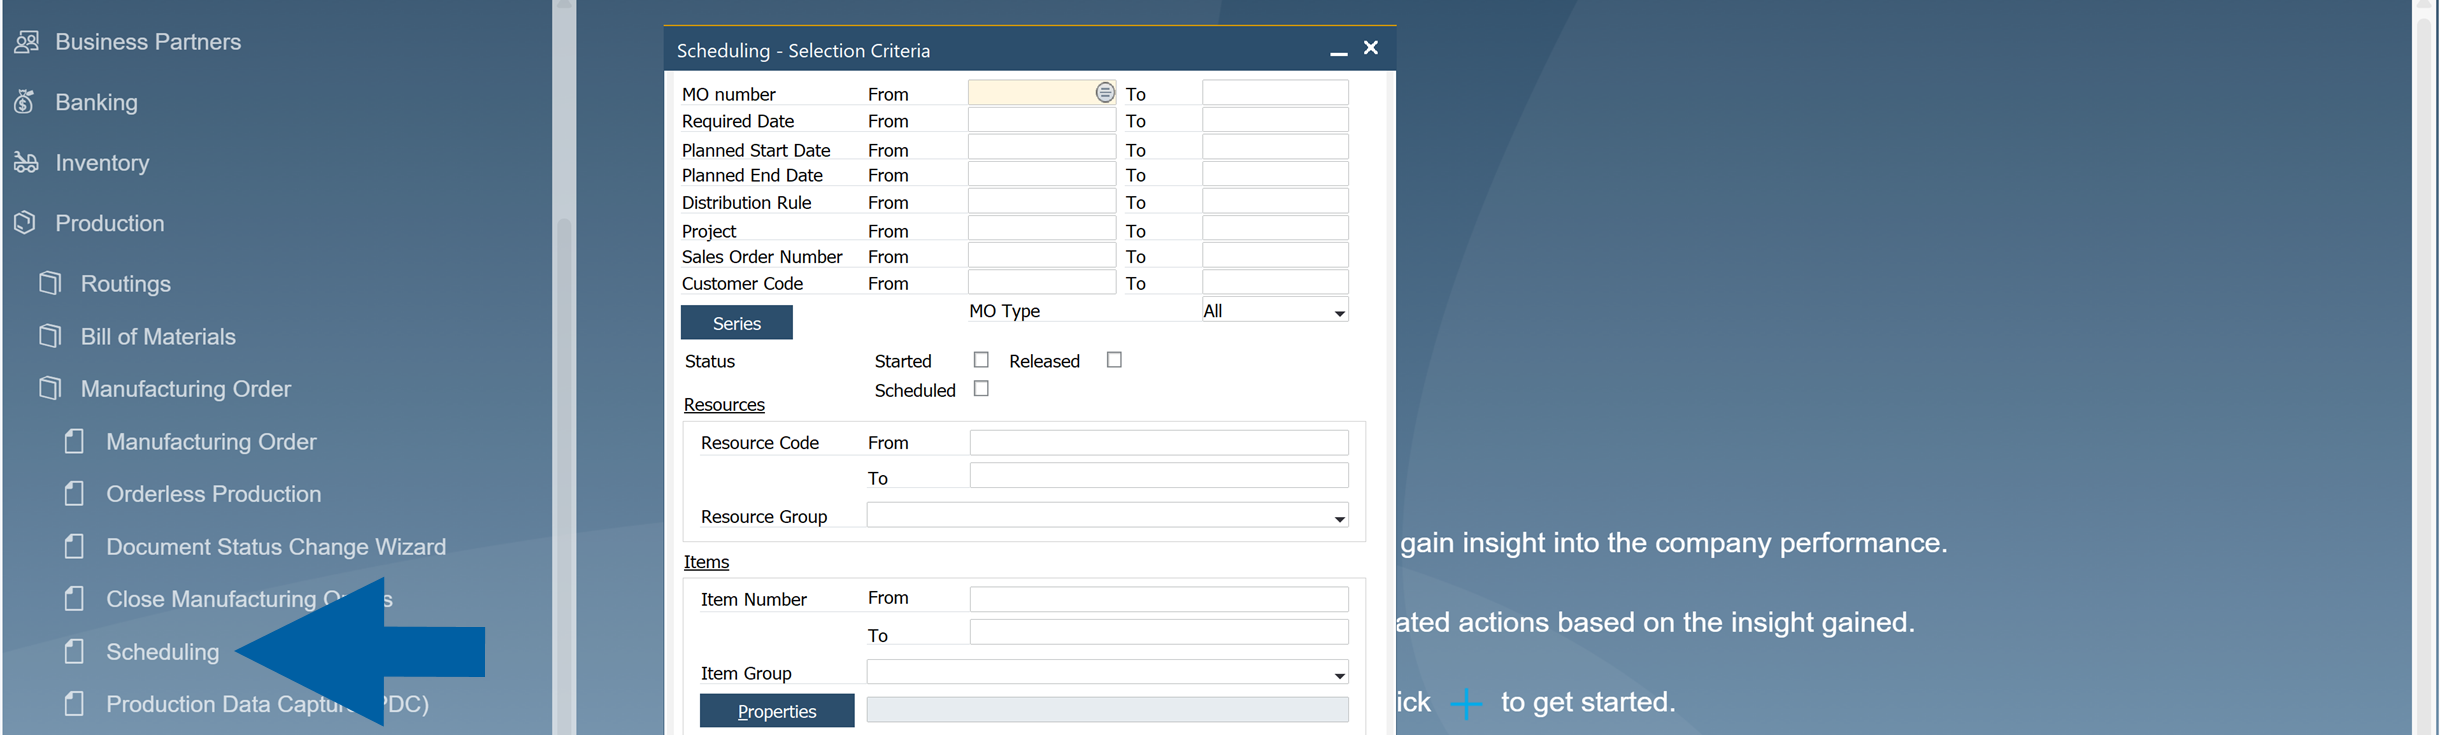
To open Scheduling Board from Manufacturing Orders, follow these steps:
-
Go to Production > Manufacturing Order > Scheduling.
-
Use the Scheduling Selection Criteria to filter the Manufacturing Orders you want to display.
-
Select one Manufacturing Order number or a range of MO number.
 tips
tips-
To select or clear all warehouses, double-click the header of the Select column.

-
If no criteria are specified, the system will display all Manufacturing Orders.
-
-
Click OK to open a list of selected Manufacturing Orders.

-
Review the list of Manufacturing Orders.
-
Click the arrow in the lower-right corner of the Select button to see the Scheduling Board option.

-
Click Scheduling Board.

-
The Scheduling Board opens and displays the selected Manufacturing Orders.

Sales Order
Sales A/R → Sales Order
Semi-finished product Manufacturing Orders can be created from the Sales Order context menu. Simply choose the Create Manufacturing Orders option:
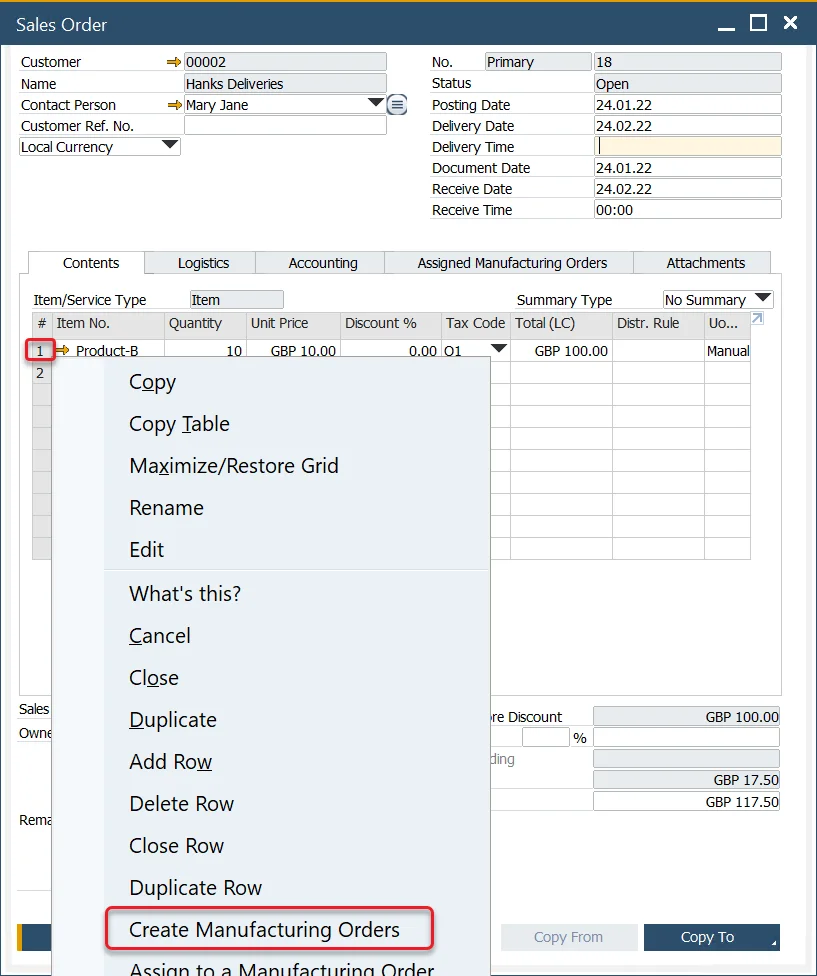
Two options are available in the context menu:
- Create Manufacturing Orders: opens the Scheduling Board
- Create Manufacturing Order: creates a single Manufacturing Order for the item in the Content tab. Clicking this option opens the context menu.
Manufacturing Order
Semi-finished products can also be created via the context menu of a final goods Manufacturing Order:
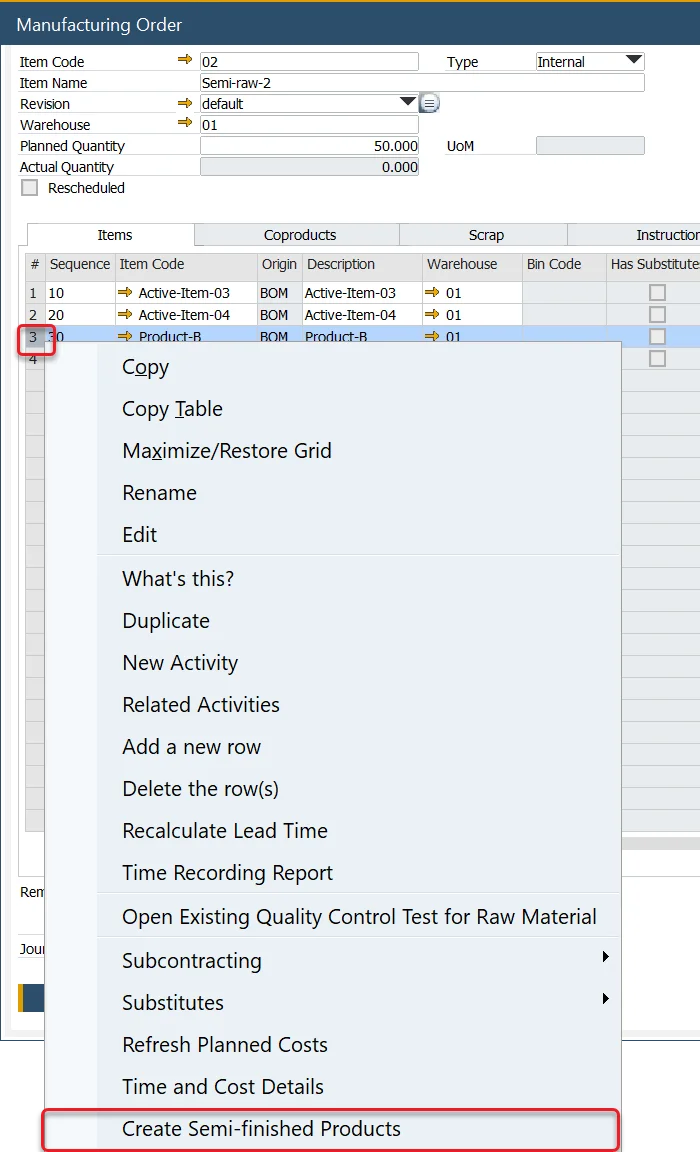
- After creating semi-finished product Manufacturing Orders, an additional option becomes available in the context menu: Scheduling → Recalculate Semi-finished Products Lead Time.
- This opens the Semi-finished Product Scheduling Board, allowing you to adjust Manufacturing Order dates and recalculate Lead Time.
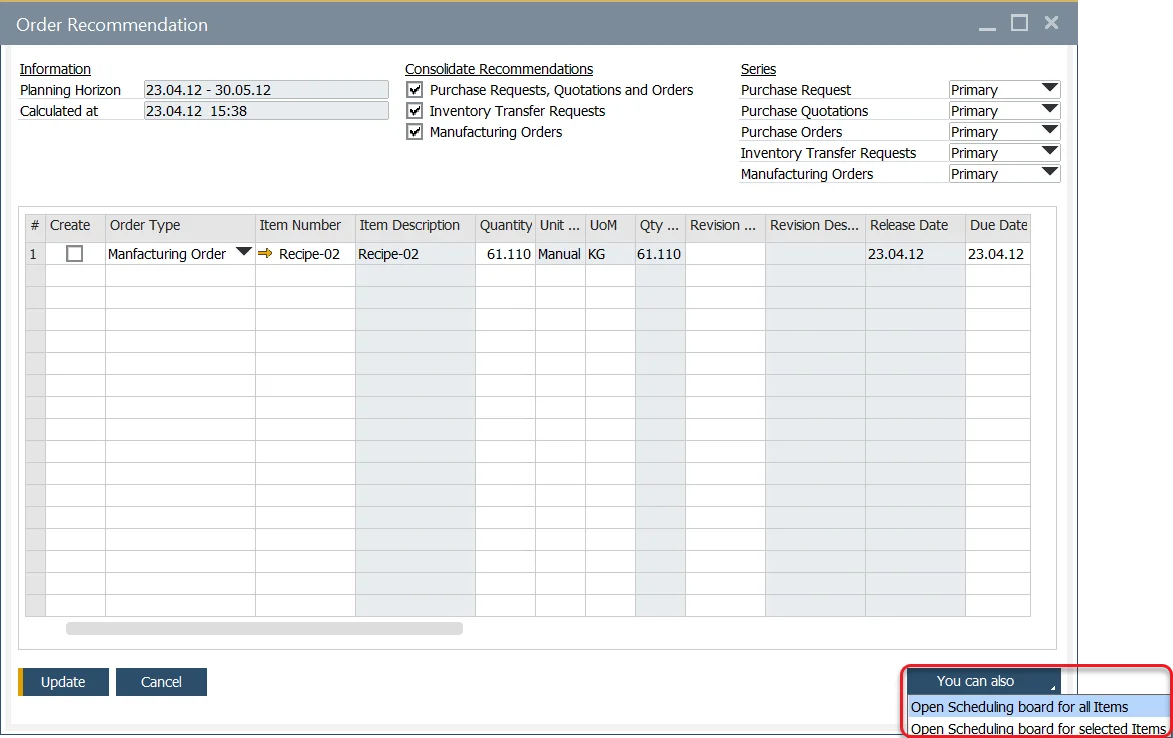
Order Recommendation
MRP → Order Recommendation
The Scheduling Board can also be accessed from the Order Recommendation form:
Scheduling Board / Semi-finished Product Scheduling

Semi-finished product scheduling is a tool for production planning, considering a product structure.
Schedule tab
Create
This checkbox determines whether a Manufacturing Order for the Item will be scheduled for creation.
The checkbox cannot be checked if a higher-level item is disabled.
Level
Indicates the item's position in the production structure. For items with semi-finished components, the hierarchy level is shown here. Learn more about multi-level BOMs and semi-finished items after clicking this link.
Quantity
Displays the planned item quantity. You can modify quantities at level 1, and changes will automatically cascade to lower levels.
Lock Quantity for Semi MORs
If the checkbox is checked, there is a possibility to change the quantity for a particular item. In this case, changing one thing does not affect other items.
Update in Transaction
When you click Update/Add on the Scheduling Board, the listed Manufacturing Orders will be processed. However, some Manufacturing Orders may not be added due to issues like synchronization errors or incorrect data configurations. In such cases, an error message will be displayed.
- The checkbox is checked: none of them will be added if there is at least one Manufacturing Order with an error.
- The checkbox is not checked: if there are Manufacturing Orders with errors, the correct ones will be added anyway (and the ones with mistakes not).
Direction
Production can be planned in two ways:
- Forward: the system automatically plans forward the start and end of the day, absolute time, and required date.
- Backward: the system automatically plans backward start and end day, absolute time, and required date. Sometimes it is impossible to make items to the required delivery date. The text on the scheduling board is red.
Priority
Sets the priority level of the production order.
Schedule Date and Time
Specifies the planned schedule's start and end date/time.
Date and Time of end of the Order
Routing
Available routing can be chosen from the Scheduling Board.
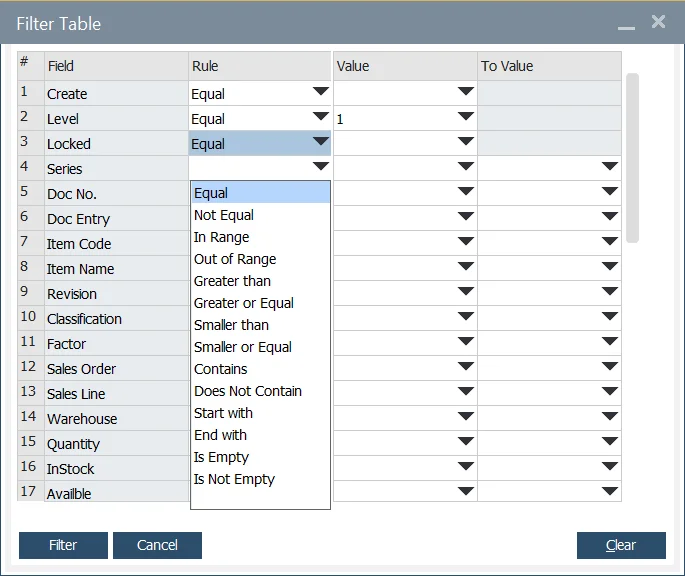
Filtering Option
The option allows filtering Manufacturing Orders based on the standard SAP Business One option.
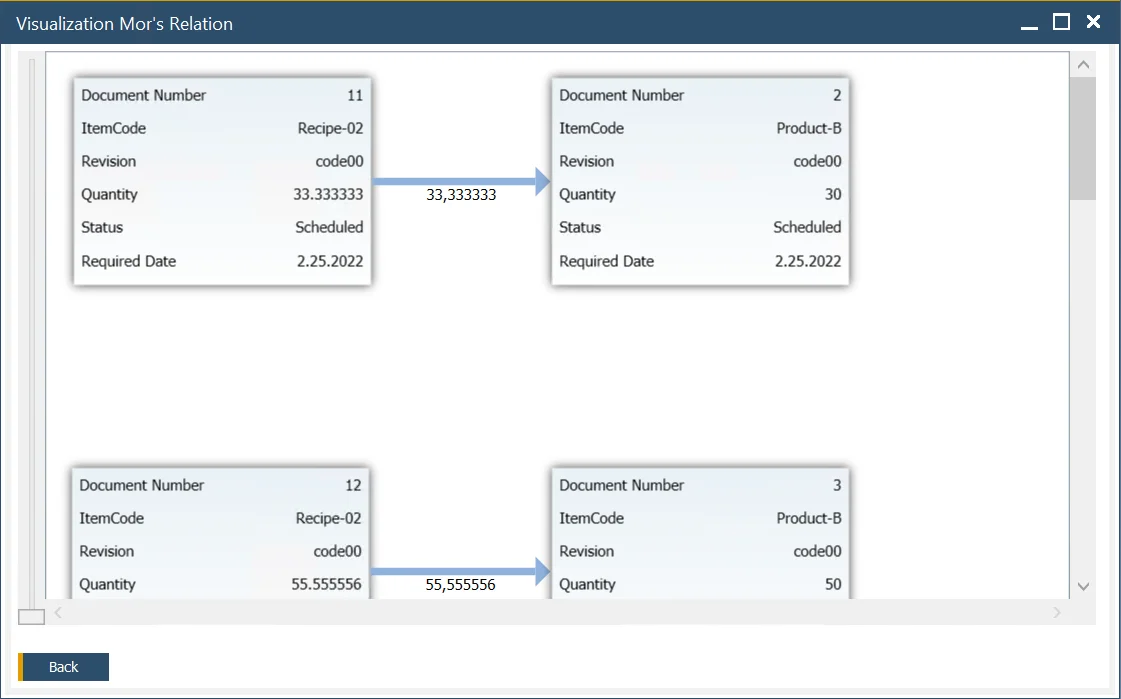
Visualize
Clicking this option opens a visual representation of relations between Manufacturing Orders:
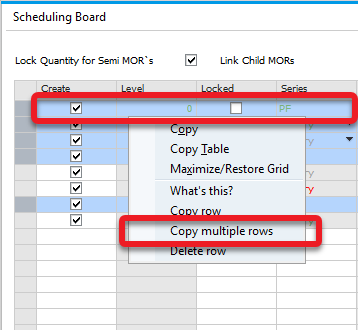
Copy row, Copy multiple rows
Options for copying one or multiple rows are available from the context menu in the first column.
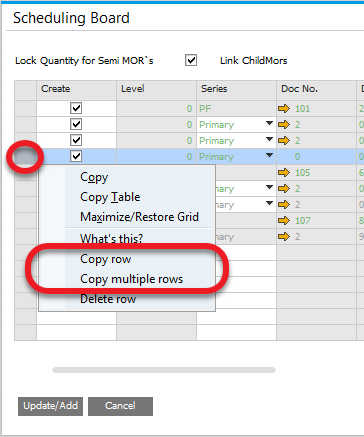
To copy multiple rows, highlight them using Shift + Left Click or Ctrl + Left Click, then right-click on any column (except the first one) to access the option:
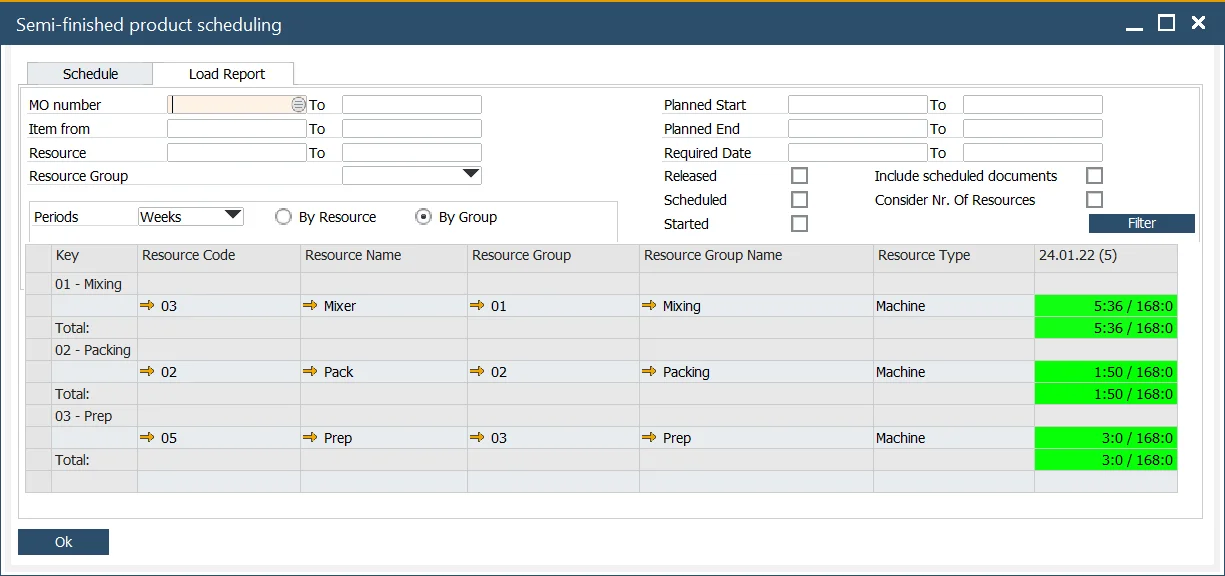
Load Report tab
The Load Report tab provides a summary of resource usage, including Set Up Time, Run Time Machine, and Labor Resources, for a specific time period.
This report takes into account all data calculated within the Schedule tab, even if the documents have not yet been saved or created.
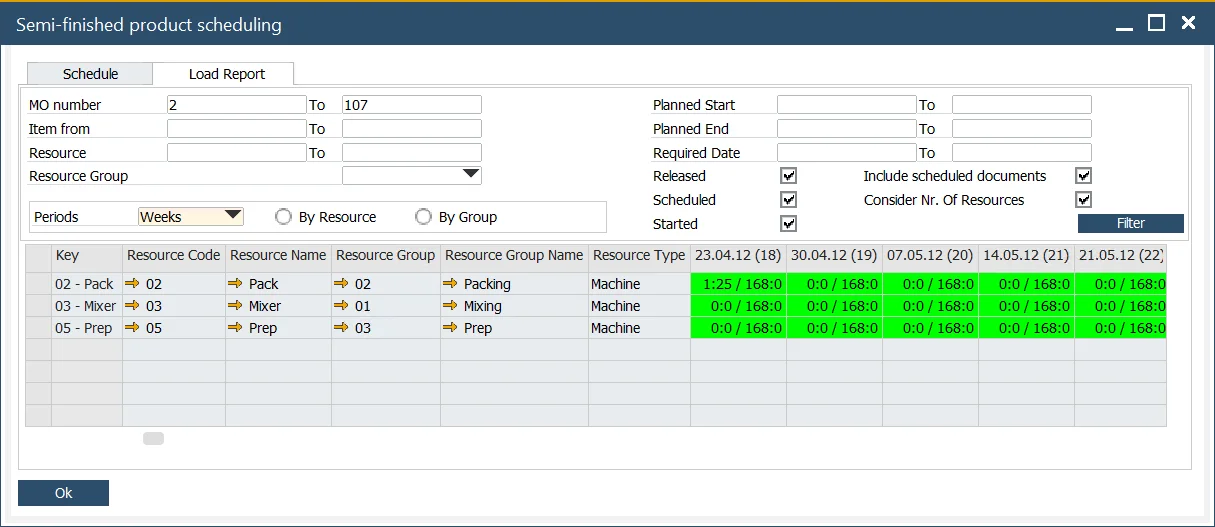
In the time columns (adjacent to the Resource Type column), values such as 1:25 / 168:00 indicate the aggregated scheduled time and the total availability based on the corresponding Resource Calendar.
Filtering options:
-
MO number: filter by specific Manufacturing Orders.
-
Item: filter by Final Good Items.
-
Resource: filter by specific Resources used in the Manufacturing Orders.
-
Resource Group: filter Manufacturing Orders that involve at least one Resource from the selected group.
-
Planned Start, Planned End, Required Date: filter based on the Manufacturing Order dates.
-
Released, Scheduled, Started: filter by the status of Manufacturing Orders.
-
Periods: aggregate data into daily, weekly, or monthly intervals (columns right of the Resource Type column).
-
By Resource/ By Group: Display data either as a list of Resources or grouped by Resource Group, including a total for each group:
Example
To understand how the Scheduling Board operates, let’s walk through an example of creating a Sales Order and determining its Delivery Date.
Step 1: Create a Sales Order
Set up a Sales Order and specify its Delivery Date in the order header.
Sales A/R > Sales Order
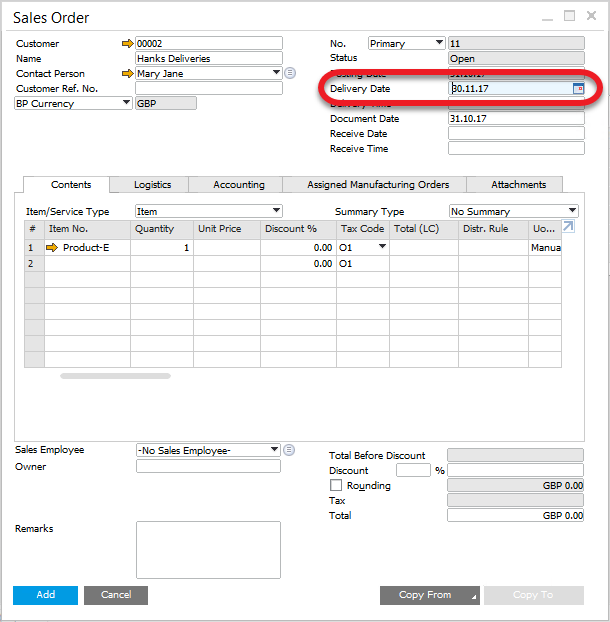
Step 2: Check Manufacturing Possibilities
To assess whether the item can be produced in time, right-click on the item within the Sales Order and select Create Manufacturing Orders.
The system automatically considers the Delivery Date, the Internal Lead Time, and plans the Start Date backward. If the calculated Start Date falls earlier than today, the system switches to Forward scheduling and calculates the earliest possible End Date instead.
Let's consider two scenarios: delivery date is possible to realize, and delivery date is not possible to realize.
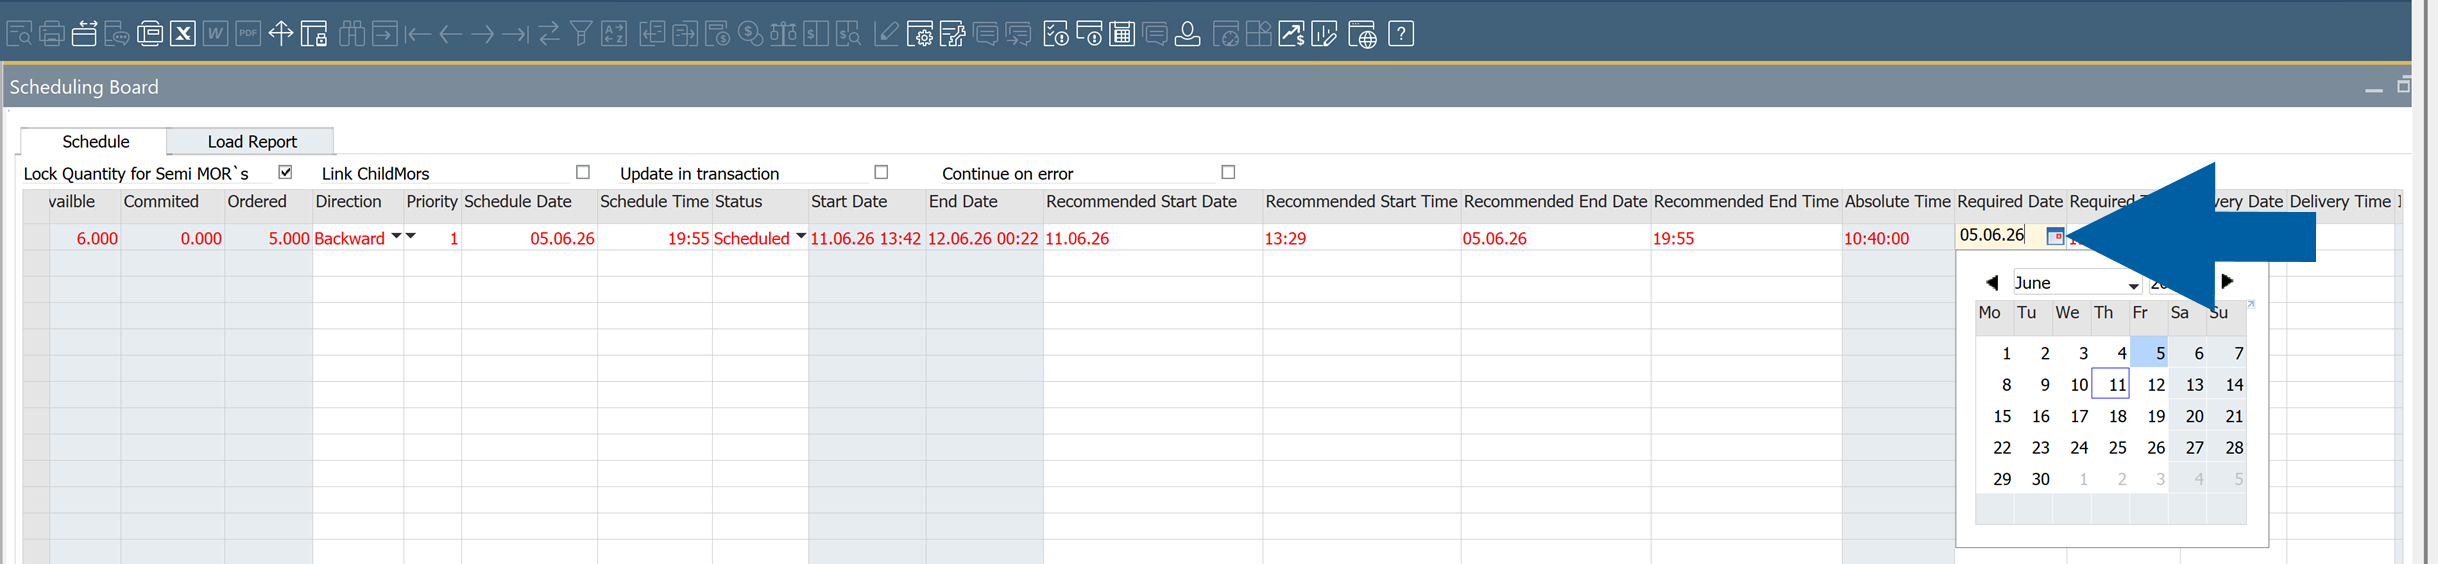
Scenario 1: The delivery date can be met
If the required delivery date can be achieved, the system schedules the Manufacturing Order using Backward scheduling and calculates the required production start and end dates.
In this example, the Manufacturing Order has a Required Date of 03.06.2026. To meet this date, production must start on 11.06.2026 at 14:12 and finish on 12.06.2026 at 00:42.
The Manufacturing Order row is displayed in green, which indicates that the order can be completed within the required timeframe and does not require rescheduling.
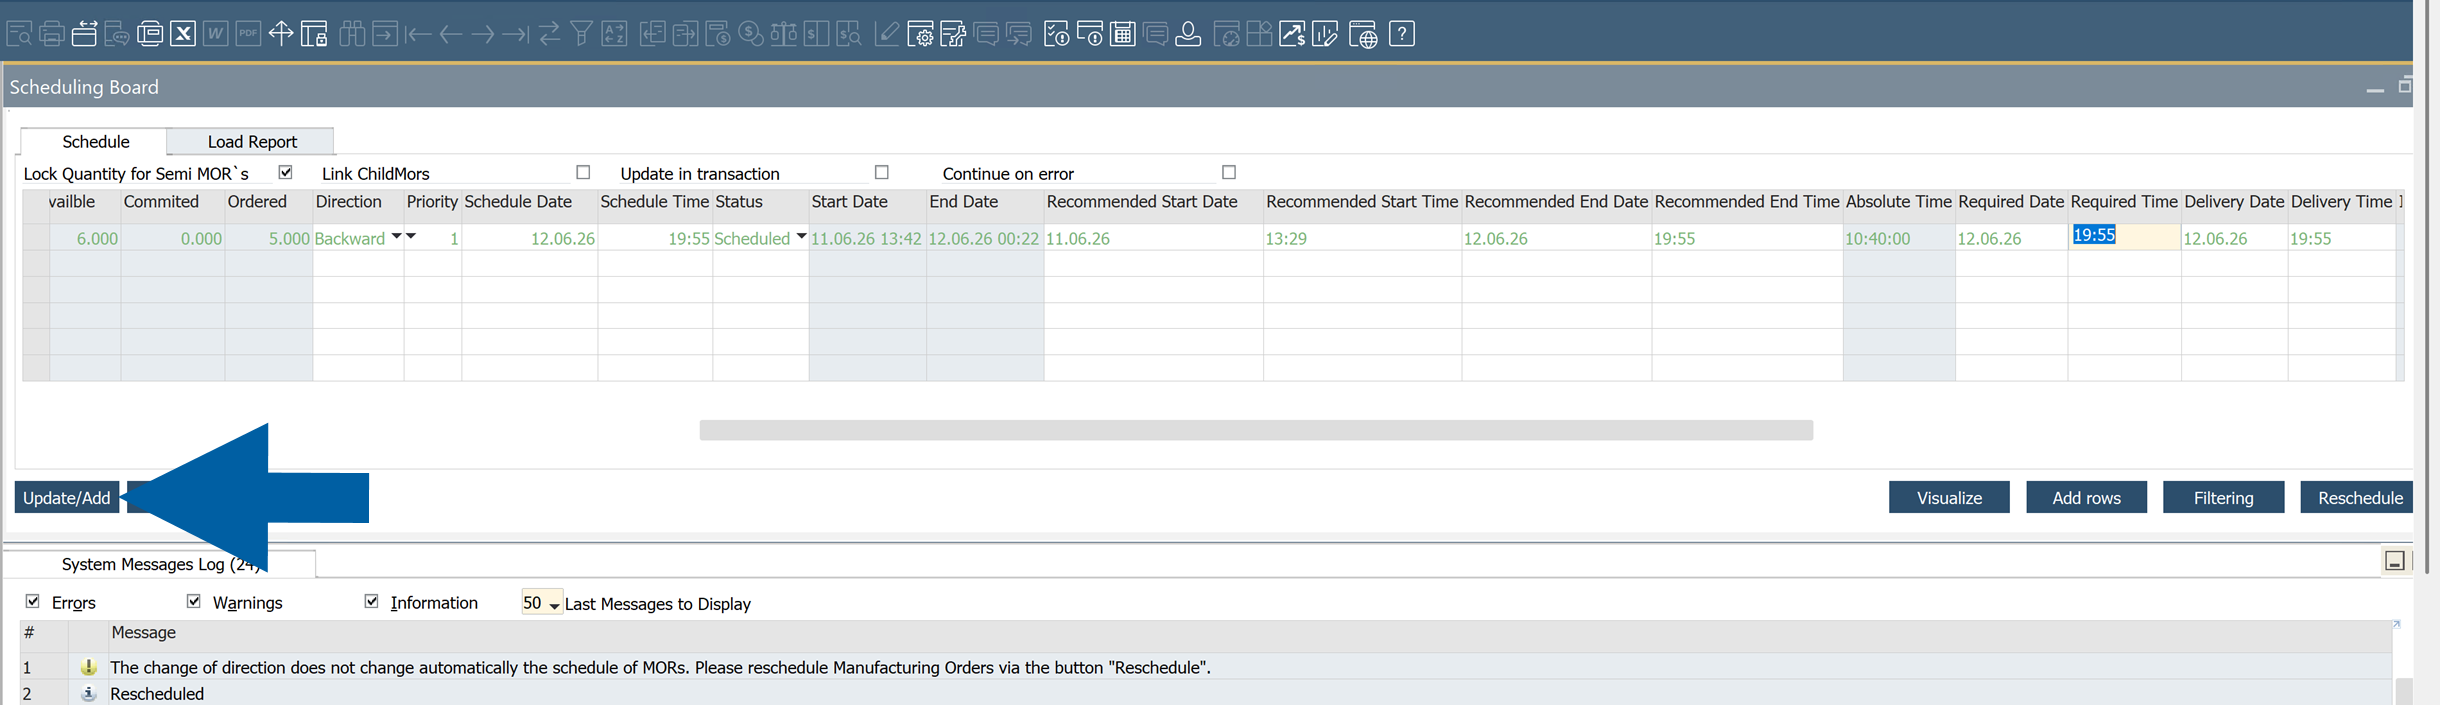
Scenario 2: Delivery date is not possible to realize
If the Manufacturing Order can't be completed by the required delivery date, the order is displayed in red on the Scheduling Board.

A red row indicates that the current schedule is not feasible. In this situation, the Manufacturing Order is scheduled using Backward scheduling, but the calculated production dates fall in the past. As a result, the order can't be completed by the Required Date.

To find the earliest possible completion date, follow these steps:
-
Click Reschedule.

-
The system automatically changes the scheduling direction to
Forwardand calculates the earliest possible Start Date and Time.
-
Based on the production time, the system also calculates the earliest possible End Date and Time. You can use the calculated End Date and Time as the new Required Date and Time.
-
Change the scheduling direction to
Backward.
-
Enter a new Required Date and Time.
-
If the Manufacturing Order can be completed within the new timeframe, the row changes from
redtogreen.
-
Click Update/Add.
-
Verify that the system displays the message
Operation completed successfully.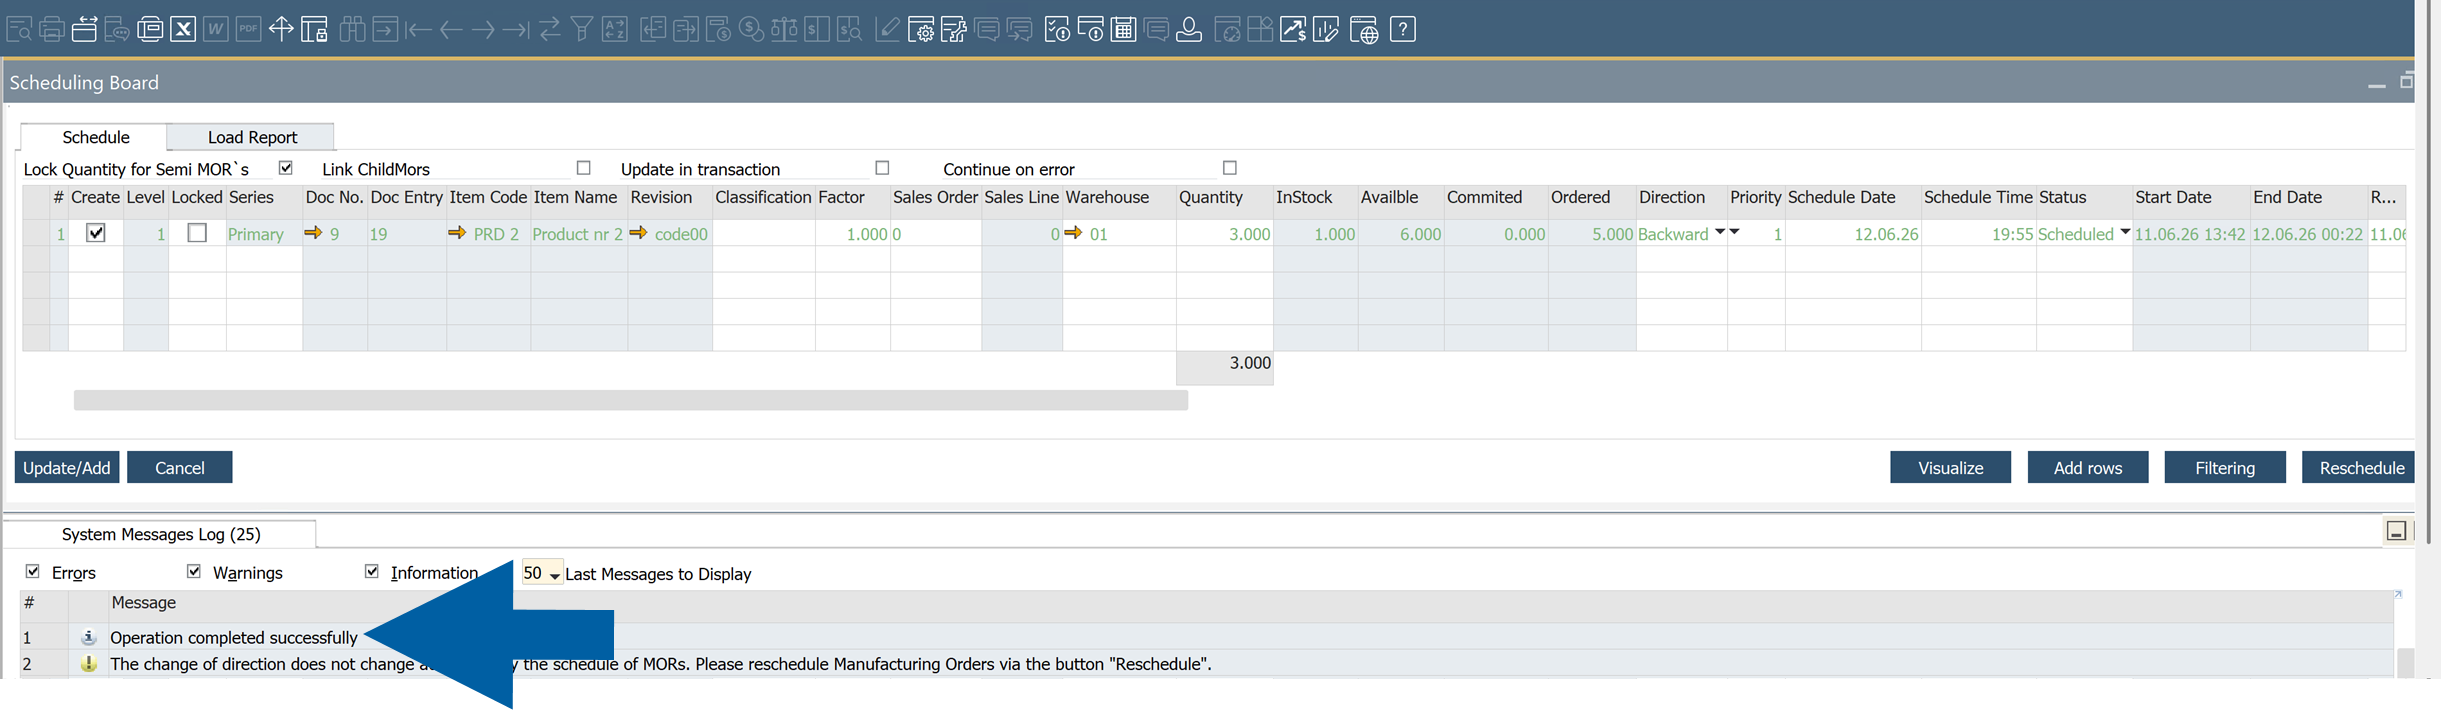
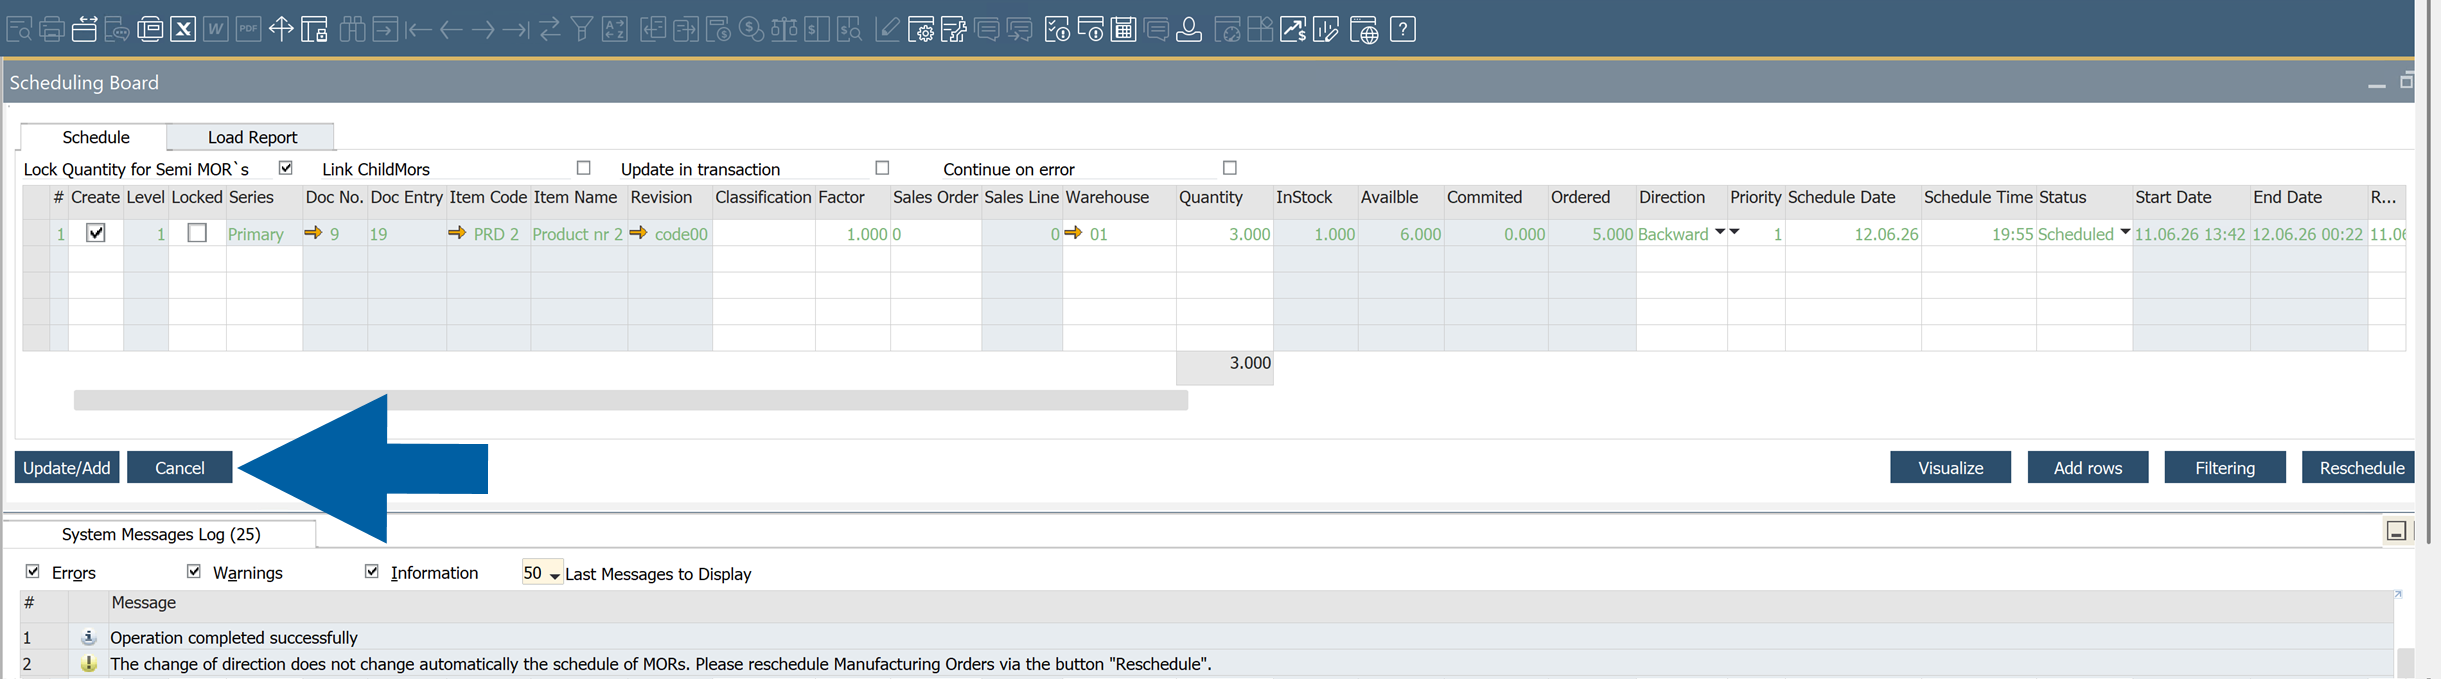
-
Done! Clik Cancel to close the Scheduling Board.
Sales Order Minimum Order Quantity
This option allows considering Sales Order options (Minimum and Maximum Quantity, Order Multiple) when creating Semi Finished Manufacturing Orders suggestions on Scheduling Board. This gives the sales operator a tool to provide an accurate estimated arrival time.